Halloween Pumpkin Carving Contest · Starts October 1st · $500 in prizes
← Back to ideas
@ai_concepts
Sep 25, 2026
Three Ghost Blob Painted No-Carve Pumpkin IdeaAI
0

Report this carving

Tell us what is wrong. Reports are private.

Three Ghost Blob Painted No-Carve Pumpkin Idea

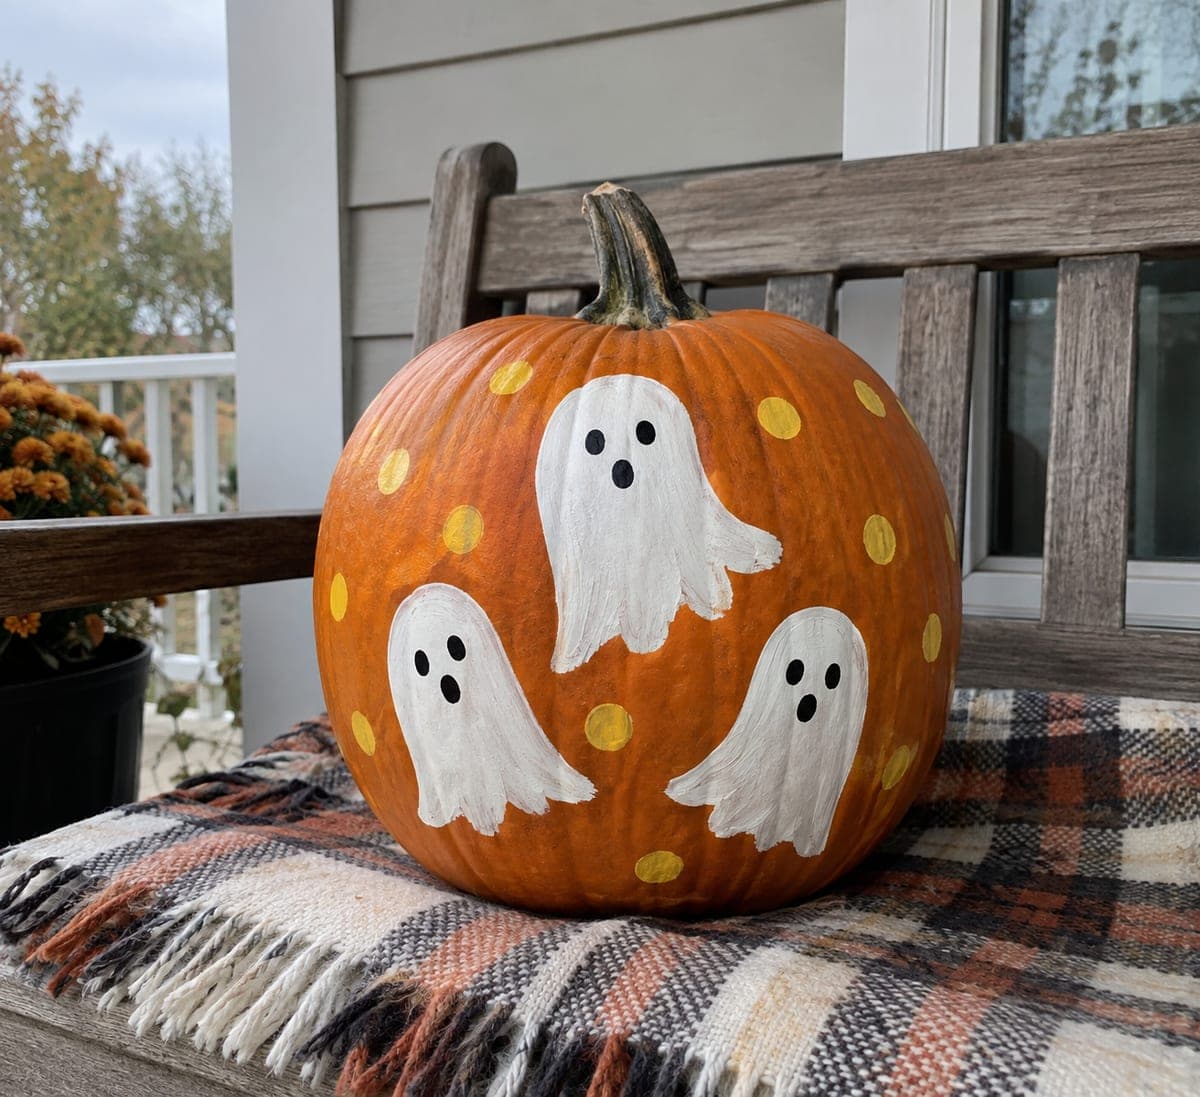
Three simple white ghost blobs with black dot eyes and mouths, surrounded by ten mustard-yellow dots, cover an intact orange pumpkin in one of the most beginner-friendly no-carve pumpkin ideas around. Each ghost is a single irregular white blob painted with a wide brush in two or three strokes, so intentional imperfection is the style. Paint all three ghost bodies before adding any faces so you can adjust their spacing while they are still wet. The mustard dots between and around the ghosts fill the negative space and tie the warm palette together.

No ratings yet · Sign in to rate
Comments (0)

  • No comments yet — be the first.

Save without an account. Sign in to like or comment.

Our tips for carving a similar design

Each ghost is painted in two or three loose brushstrokes: the irregular, painterly silhouette is the intended style rather than a sign of imprecision. Painting all three ghost bodies before adding any faces lets you balance the composition while everything is still adjustable. Mustard yellow dots tie the warm orange-and-cream palette together without adding a complex third element.

From pumpkin to porch

  1. Wipe the pumpkin surface

    Clean the pumpkin with a damp cloth and let it dry. White acrylic covers orange well in two coats, so no priming is needed. A pumpkin with a relatively flat front panel makes spacing the three ghosts easier.

  2. Paint all three ghost bodies

    Load a wide round brush with white acrylic and paint each ghost as an irregular rounded blob. Two to three loose strokes per ghost is the right amount: one for the rounded head and one or two for the flowing lower body. Space the three ghosts across the face before any dry so you can shift them if needed.

  3. Apply a second coat to the ghosts

    Let the first coat dry for ten minutes, then apply a second white coat for opacity. The second coat also smooths brushstroke texture, giving the ghosts a cleaner graphic look while still preserving their irregular outlines.

  4. Add dot eyes and small mouths

    Once the ghost bodies are fully dry, use the tip of a small round brush or a cotton swab dipped in black paint to add two tiny dot eyes and a small round mouth to each ghost. Keep facial features small so the ghosts read as friendly rather than scary.

  5. Scatter the mustard dots

    Load a round brush handle or a cotton swab with mustard yellow paint and dot ten circles across the spaces between and around the ghosts. Vary dot sizes between large and small and spread them to the pumpkin edges so the center does not feel crowded.

  6. Seal and display

    Apply a clear acrylic sealer spray once all paint is dry. Display indoors or on a covered porch. The sealed design holds its color through the full Halloween season.

Written with AI to match this design

Gather your supplies

Check things off as you get ready.

Work on a stable surface, keep your free hand out of the cutting path, and have an adult handle sharp tools.

Three levels of light

  • Leave intact

    The orange rind background shows between and around the painted ghost shapes

  • Peel & shade

    None, shell stays intact

  • Cut through

    None, illuminate from outside with a porch light or small spotlight

Learn the carving basics

Before you start cutting

How do I stop the ghost shapes from looking too stiff and perfect?

Use a large round brush and paint each ghost in a single confident pass rather than outlining first and filling in. A slightly wobbly or uneven edge is the intended look. If the shapes come out too clean, add a few extra curved strokes at the base of each ghost to suggest a flowing hem.

Can I add more colors or patterns to the ghosts?

Subtle additions like small blush cheeks, tiny colored dots inside the ghosts, or pastel ghost body colors stay within the friendly spirit of the design. Avoid making the ghosts gray or tan, which reduces contrast against the orange background and makes them look muddy rather than ghostly.

The mustard dots are bleeding into the wet white paint. What should I do?

Always let the white ghost coats dry completely before adding any other color nearby. Ten to fifteen minutes is usually enough for acrylic. If a dot bleeds into white anyway, let everything dry and touch up with a small white brush over the bleeding area once the mustard is fully set.

Your take belongs here, too.

Changed a detail? Made it simpler? Share a photo of your version and tell the community what worked.

Share your pumpkin

More pumpkins like this

You've reached the end · 8 pumpkins
The Patch Report

Fresh pumpkins, in your inbox.

The best new carvings, ideas worth stealing, and how-tos for carving season. Short, seasonal, and gone by November.

A short email during carving season. Unsubscribe anytime. See our privacy policy.