Halloween Pumpkin Carving Contest · Starts October 1st · $500 in prizes
← Back to ideas
@ai_concepts
Sep 14, 2026
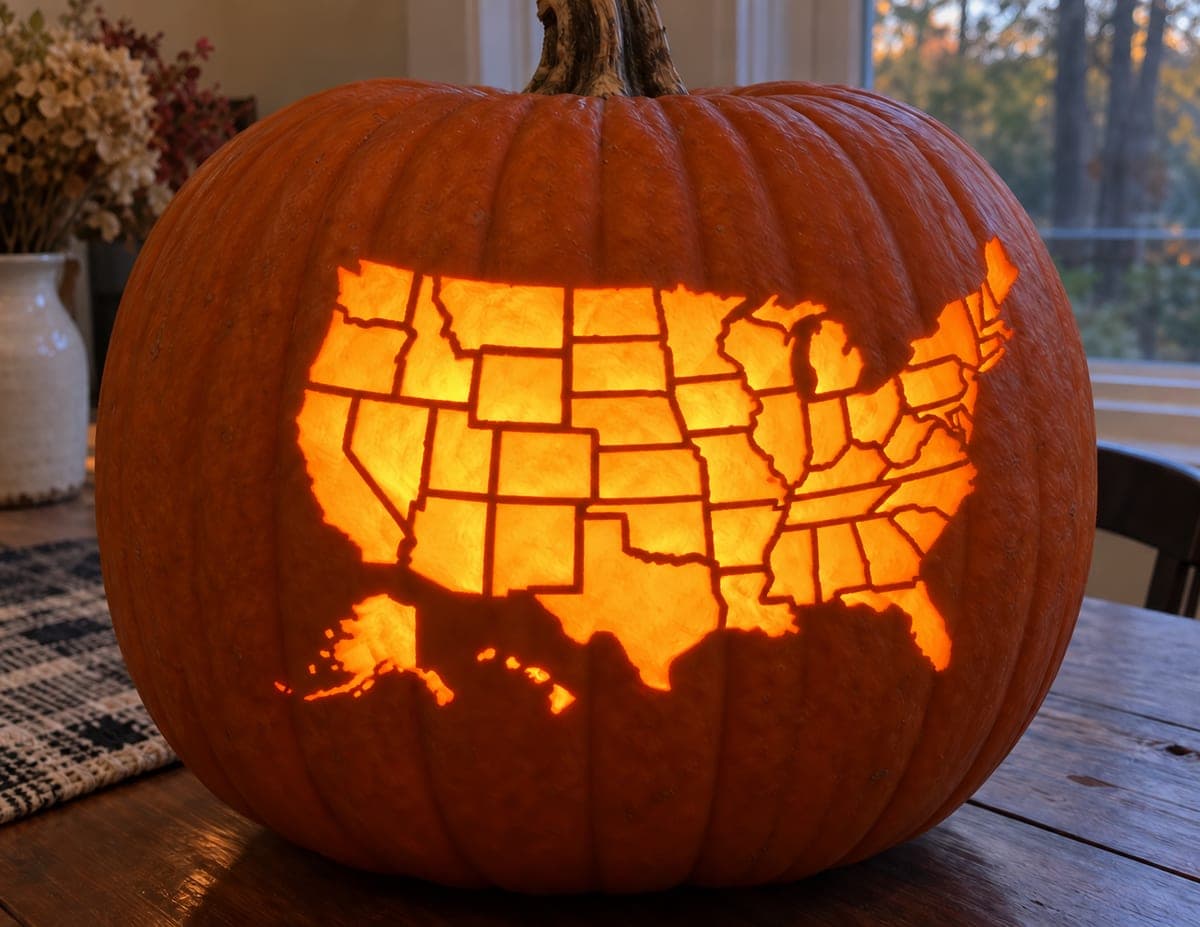
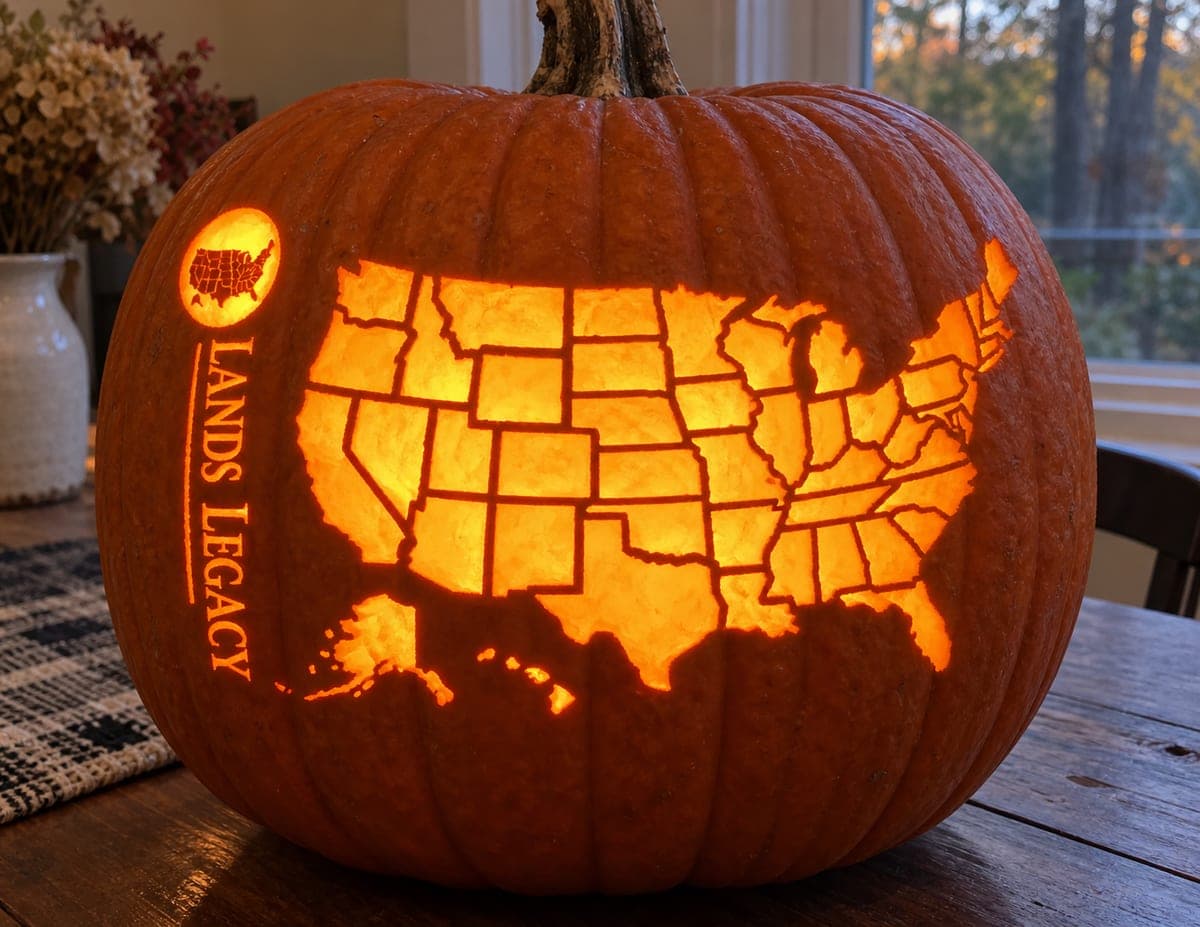
United States Map With State Borders Pumpkin
1/2
AI
0

United States Map With State Borders Pumpkin

Glowing state cells divided by thin dark border lines fill the entire face of this United States map pumpkin carving, with Alaska and Hawaii tucked below the main landmass. The technique is silhouette: the glowing interior of each state is cut through while the border lines remain as raised rind. Tape the pattern securely before transferring it, and cut the small northeastern states first while the pumpkin wall is still strong enough to resist flexing.

This is an AI-generated concept image: a realistic, carvable design idea rather than a photo of a finished carve. AI concepts are always labeled and sit out the leaderboard and the contest.

No ratings yet · Sign in to rate
Comments (0)

  • No comments yet — be the first.

Save without an account. Sign in to like or comment.

Our tips for carving a similar design

The core trick here is a silhouette map where the interior of each state is cut all the way through while the thin border lines are left as raised rind to hold everything together. Think of the whole design as one large lit opening broken into cells by a web of skinny bridges. Plan your bridge widths before you start, because those slender borders are what keep the wall from collapsing.

Written by PumpkinCarvingIdeas.com, inspired by the image above. These are our suggestions, not instructions from the uploader. This approach to the AI concept has not been tested on a real pumpkin.

From pumpkin to porch

  1. Pick the pumpkin and open the back

    Choose a tall, wide pumpkin with a broad, fairly flat front panel so the country stretches out without wrapping too far around the curve. Cut a plug in the back rather than the top so the front stays intact for your map. Scoop the guts and thin the inside of the front wall to about one inch. A thinner, even wall makes the many small cuts far easier and lights up more evenly.

  2. Size and tape the pattern

    Print or draw the map to fit your front panel, keeping Alaska and Hawaii tucked below the main landmass as shown. Tape the paper down flat, snipping little relief cuts around the edges so it hugs the curve without wrinkling. Press firmly and add tape on all sides so nothing shifts while you work. A stable pattern is critical when the borders are this thin.

  3. Transfer every border line

    Use a poking tool or a pin wheel to trace all the state borders and the outer coastline as dotted guides. Go slowly and check that you have captured the skinny eastern states before you remove the paper. Peel the pattern and connect the dots lightly with a marker if it helps you read the lines. Double check that each state cell is fully enclosed so you know exactly what will be cut and what stays.

  4. Carve the small northeastern states first

    Start with the tiny cells in the northeast while the pumpkin wall is still strong and resists flexing. Use a fine detail saw or a craft knife and make clean, vertical cuts, leaving every border line as intact raised rind. Cut and pop out one small state at a time so you always have solid material supporting your hand. Work outward toward the larger western states, saving the biggest openings for last.

  5. Open the large states and coastline last

    Once the small cells are done, cut the wide interior states and finally the long outer coastline. Removing these big pieces last keeps the panel rigid for as long as possible. Support each section with your fingers as it releases so it does not tear a neighboring border. If a bridge feels weak, leave it a touch wider rather than risk a break.

  6. Light it and photograph

    Drop in a bright LED puck or a string of LED lights, never a candle, since the many cutouts need strong, safe light. Set it in a dim room and check that every state glows evenly, adjusting the light position if some cells stay dark. Rub a little petroleum jelly on the cut edges to slow drying. Shoot your photo straight on so the whole map reads clearly.

Gather your supplies

Check things off as you get ready.

Work on a stable surface, keep your free hand out of the cutting path, and have an adult handle sharp tools.

Three levels of light

  • Leave intact

    The outer pumpkin skin around the map and the ocean areas below stay untouched and dark.

  • Peel & shade

    The thin state border lines can be skin-peeled slightly so they read as a soft dim outline instead of solid dark rind.

  • Cut through

    The interior of each state is cut fully through for the brightest glow that fills the whole map.

Learn the carving basics

Before you start cutting

How thin should the border lines be?

Keep each border bridge at least a quarter inch wide, and a bit wider where several borders meet at a corner. Anything skinnier tends to crack or dry out and sag within a day. On a thinner wall you can go slightly narrower, but err on the side of sturdy since these bridges hold the entire design together.

What if a border line breaks while carving?

Do not panic, small breaks are common on a busy map. You can pin the piece back with a toothpick or a bit of wire from the inside, or simply reshape the two neighboring states into one larger opening. Working the small states first and the big openings last greatly reduces the chance of breaks.

How do I keep Alaska and Hawaii from looking cramped?

Give them their own clear space below the main landmass and simplify their outlines rather than chasing every jagged detail. Alaska can be a bold silhouette and Hawaii a small cluster of dots or one simple shape. Leaving a bit of dark skin between them and the mainland helps each read clearly when lit.

Your take belongs here, too.

Changed a detail? Made it simpler? Share a photo of your version and tell the community what worked.

Share your pumpkin

More pumpkins like this

You've reached the end · 8 pumpkins
The Patch Report

Fresh pumpkins, in your inbox.

The best new carvings, ideas worth stealing, and how-tos for carving season. Short, seasonal, and gone by November.

A short email during carving season. Unsubscribe anytime. See our privacy policy.