Halloween Pumpkin Carving Contest · Starts October 1st · $500 in prizes
← Back to ideas
@ai_concepts
Aug 9, 2026
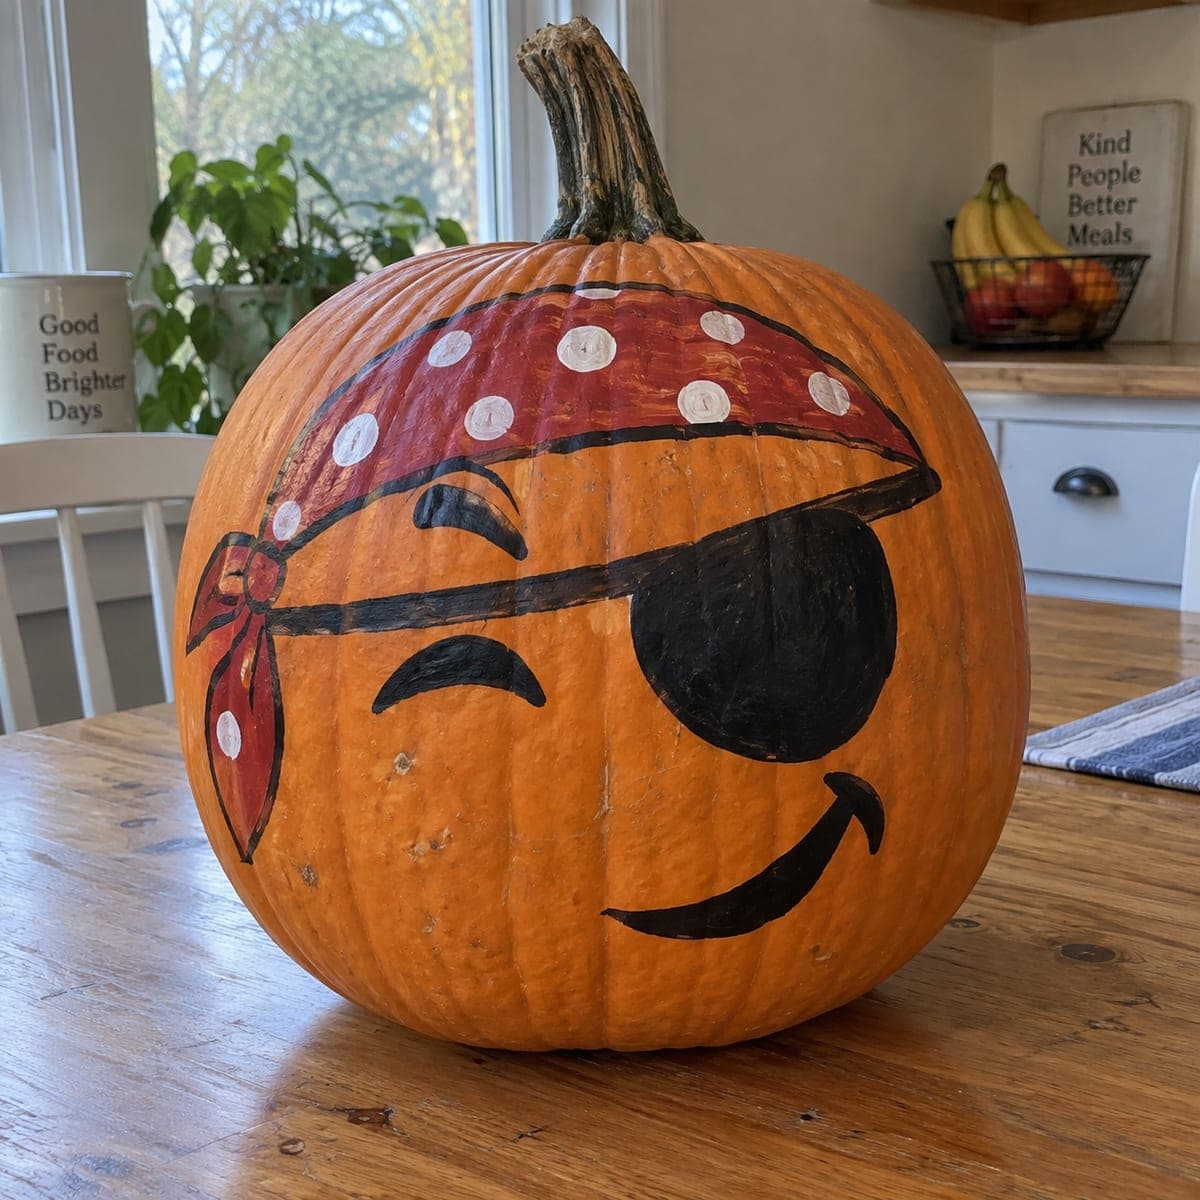
Winking Pirate Painted Pumpkin With Eye PatchAI
0

Winking Pirate Painted Pumpkin With Eye Patch

A red polka-dot bandana, a black eye patch, and a sly smirk turn this uncut pumpkin into a winking pirate. Everything is done with craft paint, making it a no-carve pumpkin project safe for kids to lead. Paint the bandana first and let it dry, then add the patch, strap, and face details with a small brush. The knotted bandana tails wrapping around the side are the touch that sells the costume.

This is an AI-generated concept image: a realistic, carvable design idea rather than a photo of a finished carve. AI concepts are always labeled and sit out the leaderboard and the contest.

No ratings yet · Sign in to rate

Comments (0)

  • No comments yet — be the first.

Save without an account. Sign in to like or comment.

Our tips for carving a similar design

The core trick here is layered paint, not cutting: a bold red bandana across the top, a black eye patch on one side, and a sly winking face done in clean black lines. Because nothing gets carved, you build it up in order and let each color dry so edges stay sharp. The knotted bandana tail wrapping around the side is the detail that turns a smiley face into a real pirate.

Written by PumpkinCarvingIdeas.com, inspired by the image above. These are our suggestions, not instructions from the uploader. This approach to the AI concept has not been tested on a real pumpkin.

From pumpkin to porch

  1. Wipe down and sketch

    Clean the pumpkin with a dry cloth so paint grips the skin. Lightly pencil in the bandana line across the upper third, the round eye patch on one side, and the winking eye and smirk below. Keep the smile slightly off center to match the playful look. Pencil erases or paints over easily, so do not stress the first draft.

  2. Paint the red bandana first

    Fill the whole top band with red craft paint and carry a knotted tail down and around one side. Use two thin coats rather than one thick one so it dries evenly and does not drip. Let it fully dry before adding anything on top. A hair dryer on low can speed this up if you are impatient.

  3. Add white polka dots

    Once the red is dry, dot on white circles with the round end of a small brush or a cotton swab. Space them loosely so they read as a pattern, not a grid. Add a couple of dots on the knot and tail too so the bandana feels continuous. Let the white set before outlining.

  4. Paint the black eye patch and strap

    Fill the eye patch as a solid black oval on one side of the face. Run a thin black strap from the patch up under the bandana edge so it looks like it holds the patch on. Keep the strap line steady by resting your hand against the pumpkin as you drag the brush. Let this dry before the fine face lines.

  5. Outline the wink, smirk, and bandana edge

    With a fine brush and black paint, add the curved winking eye, the eyebrow above it, and the smirking mouth. Trace a crisp black line along the bottom edge of the bandana to make it pop. Keep lines smooth and confident; one slow stroke beats several nervous ones. Touch up any wobbles with a dab of the base color.

  6. Seal and photograph

    Once everything is bone dry, brush on a thin clear acrylic sealer so the paint resists smudges and dew. Set the pumpkin where the stem and painted face are both visible for a photo. Natural window light, like in the kitchen shot, shows the colors best. Skip any flame near a painted pumpkin and keep it out of direct rain.

Gather your supplies

Check things off as you get ready.

Work on a stable surface, keep your free hand out of the cutting path, and have an adult handle sharp tools.

Three levels of light

  • Leave intact

    The bare orange skin of the face stays untouched and becomes the pumpkin's natural complexion.

  • Peel & shade

    This painted design has no peeled areas, but if you want a soft glow you could lightly scrape a thin halo around the face before painting.

  • Cut through

    Nothing is cut on this no-carve version; for an optional lit twist you could carve only the winking eye and drop in an LED, cutting that opening last.

Learn the carving basics

Before you start cutting

Do I need to carve anything for this design?

No, this is a fully painted, no-carve pumpkin, which makes it safe for kids to lead. Everything is built with craft paint in layers. If you later want a glow, the only spot worth carving is the small winking eye, and an adult should handle that.

How do I keep the black lines from smearing into the red?

Patience is the whole secret. Let the red bandana and the white dots dry completely before you add any black outlines on top. Craft paint usually feels dry in about 20 to 30 minutes, and a low hair dryer helps. Sealing at the end locks everything in.

What if my polka dots come out uneven?

Uneven dots actually read as hand-painted charm, so do not overthink them. Use the rounded end of a brush handle or a cotton swab for consistent circles. If one goes wrong, let it dry, dab red over it, and try again once that dries.

Your take belongs here, too.

Changed a detail? Made it simpler? Share a photo of your version and tell the community what worked.

Share your pumpkin

More pumpkins like this

You've reached the end · 8 pumpkins
The Patch Report

Fresh pumpkins, in your inbox.

The best new carvings, ideas worth stealing, and how-tos for carving season. Short, seasonal, and gone by November.

A short email during carving season. Unsubscribe anytime. See our privacy policy.