Halloween Pumpkin Carving Contest · Starts October 1st · $500 in prizes
← Back to ideas
@ai_concepts
Aug 15, 2026
Smiling Troll Face Painted PumpkinAI
0

Smiling Troll Face Painted Pumpkin

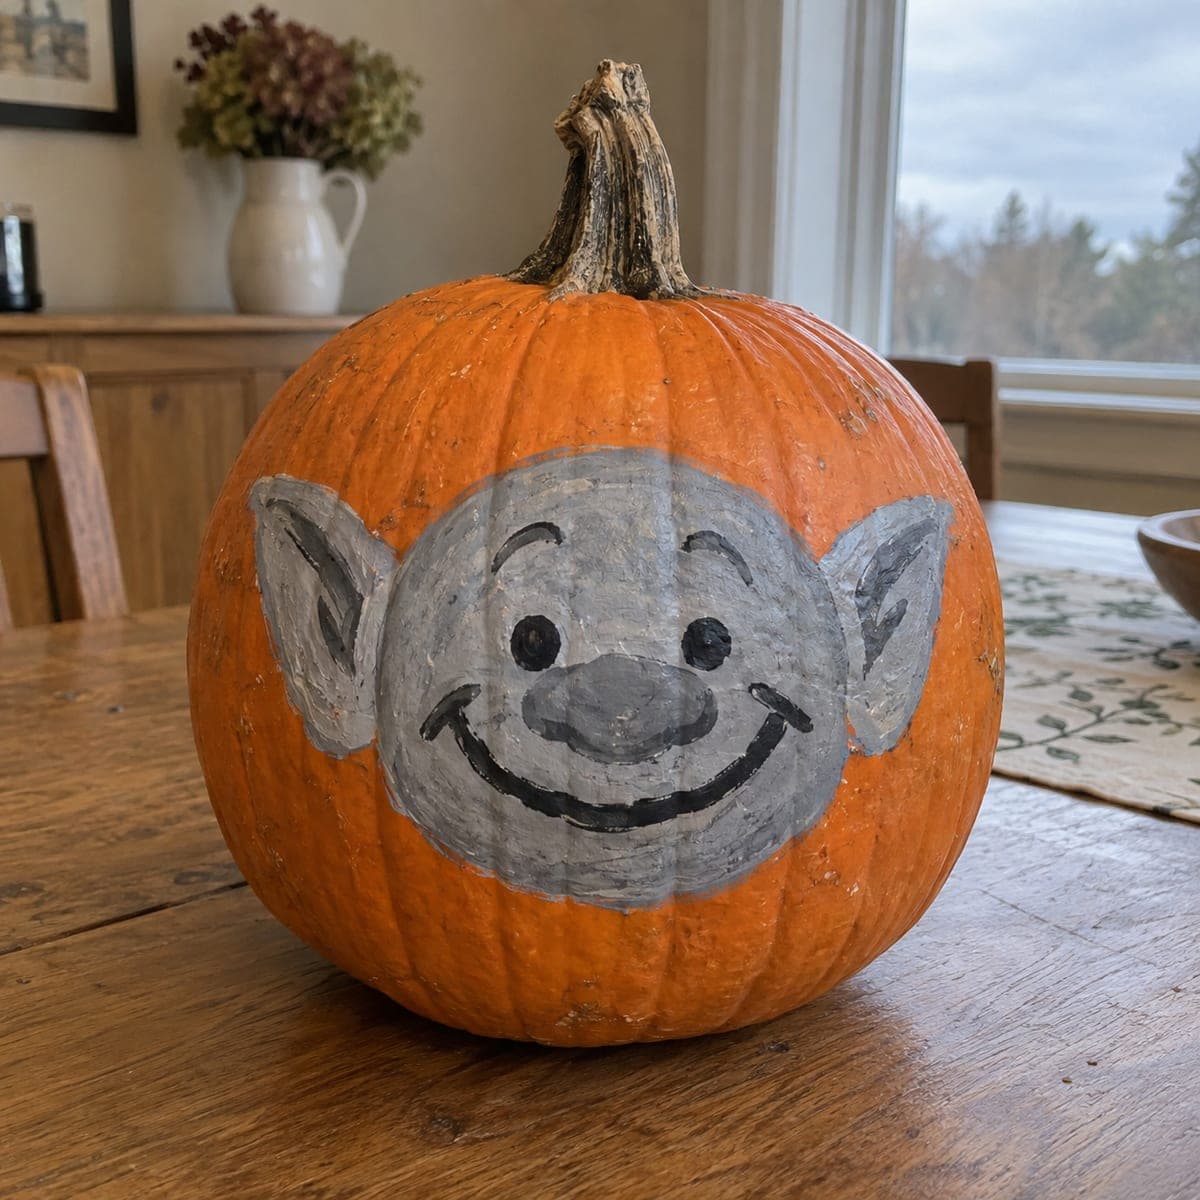
A friendly gray troll beams from this painted pumpkin, with enormous pointed ears, a squashy round nose, and a wide happy grin. The whole face uses just three paint colors, so it is a quick no-carve pumpkin project for a weeknight with kids. Paint the gray head shape first, add ear shading while it dries, then finish the eyebrows and smile with a fine liner brush. It stays adorable indoors well past Halloween.

This is an AI-generated concept image: a realistic, carvable design idea rather than a photo of a finished carve. AI concepts are always labeled and sit out the leaderboard and the contest.

No ratings yet · Sign in to rate

Comments (0)

  • No comments yet — be the first.

Save without an account. Sign in to like or comment.

Our tips for carving a similar design

The whole trick here is a soft gray head shape with two big pointed ears that read as troll at a glance, all done in paint so nothing structural is at risk. Block in the round gray face and ears first, add darker gray shading in the ear hollows and along the nose while the base dries, then paint the black brows and grin last with a fine liner. It is a no-carve project, so plan your shapes in pencil before any paint goes down.

Written by PumpkinCarvingIdeas.com, inspired by the image above. These are our suggestions, not instructions from the uploader. This approach to the AI concept has not been tested on a real pumpkin.

From pumpkin to porch

  1. Clean and sketch the layout

    Wipe the pumpkin down so paint grips the skin, and let it dry fully. Choose the smoothest front panel and lightly pencil a large circle for the head with a pointed ear shape on each side. Keep the face centered and leave orange margin all around so the gray shape pops. Step back and check the ears look symmetrical before you commit.

  2. Paint the gray head and ears

    Fill the head circle and both ears with a solid light gray using a medium flat brush. Two thin coats look better than one thick one, so let the first dry before adding the second. Keep your edges clean where gray meets orange, since a crisp outline sells the shape. Wash the brush and set the pumpkin aside to dry.

  3. Shade the ears and nose

    Mix a darker gray and brush it into the inner hollow of each ear so they look cupped and dimensional. Add a soft round patch of the same darker gray for the squashy nose in the center of the face. Feather the edges with a dry brush so the shading blends rather than sits as a hard line. Let everything dry before the fine detail pass.

  4. Add the eyes

    Paint two simple black dots for eyes, spaced evenly above the nose. Keep them small and round for that friendly look, and let a thin sliver of gray show around each one. Wait for the black to dry so it does not smear into the next step.

  5. Line the brows and grin

    Switch to a fine liner brush and paint the two arched eyebrows above the eyes in a single confident stroke each. Draw the wide happy smile as one smooth curve, adding the little upturned tick at each corner. If your hand shakes, rest your painting elbow on the table and pull the brush slowly toward you.

  6. Seal and photograph

    Once fully dry, brush on a thin coat of clear matte sealer to protect the paint from smudges and moisture. Set the troll on a table where indoor light hits the face evenly. Snap your photo straight on so both ears frame the grin. Since nothing is cut, this one keeps well for weeks indoors.

Gather your supplies

Check things off as you get ready.

Work on a stable surface, keep your free hand out of the cutting path, and have an adult handle sharp tools.

Three levels of light

  • Leave intact

    The orange background around the head stays untouched skin, keeping the face framed and bright against the natural rind.

  • Peel & shade

    For an optional glow twist, lightly scrape the skin inside the ear hollows so they catch a dim orange warmth behind the gray paint.

  • Cut through

    If you want real light, cut only the two small eye dots all the way through and drop an LED inside so the grin gains a pair of glowing pupils.

Learn the carving basics

Before you start cutting

This is a painted concept, so do I have to carve anything?

No, the design is built entirely with paint and needs no blade at all. That makes it a safe weeknight project you can do alongside kids. If you later want a soft glow, an adult can add a couple of tiny eye cutouts, but the face works fully as a no-carve piece.

How do I keep the pointed ears looking even?

Sketch both ears in pencil first and measure roughly from the head circle to each tip before painting. Paint one ear, then match the second to it rather than working them at the same time. A little asymmetry actually adds character to a troll, so do not stress over perfection.

Will the paint hold up if I want to keep it out past Halloween?

Yes, a real pumpkin left uncut can last several weeks indoors, and a clear matte sealer protects the paint from smudging. Keep it out of direct sun and off damp surfaces. Wipe it gently with a dry cloth if dust settles.

Your take belongs here, too.

Changed a detail? Made it simpler? Share a photo of your version and tell the community what worked.

Share your pumpkin

More pumpkins like this

You've reached the end · 8 pumpkins
The Patch Report

Fresh pumpkins, in your inbox.

The best new carvings, ideas worth stealing, and how-tos for carving season. Short, seasonal, and gone by November.

A short email during carving season. Unsubscribe anytime. See our privacy policy.