Halloween Pumpkin Carving Contest · Starts October 1st · $500 in prizes
← Back to ideas
@ai_concepts
Aug 13, 2026
Shocked Cartoon Eyes Painted No-Carve PumpkinAI
0

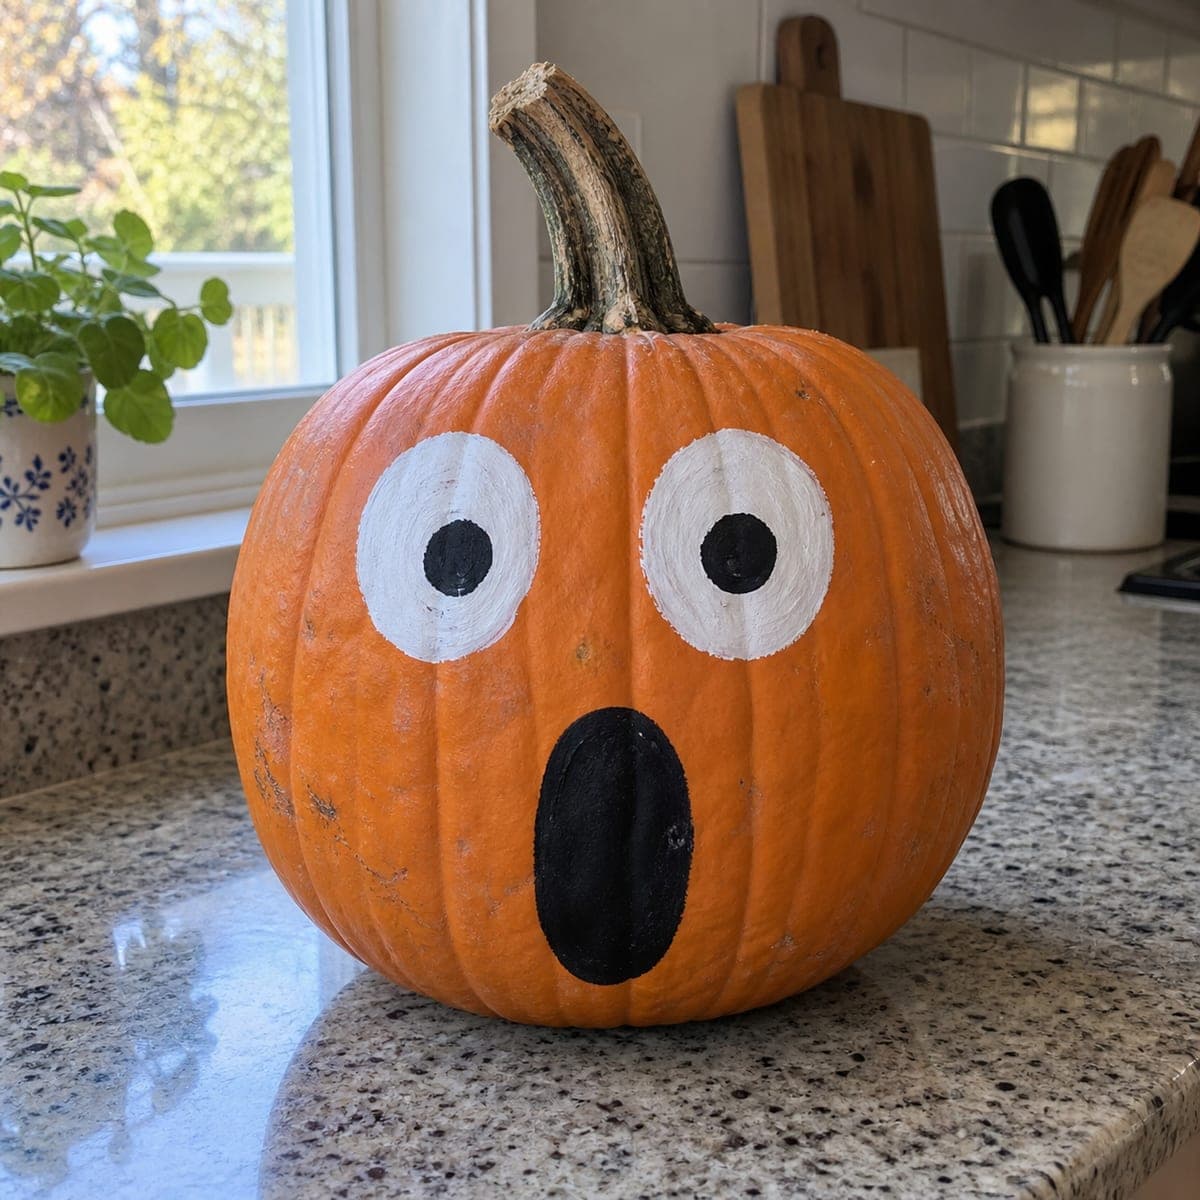
Shocked Cartoon Eyes Painted No-Carve Pumpkin

Enormous white googly eyes and a wide oval black mouth give this painted pumpkin a hilariously startled expression that kids find irresistible. The design uses only three acrylic colors: white for the eye circles, black for the pupils and mouth, with the orange rind itself providing the face color. Paint both white circles first and let them dry completely before adding the centered black pupils so they stay perfectly round. This no-carve pumpkin idea is fast, mess-free, and fun to display alongside carved neighbors for a mix-and-match porch scene.

This is an AI-generated concept image: a realistic, carvable design idea rather than a photo of a finished carve. AI concepts are always labeled and sit out the leaderboard and the contest.

No ratings yet · Sign in to rate

Comments (0)

  • No comments yet — be the first.

Save without an account. Sign in to like or comment.

Our tips for carving a similar design

The whole trick here is contrast: leave the orange rind as the face, then let two oversized white circles and one gaping black oval do all the work. Paint the white eyes first and let them dry fully so the round black pupils sit clean and centered on top. Because nothing is cut, this is a fast, mess-free project that pairs nicely next to carved pumpkins on a display.

Written by PumpkinCarvingIdeas.com, inspired by the image above. These are our suggestions, not instructions from the uploader. This approach to the AI concept has not been tested on a real pumpkin.

From pumpkin to porch

  1. Clean and dry the surface

    Wipe the whole pumpkin with a damp cloth to remove dust and field dirt, then dry it completely. Acrylic paint grips a clean, dry rind far better than a waxy or damp one. Pick the flattest, smoothest face of the pumpkin for your design so the eyes and mouth read clearly. Set it on a towel to keep it from rolling while you work.

  2. Sketch the layout in pencil

    Lightly pencil two large circles for the eyes near the upper middle, spaced a bit apart, and a tall oval mouth below and between them. Keep the eyes big and slightly uneven in placement for that comic, surprised look. Step back and check the spacing before committing to paint. Pencil lines will disappear under the paint or wipe away with a damp finger.

  3. Paint the white eye circles

    Fill both circles with white acrylic using a round brush, working in even strokes. Plan on two coats for solid, opaque white, letting the first coat dry before adding the second. Do not rush to add the pupils yet. Let the white dry completely so the black on top stays crisp and does not smear into gray.

  4. Add the black pupils

    Once the white is fully dry, paint a smaller black circle centered in each eye. Keep them round and equal in size, and place them slightly toward the middle for that cross-eyed, shocked expression. Use a smaller brush for control and touch up the edges as needed. Let them dry before handling.

  5. Paint the open mouth

    Fill the tall oval mouth with black acrylic, giving it two coats for a deep, solid look. Keep the top and bottom rounded so it reads as a surprised gasp rather than a frown. If you want a little dimension, leave a thin unpainted highlight streak near one edge. Let everything dry hard before moving the pumpkin.

  6. Seal and display

    Once dry, brush on a coat of clear acrylic sealer or matte spray to protect the paint from rain and handling. Display the finished pumpkin on a porch or shelf, ideally beside a couple of carved pumpkins for a mix-and-match scene. Since nothing is cut open, it will last as long as the pumpkin stays firm. Toss it once the rind starts to soften.

Gather your supplies

Check things off as you get ready.

Work on a stable surface, keep your free hand out of the cutting path, and have an adult handle sharp tools.

Three levels of light

  • Leave intact

    The orange rind stays bare and forms the whole face color, no glow needed.

  • Peel & shade

    Not used here, this is a painted design with no skin peeling.

  • Cut through

    Not used here, nothing is cut open; all detail comes from paint.

Learn the carving basics

Before you start cutting

Why paint the white circles before the black pupils?

White acrylic needs to dry fully so the black pupil on top stays sharp and round instead of bleeding into a muddy gray. If you drop black onto wet white, the two colors blend at the edges. Letting each layer dry also keeps the pupils perfectly centered. It only adds a short wait and makes a big difference in the final look.

Can I make this glow like a carved pumpkin?

A painted pumpkin does not light up from the inside since nothing is cut. If you want a glow, set a battery LED beside it or place it near carved neighbors that do light up. Keep flames away from paint and rind entirely and stick with LEDs. The design is meant to stand out by daylight and porch light rather than from within.

How do I get the surprised expression just right?

Keep the eyes large and the pupils centered or turned slightly inward for that wide, startled stare. Make the mouth a tall rounded oval rather than a flat line so it reads as a gasp. Sketch it in pencil first and step back a few feet to check before painting. Small tweaks to pupil placement change the whole mood.

Your take belongs here, too.

Changed a detail? Made it simpler? Share a photo of your version and tell the community what worked.

Share your pumpkin

More pumpkins like this

You've reached the end · 8 pumpkins
The Patch Report

Fresh pumpkins, in your inbox.

The best new carvings, ideas worth stealing, and how-tos for carving season. Short, seasonal, and gone by November.

A short email during carving season. Unsubscribe anytime. See our privacy policy.