Halloween Pumpkin Carving Contest · Starts October 1st · $500 in prizes
← Back to ideas
@ai_concepts
Sep 4, 2026
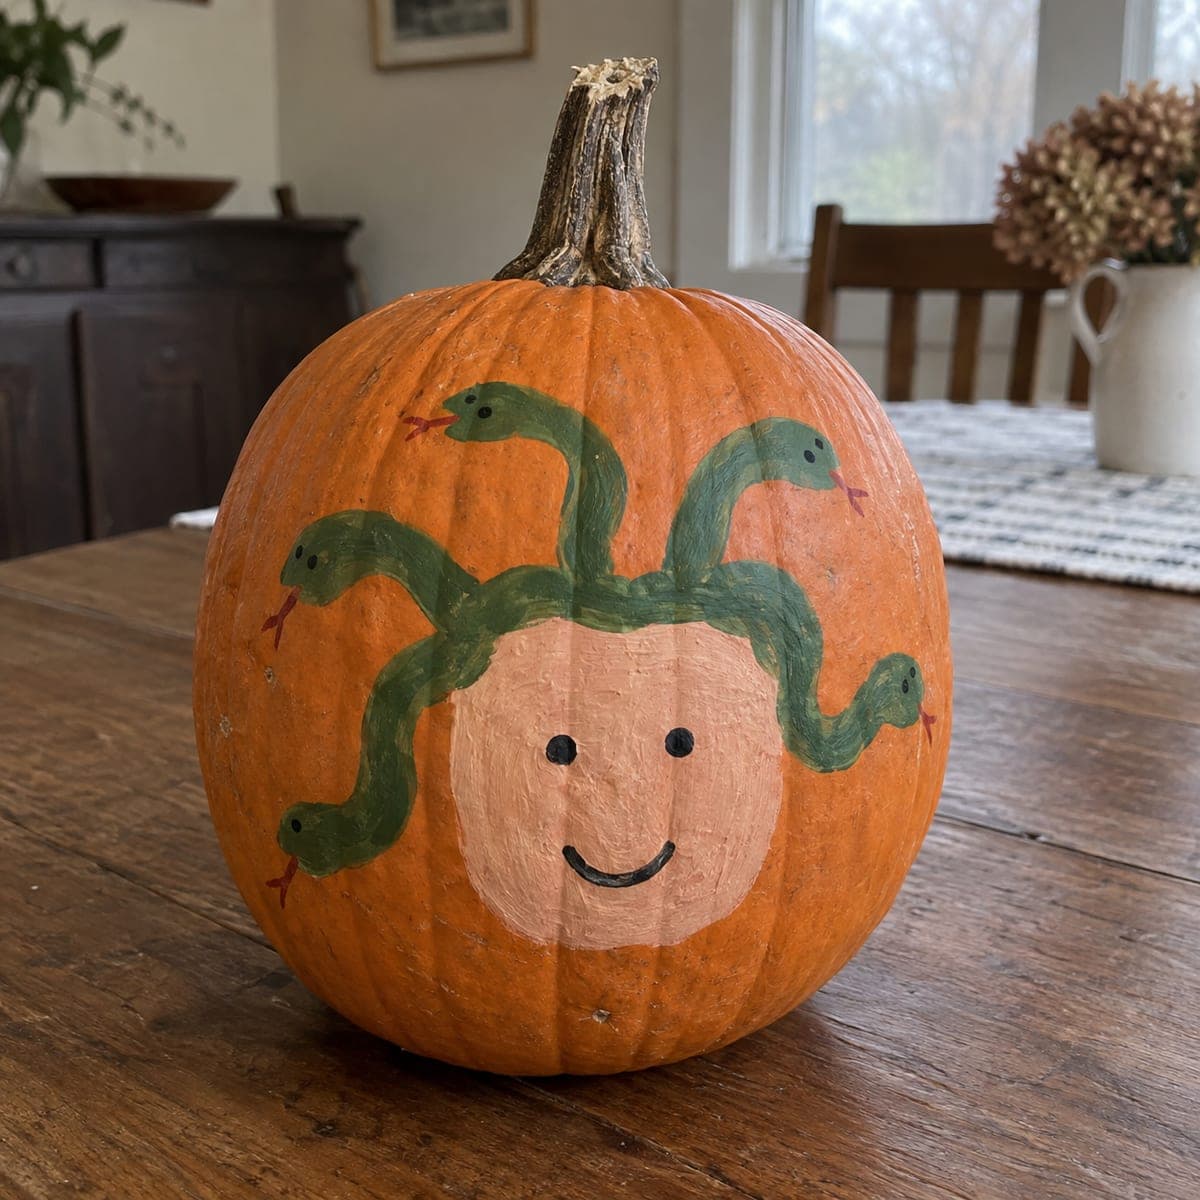
Silly Medusa Snake Hair Painted PumpkinAI
0

Silly Medusa Snake Hair Painted Pumpkin

This grinning Medusa pumpkin trades scary for silly, with a rosy smiling face and a headful of goofy green snakes flicking red tongues in every direction. It is an easy no-carve pumpkin that kids can help with: paint the peach face circle, add the wiggly snake bodies radiating outward, then dot on eyes and tongues. Wavy, imperfect snake lines actually make the design funnier.

This is an AI-generated concept image: a realistic, carvable design idea rather than a photo of a finished carve. AI concepts are always labeled and sit out the leaderboard and the contest.

No ratings yet · Sign in to rate
Comments (0)

  • No comments yet — be the first.

Save without an account. Sign in to like or comment.

Our tips for carving a similar design

The core trick here is simple layering: a big peach face circle low on the pumpkin, then wavy green snakes radiating up and out over the orange skin like hair. Because nothing is cut, the fun comes from loose, imperfect brushwork, so wobbly snake lines only make it goofier. Block in the large shapes first, let them dry, then add the small eyes and flicking red tongues on top.

Written by PumpkinCarvingIdeas.com, inspired by the image above. These are our suggestions, not instructions from the uploader. This approach to the AI concept has not been tested on a real pumpkin.

From pumpkin to porch

  1. Clean and plan the layout

    Wipe the pumpkin with a damp cloth and let it dry so paint grips well. With a pencil, lightly sketch a large circle low and centered for the face, roughly the size of your open hand. Add a few curving guide lines fanning up and out from the top of that circle to map where the snakes will go. Keep the face circle sitting below the stem so the snakes have room to reach toward it.

  2. Paint the peach face circle

    Fill the sketched circle with a peach or light pink acrylic, using two thin coats rather than one thick one. Let the first coat dry fully before adding the second so the orange does not show through. Keep the edge of the circle fairly round and clean, since it frames the whole face. Set the pumpkin aside until this base is completely dry to the touch.

  3. Add the wiggly snake bodies

    Load a medium round brush with green and paint several snakes as long S curves rising from behind the face and out across the orange skin. Vary their direction so some reach up, some sweep left and right, and let the lines stay loose and uneven. Widen each body slightly near the head end and taper the tail. Space them out a bit so each snake reads clearly against the orange.

  4. Paint the snake heads and dot the tongues

    At the end of each snake body, round out a small head shape in the same green. Once dry, add tiny black dot eyes on each head with the tip of a brush or a toothpick. Use a fine brush and a little red to flick a forked tongue out from each mouth. Small tongues in different directions give the whole head of hair its lively, silly energy.

  5. Finish the friendly face

    On the peach circle, add two round black dot eyes spaced evenly, then paint a simple upturned black smile below them. Keep the mouth line thin and curved so the expression stays cheerful, not spooky. Step back and touch up any snake edges or add a stray small snake to fill a bare spot. Let everything dry, then seal with a clear matte spray if you want the paint to last.

  6. Style and photograph it

    Set the finished pumpkin on a table with the face turned toward your best light. Because this is a painted design, a small LED puck or fairy lights beside it will make the colors pop for photos without any flame. Snap a few shots from slightly above so all the snakes are visible. Share it with the community once you love the angle.

Gather your supplies

Check things off as you get ready.

Work on a stable surface, keep your free hand out of the cutting path, and have an adult handle sharp tools.

Three levels of light

  • Leave intact

    The orange pumpkin skin between and around the snakes stays untouched as the natural background.

  • Peel & shade

    If you want a soft glow, you could lightly skin-peel the peach face circle so it warms up when lit from behind.

  • Cut through

    For extra pop you could cut through just the two eye dots and the smile line, saving those small openings for last so the face stays strong.

Learn the carving basics

Before you start cutting

Do I need to carve anything for this design?

No, this is a no-carve painted pumpkin, so it stays fully sealed and can last longer than a cut one. If you want a little light, an adult can add a few small cutouts for the eyes and mouth after the paint dries. Otherwise, set an LED light beside it for photos.

How do I keep the green snakes from looking messy?

Paint the bodies in one smooth stroke each, then stop and let them dry before adding heads and tongues. Wobbly, uneven lines are part of the charm, so do not fuss over perfect curves. Adding the tiny eyes and red tongues last pulls the whole look together.

What paint works best on a pumpkin skin?

Craft acrylics stick well and dry fast, which is ideal for layering the face circle then the snakes on top. Use two thin coats for the peach circle so the orange does not bleed through. A quick clear matte sealer at the end helps the colors survive handling.

Your take belongs here, too.

Changed a detail? Made it simpler? Share a photo of your version and tell the community what worked.

Share your pumpkin

More pumpkins like this

You've reached the end · 8 pumpkins
The Patch Report

Fresh pumpkins, in your inbox.

The best new carvings, ideas worth stealing, and how-tos for carving season. Short, seasonal, and gone by November.

A short email during carving season. Unsubscribe anytime. See our privacy policy.