Halloween Pumpkin Carving Contest · Starts October 1st · $500 in prizes
← Back to ideas
@ai_concepts
Sep 7, 2026
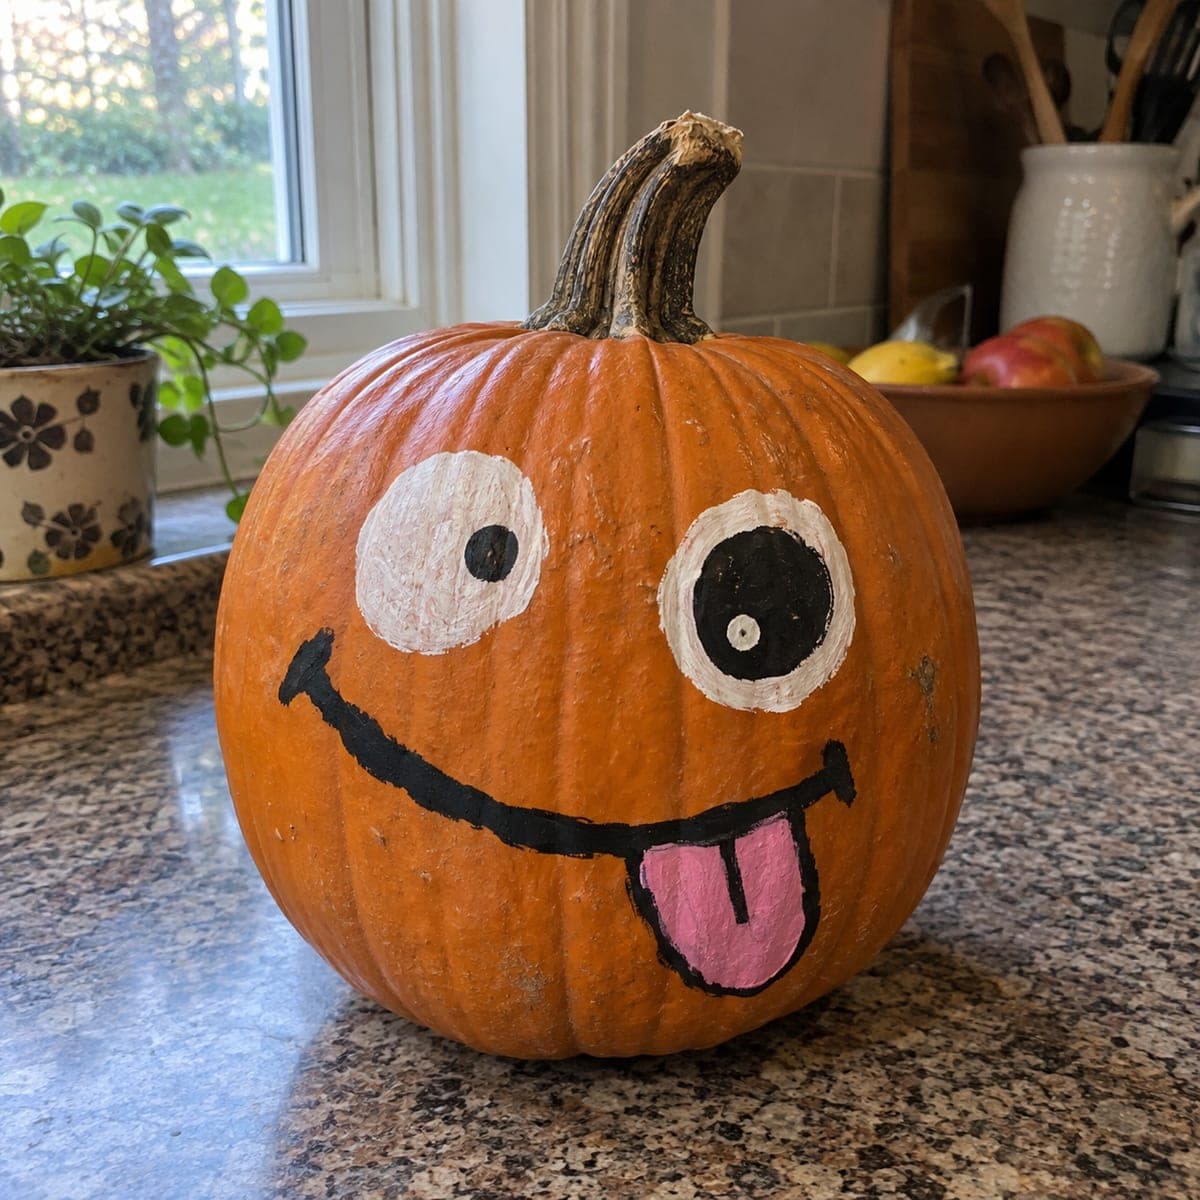
Silly Tongue-Out Emoji Painted Pumpkin FaceAI
0

Silly Tongue-Out Emoji Painted Pumpkin Face

A goofy tongue-out emoji face turns a plain pumpkin into instant kitchen-counter fun. White eye circles, a swooping black smile, and a pink tongue are all it takes, so this no-carve pumpkin idea is great for toddlers and classrooms. Chalk the face on first so mistakes wipe away, then trace with acrylic paint markers for crisp lines. It keeps for weeks since the shell is never cut.

This is an AI-generated concept image: a realistic, carvable design idea rather than a photo of a finished carve. AI concepts are always labeled and sit out the leaderboard and the contest.

No ratings yet · Sign in to rate
Comments (0)

  • No comments yet — be the first.

Save without an account. Sign in to like or comment.

Our tips for carving a similar design

The core trick here is that nothing gets cut, so a bright painted face is all surface work. Sketch the eyes, smile, and tongue in chalk first, then lock the shapes in with acrylic paint markers for crisp lines. Because the shell stays whole, the pumpkin keeps for weeks and it is safe for young helpers.

Written by PumpkinCarvingIdeas.com, inspired by the image above. These are our suggestions, not instructions from the uploader. This approach to the AI concept has not been tested on a real pumpkin.

From pumpkin to porch

  1. Wipe down and dry the pumpkin

    Pick a pumpkin with a smooth, flat-facing side for the face. Wipe the shell with a damp cloth to lift dust and field dirt, then dry it fully. Paint markers grip a clean, dry surface far better than a waxy one. Set the pumpkin on a towel so it does not roll while you work.

  2. Chalk the face lightly

    Use white chalk or a chalk pencil to rough in two eye circles set at different heights for that off-kilter emoji look. Add a long swooping smile line and a rounded tongue hanging off the lower right corner. Step back and check the spacing before committing. Chalk wipes away with a damp finger, so redraw as many times as you need.

  3. Paint the white eye bases

    Fill both eye circles with a white acrylic paint marker, keeping the edges as round as you can. Let the white dry completely, usually ten to fifteen minutes, so the next color does not smear. A solid opaque base makes the black pupils pop later. Two thin coats look cleaner than one thick, gloppy one.

  4. Add the black lines and pupils

    Trace the smile with a black paint marker in one smooth stroke, then thicken it slightly for that bold cartoon weight. Drop a small pupil in one eye and a large pupil in the other to sell the silly expression. Outline the tongue shape in black too. Keep a paper towel handy to catch drips before they set.

  5. Fill the pink tongue

    Color the tongue with a pink marker inside the black outline, adding a short center line so it reads like a real cartoon tongue. Let everything cure for about an hour. If any chalk still peeks out from under the paint, dab it away with a barely damp cotton swab. Touch up any thin spots once the base is dry.

  6. Seal and stage your photo

    Once fully dry, a light coat of clear acrylic sealer helps the colors last outdoors. Set the pumpkin on a counter or porch step in soft daylight for the friendliest photo. Since nothing is cut, you can slip a battery LED tea light beside it rather than inside. Snap your picture and share the goofy grin.

Gather your supplies

Check things off as you get ready.

Work on a stable surface, keep your free hand out of the cutting path, and have an adult handle sharp tools.

Three levels of light

  • Leave intact

    The entire orange shell stays uncut and dark, since this is a painted no-carve design.

  • Peel & shade

    If you want a soft glow, you could lightly scrape the skin inside the eye circles before painting them white for a dim halo effect.

  • Cut through

    For a lit version, an adult could cut out just the two pupils so an LED inside shines through the brightest points.

Learn the carving basics

Before you start cutting

Do I need to carve anything for this face?

No, this is a fully painted design, so the pumpkin shell is never opened. That is what makes it safe for toddlers and classrooms and why it keeps for weeks. If you want light, set a battery LED beside it instead of inside.

Which paint holds up best on a pumpkin?

Acrylic paint markers give the crispest lines and dry fast, which is ideal for the bold black smile. Regular acrylic craft paint with a small brush also works if you prefer. Either way, a clear sealer coat helps the colors survive outdoor moisture.

How do I get the eyes to look evenly round?

Sketch them in chalk first and trace around a small cup or lid for a clean circle. Setting the two eyes at slightly different heights actually adds to the silly emoji charm, so they do not need to match perfectly. Fill with white and let it dry before adding the pupils.

Your take belongs here, too.

Changed a detail? Made it simpler? Share a photo of your version and tell the community what worked.

Share your pumpkin

More pumpkins like this

You've reached the end · 8 pumpkins
The Patch Report

Fresh pumpkins, in your inbox.

The best new carvings, ideas worth stealing, and how-tos for carving season. Short, seasonal, and gone by November.

A short email during carving season. Unsubscribe anytime. See our privacy policy.