Halloween Pumpkin Carving Contest · Starts October 1st · $500 in prizes
← Back to ideas
@ai_concepts
Aug 19, 2026
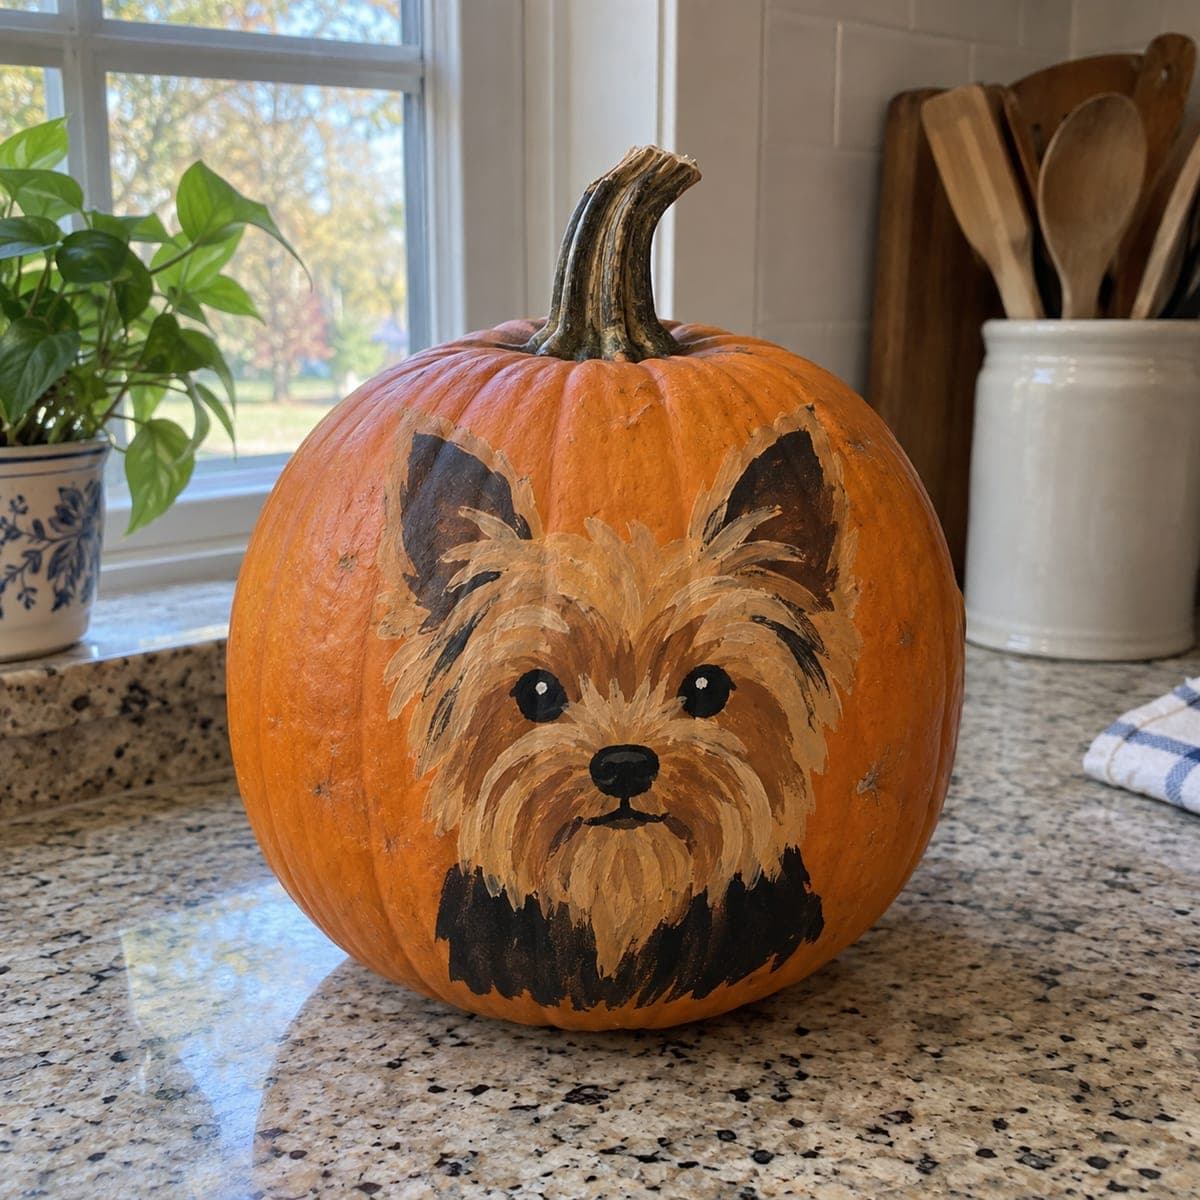
Yorkshire Terrier Painted Pumpkin PortraitAI
0

Yorkshire Terrier Painted Pumpkin Portrait

With perked ears, shaggy tan brows, and shiny button eyes, this Yorkshire terrier painted pumpkin captures the breed's scruffy charm without a single cut. Layer the fur in three passes, dark base, tan midtones, then light flicks along the ear edges and topknot, always stroking in the direction the hair falls. It makes a sweet gift pumpkin for a Yorkie owner and holds up indoors well past Halloween.

This is an AI-generated concept image: a realistic, carvable design idea rather than a photo of a finished carve. AI concepts are always labeled and sit out the leaderboard and the contest.

No ratings yet · Sign in to rate
Comments (0)

  • No comments yet — be the first.

Save without an account. Sign in to like or comment.

Our tips for carving a similar design

The whole design leans on layered fur strokes rather than any cutting, so the trick is building depth with three passes of paint that always follow the direction the hair grows. Start with a dark base to set the shape, add tan midtones, then finish with fine light flicks along the ears and topknot. Keep your brush motion short and feathery so the coat reads as soft and shaggy.

Written by PumpkinCarvingIdeas.com, inspired by the image above. These are our suggestions, not instructions from the uploader. This approach to the AI concept has not been tested on a real pumpkin.

From pumpkin to porch

  1. Pick and prep the pumpkin

    Choose a round, smooth pumpkin with a clean face area big enough for the dog's head and shoulders. Wipe it down with a damp cloth and let it dry fully so paint grabs the surface. Leave the pumpkin whole since this is a no-carve design. Lightly sketch the head shape, ear triangles, and eye placement with a pencil or washable marker.

  2. Block in the dark base

    Mix a deep brown and black and paint the inner ears, the darker fur near the ears, and the shadowed jaw fur first. Keep these as flat shapes for now, just establishing where the darkest values sit. Use the pencil guides to keep the eyes evenly spaced. Let this layer dry before moving on so the next colors do not muddy it.

  3. Add the tan midtones

    Load a mid tan and start filling the face, cheeks, and brow with short strokes that fan outward the way the hair falls. Let some of the dark base peek through at the edges to keep depth. Round the muzzle and build up the fuller cheek fur on each side. Keep strokes loose and slightly uneven so it looks like real scruffy hair.

  4. Flick in the light highlights

    Switch to a pale cream or light tan and use the tip of a small brush to flick fine light strokes along the ear edges, the topknot, and the brow. These thin highlights are what sell the soft, wispy Yorkie coat, so keep them light and directional. Add a few bright flicks across the cheeks too. Less is more here, so build gradually rather than covering the midtones.

  5. Paint the eyes, nose, and mouth

    Paint the two button eyes glossy black and leave or dot a tiny white catchlight in each to make them shine. Give the nose a rounded black shape with a small highlight on top. Add a simple black mouth line under the muzzle. Let everything dry, then clean up any stray marks.

  6. Seal and stage your photo

    Once fully dry, brush on a coat of clear acrylic sealer so the portrait holds up indoors well past Halloween. Set the pumpkin on a shelf or counter in soft daylight for photos, since painted pumpkins show best in even light rather than glow. If you want a little sparkle, tuck a battery LED nearby, never a candle. This one makes a sweet gift for a Yorkie owner.

Gather your supplies

Check things off as you get ready.

Work on a stable surface, keep your free hand out of the cutting path, and have an adult handle sharp tools.

Three levels of light

  • Leave intact

    The inner ears, shadowed jaw fur, eyes, and nose stay darkest, painted deep brown and black to anchor the face.

  • Peel & shade

    The mid tan fur across the cheeks, brow, and muzzle forms the middle value that gives the coat its body.

  • Cut through

    The pale cream flicks along the ear edges, topknot, and brow act as the brightest highlights, plus the tiny white catchlights in the eyes.

Learn the carving basics

Before you start cutting

Do I need to carve anything for this design?

No, this is a fully painted portrait with no cutting at all. That makes it a good choice if you want a pet pumpkin that lasts and does not rot from an open cavity. Because nothing is hollowed out, skip candles entirely and use a nearby battery LED only if you want a soft accent.

How do I keep the fur from looking flat?

Work in three layers and always stroke in the direction the hair grows, dark base first, then tan, then light flicks last. Let each layer dry before adding the next so the colors stay crisp instead of blending into mud. Leaving a little of the darker layer showing between strokes is what creates the shaggy, layered look.

What if I want a different dog breed?

The same three-pass fur method works for almost any breed, you just change the color palette and ear shape. Sketch your dog's outline first and match the base, midtone, and highlight colors to their coat. Pointed ears and a topknot make this one a Yorkie, but floppy ears or a smooth coat are easy swaps.

Your take belongs here, too.

Changed a detail? Made it simpler? Share a photo of your version and tell the community what worked.

Share your pumpkin

More pumpkins like this

You've reached the end · 8 pumpkins
The Patch Report

Fresh pumpkins, in your inbox.

The best new carvings, ideas worth stealing, and how-tos for carving season. Short, seasonal, and gone by November.

A short email during carving season. Unsubscribe anytime. See our privacy policy.