Halloween Pumpkin Carving Contest Β· Starts October 1st Β· $500 in prizes
← Back to ideas
@ai_concepts
Jul 12, 2026
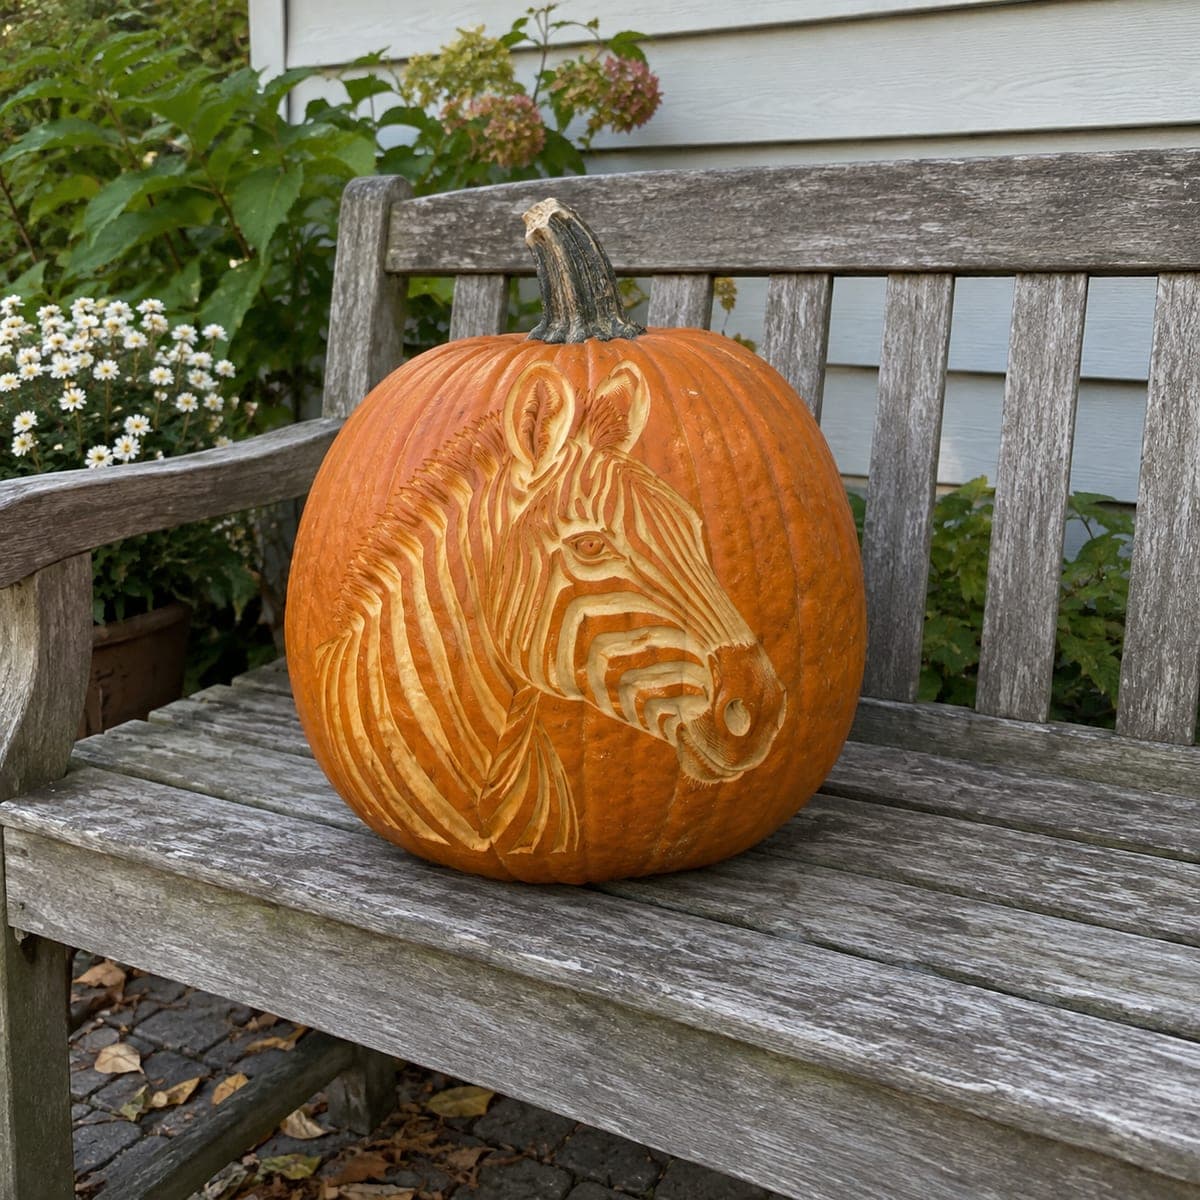
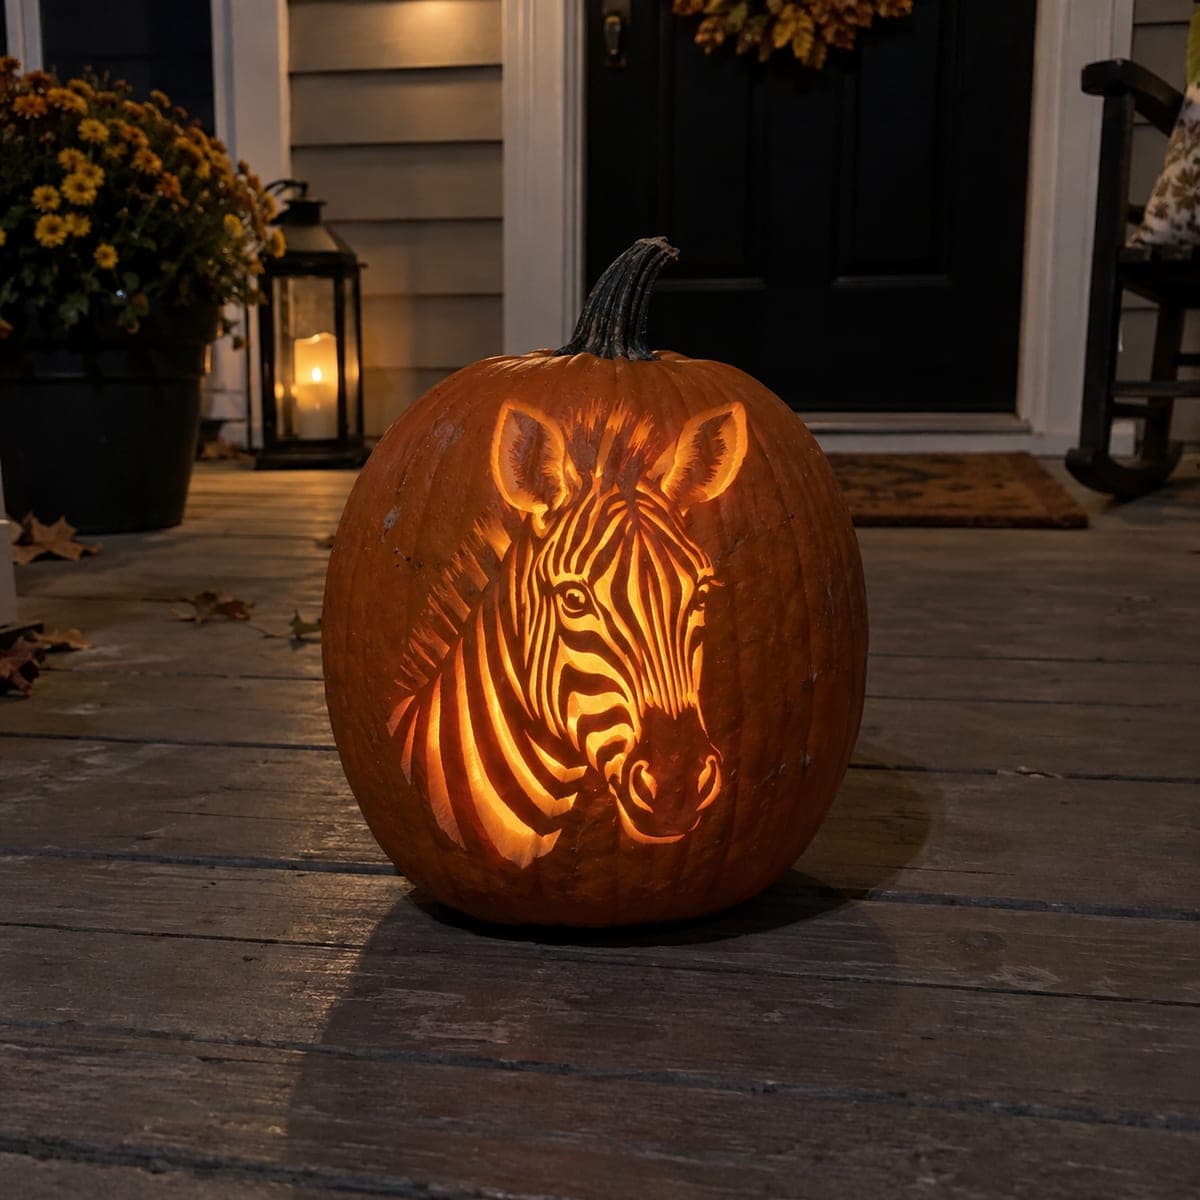
Zebra Head Etched Pumpkin With Flowing ManeAI
0

Zebra Head Etched Pumpkin With Flowing Mane

Bold zebra stripes wrap a turned head and upright mane in this striking etched pumpkin portrait. The pattern is pure two-tone discipline: the dark stripes are untouched orange skin and the light ones are peeled flesh, so map every stripe on the shell in marker before the first cut. Follow the head's curves with your stripe lines to keep the face looking rounded rather than flat.

This is an AI-generated concept image: a realistic, carvable design idea rather than a photo of a finished carve. AI concepts are always labeled and sit out the leaderboard and the contest.

No ratings yet Β· Sign in to rate

Comments (0)

  • No comments yet β€” be the first.

Save without an account. Sign in to like or comment.

Our tips for carving a similar design

The whole effect here rides on one trick: every dark stripe is untouched orange skin and every light stripe is peeled flesh, so this is a surface etch with almost no cutting through. Since this is an AI concept and no real pumpkin exists, think of it as a plan you could follow: map all the stripes in marker first, then peel only the light bands. Let your stripe lines curve with the shape of the head so the face reads round instead of flat.

Written by PumpkinCarvingIdeas.com, inspired by the image above. These are our suggestions, not instructions from the uploader. This approach to the AI concept has not been tested on a real pumpkin.

From pumpkin to porch

  1. Pick a tall pumpkin and open the back

    Choose a large, evenly rounded pumpkin with one broad, smooth face for the zebra. Cut a hatch in the back or bottom, not the top, so the stem stays intact for the mane area up top. Scrape the inside wall behind the face down to about one inch so light passes through the peeled areas. A thinner wall makes the glow even and the etching easier.

  2. Transfer the stripe map

    Tape your zebra stencil to the front and poke through the outline and every stripe boundary with a pin or transfer wheel. Remove the paper and connect the dots in marker, drawing each stripe as a full shape rather than a single line. Take your time here, since the two-tone read depends entirely on which bands stay dark and which get peeled. Mark the peel zones clearly so you never lose track once you start.

  3. Outline the head and features

    With a fine detail loop or a sharp lino-style tool, lightly score along the outer edge of the head, ears, muzzle, and eye. Keep these lines shallow at first so you can correct any wobble. Define the eye and nostril as small, controlled shapes since they anchor the whole face. Leave narrow ridges of skin between adjacent stripes so the pattern stays crisp and structurally strong.

  4. Peel the light stripes

    Working stripe by stripe, remove only the orange skin inside your marked light bands, taking off the top layer to reveal the pale flesh underneath. Keep the depth consistent so every light stripe glows the same. Follow the curve of the head with each stroke so the stripes bend around the muzzle and cheek. Leave the dark stripes completely untouched for maximum contrast.

  5. Shade the mane and depth

    For the upright mane and the shadowed edges, vary how deep you peel: shave a little more where you want a brighter highlight and less where you want a softer mid tone. Feather the strokes on the mane so it looks like flowing hair rather than solid blocks. Step back often and check the balance of light and dark from a few feet away. Clean up any ragged edges with the tip of your detail tool.

  6. Light it and photograph

    Drop a battery LED puck inside, warm white for a natural glow, and set it toward the carved face. Test in a dark room and touch up any stripe that looks muddy or uneven. Coat the peeled areas with petroleum jelly to slow drying and keep the contrast fresh. Photograph it at dusk on a bench or step where side light still shows the etched texture.

Gather your supplies

Check things off as you get ready.

Work on a stable surface, keep your free hand out of the cutting path, and have an adult handle sharp tools.

Three levels of light

  • Leave intact

    The dark zebra stripes, the eye, nostril, and outer background stay as untouched orange skin.

  • Peel & shade

    The light stripes, cheek, and flowing mane are skin-peeled for a soft mid glow.

  • Cut through

    Almost nothing is cut fully through; you might open only a tiny highlight in the eye if you want one bright spark.

Learn the carving basics

Before you start cutting

Do I cut all the way through anywhere on this design?

Mostly no. This is an etched portrait, so the light stripes are shallow peels that let a dim glow through, not full cutouts. If you want a single bright accent, you could cut a tiny opening in the eye, but leave everything else as surface work.

How do I keep the stripes from looking flat?

Curve every stripe line to follow the shape of the head, cheek, and muzzle instead of running them straight. Bending the bands around the form tricks the eye into reading a rounded face. Marking the full stripe map before you cut is what makes this possible.

What if I peel a stripe that should have stayed dark?

Because the design is pure two-tone, a wrongly peeled band breaks the pattern. Mark your peel zones clearly and double check before each stroke. If you slip, you can sometimes shade the surrounding area to blend the mistake, but planning carefully up front is the real fix.

Your take belongs here, too.

Changed a detail? Made it simpler? Share a photo of your version and tell the community what worked.

Share your pumpkin

More pumpkins like this

You've reached the end Β· 8 pumpkins
The Patch Report

Fresh pumpkins, in your inbox.

The best new carvings, ideas worth stealing, and how-tos for carving season. Short, seasonal, and gone by November.

A short email during carving season. Unsubscribe anytime. See our privacy policy.