Halloween Pumpkin Carving Contest · Starts October 1st · $500 in prizes
← Back to ideas
@ai_concepts
Sep 14, 2026
Badass Block-Letter PumpkinAI
0

Badass Block-Letter Pumpkin

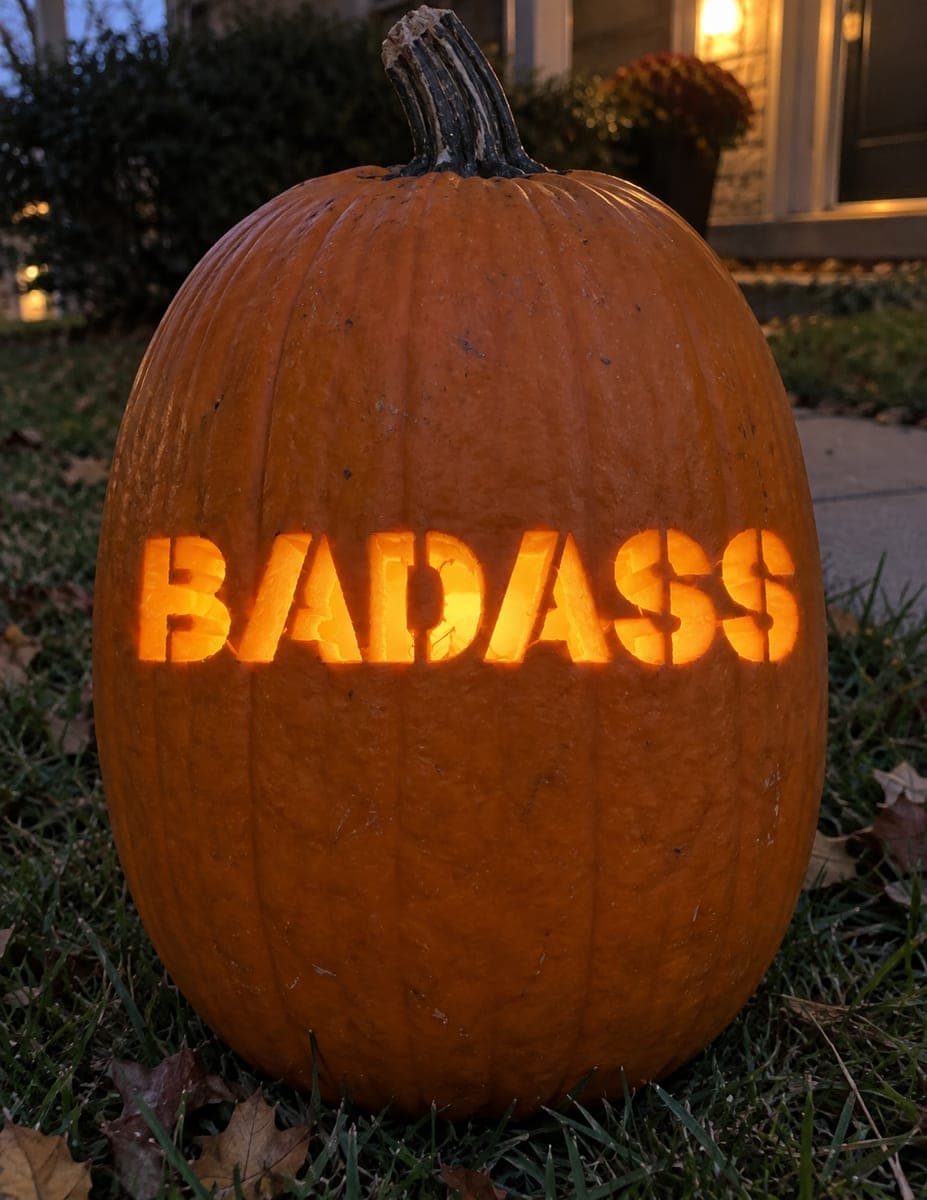
Six chunky block caps spelling BADASS are cut in a single row across the middle of a tall oval pumpkin for this bold statement pumpkin carving idea, each letter fully pierced so the word blazes in orange at dusk. The stencil typeface has thick strokes that hold up well in pumpkin flesh without cracking, but the enclosed counters in the A and D each need a small rind bridge to stay in place. Set those bridges first in pencil before you start cutting, and remove them last after all the open forms around them are done. Displayed on a front lawn, the single-row word reads instantly from the sidewalk.

This is an AI-generated concept image: a realistic, carvable design idea rather than a photo of a finished carve. AI concepts are always labeled and sit out the leaderboard and the contest.
No ratings yet · Sign in to rate

Comments (0)

  • No comments yet — be the first.

Save without an account. Sign in to like or comment.

Our tips for carving a similar design

The core trick here is a single row of chunky block capitals fully pierced so the whole word glows in one clean band of light. The thick strokes are forgiving in pumpkin flesh, but the enclosed centers in the A and D need tiny rind bridges to keep those islands from falling out. Plan those bridges in pencil first, cut everything else, then remove the bridges last.

Written by PumpkinCarvingIdeas.com, inspired by the image above. These are our suggestions, not instructions from the uploader. This approach to the AI concept has not been tested on a real pumpkin.

From pumpkin to porch

  1. Pick a tall pumpkin and prep it

    Choose a tall oval pumpkin with a smooth, flat-ish front panel so all six letters sit in one clean row. Cut a lid from the bottom or the back rather than the top so the stem stays intact for display. Scoop out the pulp and thin the inside carving wall to about one inch where the letters will go. A thinner wall makes piercing the strokes much easier and lets more light through.

  2. Position and tape the stencil

    Center the BADASS stencil across the middle of the pumpkin and tape it flat, snipping the edges so the paper hugs the curve without wrinkles. Step back and check that the word sits level and reads straight on from the sidewalk. Poke transfer holes along every letter outline with a pin or awl, keeping the dots close together on curves. Peel the paper and connect the dots lightly in pencil.

  3. Mark your rind bridges first

    Before any cutting, draw two small bridges in pencil: one holding the triangular island inside the A and one holding the loop island inside the D. Make each bridge about a quarter inch wide so it is strong but nearly invisible when lit. Marking them now keeps you from accidentally cutting them away. These are the last things you will remove.

  4. Cut the solid letters first

    Start with the fully open letters, B, the second A body, and both S shapes, using a small saw tool and gentle steady strokes. Let an adult handle the blade and cut away from your hands, resting the pumpkin in your lap or on a towel. Push the cut pieces out from the inside to avoid tearing the front edges. Save the enclosed A and D counters for the bridge step.

  5. Remove the bridges and clean up

    Now cut around the A and D islands, leaving the pencil-marked bridges in place until the very end. Once the surrounding openings are done and the islands feel stable, decide whether to slice the bridges free for a fully open look or leave them for extra support. Trim any ragged inner edges with a paring knife so each stroke reads crisp. Wipe off leftover pencil with a damp paper towel.

  6. Light it and photograph at dusk

    Drop a bright battery LED or two inside so the whole word blazes evenly across the row. Candles are a fire risk with a sealed pumpkin, so stick with LEDs. Set the pumpkin on a flat lawn or step and shoot at dusk when the ambient light still shows the pumpkin shape but the letters glow strong. A low camera angle from the sidewalk shows off the instant readability.

Gather your supplies

Check things off as you get ready.

Work on a stable surface, keep your free hand out of the cutting path, and have an adult handle sharp tools.

Three levels of light

  • Leave intact

    The whole pumpkin body and the untouched skin around the word stay dark orange.

  • Peel & shade

    Optional: lightly skin-peel a thin outline halo around the letters for a soft glow border.

  • Cut through

    All six block letters are pierced all the way through so the word blazes brightest.

Learn the carving basics

Before you start cutting

How wide should the rind bridges in the A and D be?

Aim for about a quarter inch of rind on each bridge. That is strong enough to hold the inner island in place while cutting yet thin enough that it nearly disappears when lit. Mark them in pencil before you cut anything else so you do not remove them by mistake.

Will thin strokes crack in the pumpkin?

This block typeface uses thick strokes on purpose, so cracking is rarely a problem. Just thin the inside wall to about an inch and cut with slow, steady strokes rather than forcing the tool. The chunky letters hold up well even on a curved surface.

Should I carve top-down or bottom-up?

Cut a lid from the bottom or back instead of the top so the stem stays intact for a cleaner look. Then carve the solid open letters first and leave the enclosed A and D counters for last. Removing the bridges at the very end keeps the islands supported the whole time.

Your take belongs here, too.

Changed a detail? Made it simpler? Share a photo of your version and tell the community what worked.

Share your pumpkin

More pumpkins like this

You've reached the end · 8 pumpkins
The Patch Report

Fresh pumpkins, in your inbox.

The best new carvings, ideas worth stealing, and how-tos for carving season. Short, seasonal, and gone by November.

A short email during carving season. Unsubscribe anytime. See our privacy policy.