Halloween Pumpkin Carving Contest · Starts October 1st · $500 in prizes
← Back to ideas
@ai_concepts
Sep 14, 2026
Make America Great Again PumpkinAI
0

Make America Great Again Pumpkin

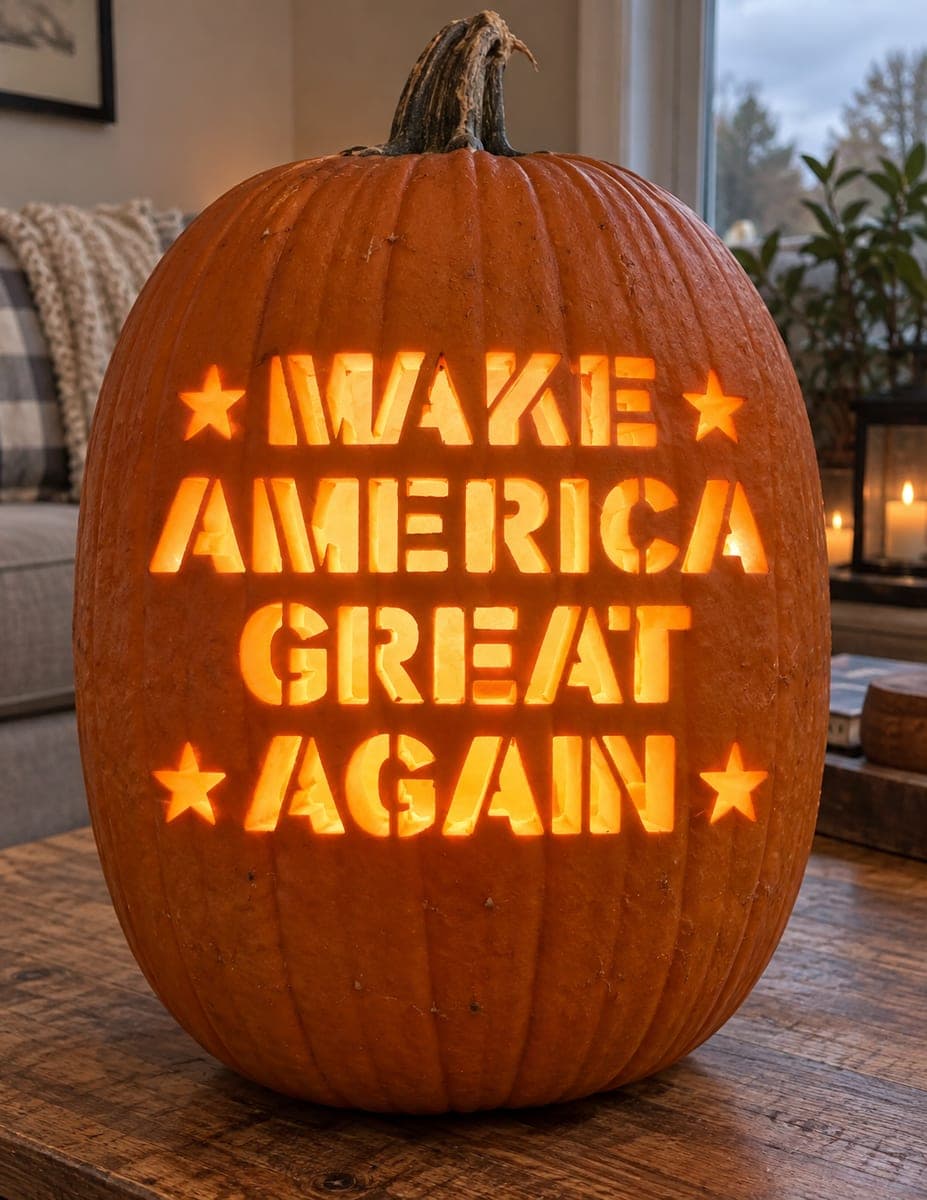
Four stacked rows of large stencil letters reading MAKE, AMERICA, GREAT, and AGAIN fill the face of this tall pumpkin, with a five-pointed star flanking the top row on each side and a matching pair framing the bottom row, all pierced through and glowing warmly. The sheer number of open cutouts means the pumpkin walls carry a heavy structural load, so choose a pumpkin with walls at least an inch thick and scrape sparingly. Transfer the lettering with a pin tool before sawing so you can confirm letter spacing and star placement while the pumpkin is still intact.

This is an AI-generated concept image: a realistic, carvable design idea rather than a photo of a finished carve. AI concepts are always labeled and sit out the leaderboard and the contest.
No ratings yet · Sign in to rate

Comments (0)

  • No comments yet — be the first.

Save without an account. Sign in to like or comment.

Our tips for carving a similar design

The core trick here is treating each letter as its own floating island, so the thin bridges of skin between and inside letters do all the structural work. Since this is a concept image, picture a tall thick-walled pumpkin where every letter and star is a full cutout. Plan your spacing on the intact shell first, then cut so the counters inside letters like A, R, and G stay attached.

Written by PumpkinCarvingIdeas.com, inspired by the image above. These are our suggestions, not instructions from the uploader. This approach to the AI concept has not been tested on a real pumpkin.

From pumpkin to porch

  1. Pick a tall, thick pumpkin and prep it

    Choose a tall pumpkin with a flat-ish front face and walls at least an inch thick, since this many openings puts a heavy load on the shell. Cut a lid or a wide bottom access hole so you can reach the whole interior. Scoop the guts and scrape the front wall only lightly, leaving plenty of material for strength. Over-thinning the wall is the fastest way to lose letters, so go easy.

  2. Transfer the four rows and stars

    Print a stencil with MAKE, AMERICA, GREAT, and AGAIN stacked in four even rows, plus a five-pointed star at each end of the top and bottom rows. Tape it snugly to the front and use a pin tool to poke closely spaced dots along every edge. Take your time confirming letter spacing and that the stars line up before any sawing. While the pumpkin is still whole, this is your chance to fix crooked rows.

  3. Score all the outlines first

    Remove the paper and lightly connect your pin dots with a detail saw or craft knife, scoring the full outline of every letter and star without cutting all the way through yet. Working shallow first lets you catch spacing mistakes and keeps the shell rigid while you carve. Pay special attention to the enclosed centers of A, R, and G so you keep those bridges intact. An adult should handle all the cutting tools.

  4. Cut the small pieces before the big ones

    Start with the stars and the smaller letters, cutting each opening fully through with steady, gentle saw strokes. Push cut pieces inward or out cleanly so you do not tear neighboring edges. Save the widest openings, like the big A and M shapes, for last so the pumpkin holds its shape as long as possible. If a bridge feels fragile, leave a hair more skin rather than risk a break.

  5. Clean the edges and check the bridges

    Go back and trim any ragged edges so light passes cleanly through each stroke of the letters. Inspect the thin bridges between rows and inside letters, and if one cracked, a toothpick and a dab of white glue can splint it. Wipe away debris from inside so nothing blocks the glow. Test-fit your light before the final display.

  6. Light it and photograph

    Drop in a bright battery LED or two, never a candle, since the many cutouts need even light to read all four words. Place the pumpkin at eye level against a dark background so the warm letters pop. Shoot in a dim room with the LED as the main light for that even orange glow. Prop it on a flat wood surface so it sits square and the rows stay level.

Gather your supplies

Check things off as you get ready.

Work on a stable surface, keep your free hand out of the cutting path, and have an adult handle sharp tools.

Three levels of light

  • Leave intact

    The whole outer pumpkin face and the ribbed background stay untouched and dark.

  • Peel & shade

    Optionally skin-peel a thin border ring around the text block for a soft halo without weakening the wall.

  • Cut through

    Every letter of MAKE, AMERICA, GREAT, and AGAIN plus the four stars are cut fully through for the brightest glow.

Learn the carving basics

Before you start cutting

How do I keep letters like A, R, and G from falling out?

Those letters have enclosed centers that need a small bridge of skin to stay attached. Keep at least a quarter inch of connecting material and cut carefully around them. If a bridge does snap, splint it back with a toothpick and a little white glue.

Does the order I cut in really matter with this much text?

Yes, quite a bit. Cut the small stars and narrow letters first while the shell is still strong, and save the widest openings for last. This keeps the pumpkin rigid so it does not sag or crack partway through.

Why not use a candle inside all these cutouts?

With this many open windows a candle flame would flicker unevenly and could scorch the thin bridges. A bright battery LED gives steady, even light so all four rows read clearly. Two LEDs spread the glow more evenly across the tall face.

Your take belongs here, too.

Changed a detail? Made it simpler? Share a photo of your version and tell the community what worked.

Share your pumpkin

More pumpkins like this

You've reached the end · 8 pumpkins
The Patch Report

Fresh pumpkins, in your inbox.

The best new carvings, ideas worth stealing, and how-tos for carving season. Short, seasonal, and gone by November.

A short email during carving season. Unsubscribe anytime. See our privacy policy.