Halloween Pumpkin Carving Contest Β· Starts October 1st Β· $500 in prizes
← Back to ideas
@ai_concepts
Sep 14, 2026
Circled Anarchy A PumpkinAI
0

Circled Anarchy A Pumpkin

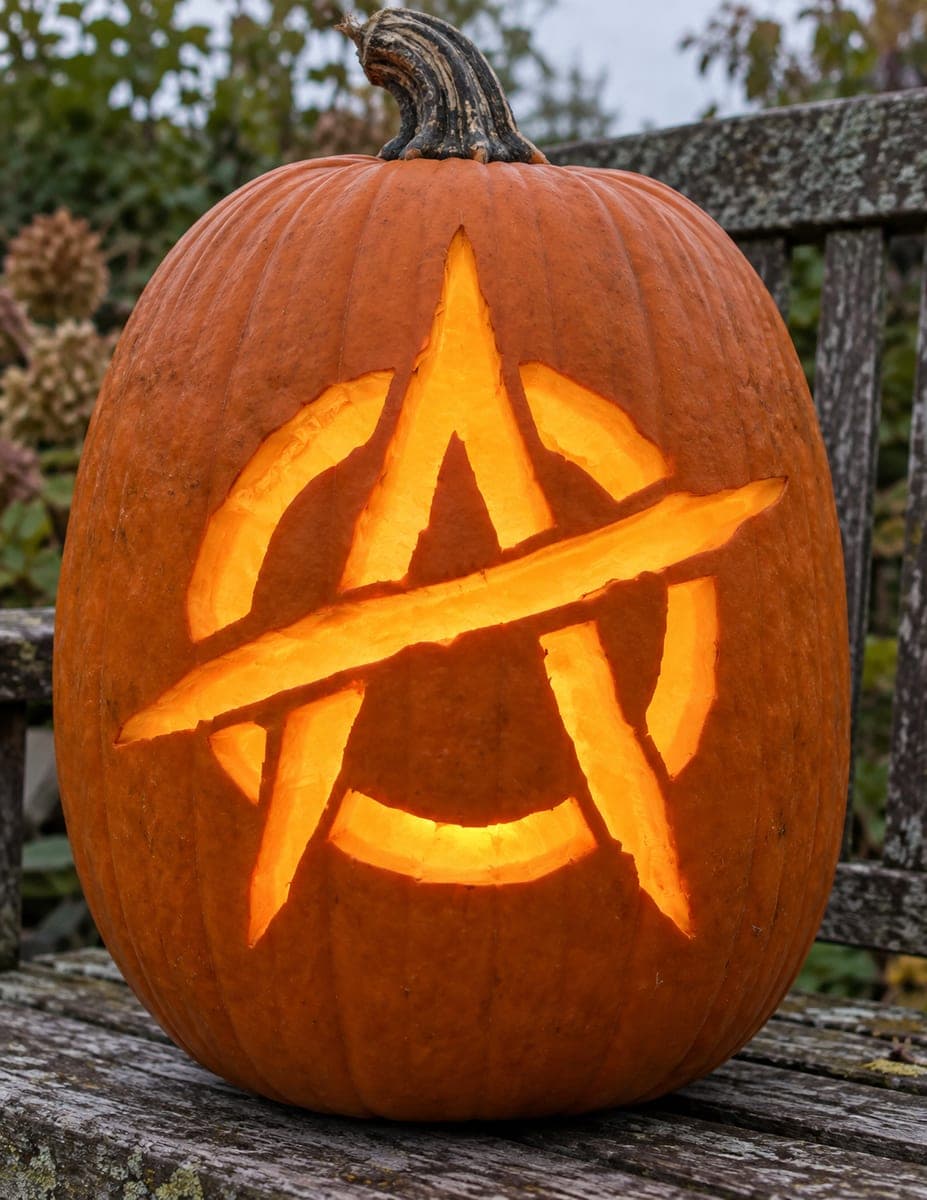
A bold anarchy symbol fills most of the pumpkin face: a thick capital A with a horizontal crossbar enclosed inside a large circle, all pierced through in rough, energetic cuts. The wide stroke widths mean the openings glow strongly even without thinning the wall. Cut the circle first to lock in the outer boundary, then remove the two legs of the A and the crossbar, leaving the triangular enclosed center intact as a floating island of orange skin. This jack-o-lantern design reads well from the street because the high contrast between the lit cuts and the dark pumpkin body keeps the symbol sharp.

This is an AI-generated concept image: a realistic, carvable design idea rather than a photo of a finished carve. AI concepts are always labeled and sit out the leaderboard and the contest.


No ratings yet Β· Sign in to rate

Comments (0)

  • No comments yet β€” be the first.

Save without an account. Sign in to like or comment.

Our tips for carving a similar design

The core trick here is a thick circled A made entirely of wide full cutouts, so the openings glow strong without ever thinning the wall. The plan is to cut the outer ring first to lock the boundary, then remove the two legs and the crossbar of the A, and leave the small triangular center as a floating island of dark skin. High contrast between the bright cuts and the untouched body is what keeps the symbol readable from the street.

Written by PumpkinCarvingIdeas.com, inspired by the image above. These are our suggestions, not instructions from the uploader. This approach to the AI concept has not been tested on a real pumpkin.

From pumpkin to porch

  1. Prep the pumpkin and plan the layout

    Pick a tall pumpkin with a broad, fairly flat front so the whole symbol fits with room to spare. Cut a lid from the bottom or back rather than the top, which keeps the stem intact and makes it easy to set the pumpkin over an LED light later. Scoop the inside and thin the front wall to about one inch so your knife glides through. Wipe the face dry before you transfer any pattern.

  2. Transfer the circled A design

    Print or draw the symbol so it fills most of the face, then tape the pattern flat and poke the outlines with a pushpin or a transfer wheel. Mark the outer circle, both legs of the A, the horizontal crossbar, and the triangular center that will stay dark. Keep your stroke widths generous, since wide cuts are what make this design glow. Step back and check that the circle looks round and the A sits centered before you cut anything.

  3. Cut the outer circle first

    Start with the circular ring so the outer boundary is locked in before you remove any interior mass. Use a small serrated saw and take slow, steady strokes, letting the blade do the work rather than forcing it. Leave a few thin uncut spots along the ring if you want extra support while you work, then finish them last. Adults should handle all the sharp tools, and always cut away from your holding hand.

  4. Remove the A legs and crossbar

    Cut out the two angled legs of the A next, then the horizontal crossbar. Work from the center of each shape outward toward your marked lines so the wall stays supported as long as possible. Take care where the crossbar meets the legs, keeping those junctions clean so the openings stay crisp. The triangular pocket at the top of the A stays in place as a floating island, so cut around it, not through it.

  5. Clean the edges and check the island

    Trim the inside faces of every opening so the light spreads evenly and the edges look sharp. Gently rock the triangular center island to make sure it is still firmly attached to the surrounding skin, and leave a little extra rim if it feels loose. Rounding or slightly beveling the back edge of each cut widens the throw of light. Rinse away loose pulp and pat the cuts dry.

  6. Light it and photograph

    Set a battery LED puck or string inside and skip real candles, since the wide openings and dry edges do better with cool, steady light. Test the glow in a dark room and rotate the light until the circle and A read evenly. If any area looks dim, scrape a little more from the inside wall behind it. Shoot your photo at dusk so the bright cuts pop against the dark body.

Gather your supplies

Check things off as you get ready.

Work on a stable surface, keep your free hand out of the cutting path, and have an adult handle sharp tools.

Three levels of light

  • Leave intact

    The main pumpkin body and the small triangular center of the A stay untouched and dark for contrast.

  • Peel & shade

    Optionally shave a thin skin border just outside the circle for a soft dim halo around the symbol.

  • Cut through

    The full circle ring, both A legs, and the crossbar are cut all the way through for the brightest glow.

Learn the carving basics

Before you start cutting

How do I keep the triangular center from falling out?

That center is a floating island held only by the skin around its edges, so cut around it carefully and never through its supports. Keep the surrounding wall at full thickness rather than thinning it, and leave a slightly wider rim if the piece feels wobbly. If it does loosen, a couple of toothpicks pushed from behind can pin it back in place.

Do I really need to cut the circle before the A?

Yes, cutting the outer ring first locks in the boundary and keeps the shape round while the pumpkin is still strong. If you removed the A legs first, the wall would flex and your circle could end up lopsided. Working outer to inner is the safest order for any enclosed symbol.

Will the openings glow if I do not thin the wall?

They will, because the strokes here are wide, and wide full cutouts throw plenty of light on their own. Thinning is mainly for shaded or peeled areas, which this design does not require. A bright LED inside a hollowed pumpkin is all you need for a strong, sharp result.

Your take belongs here, too.

Changed a detail? Made it simpler? Share a photo of your version and tell the community what worked.

Share your pumpkin

More pumpkins like this

You've reached the end Β· 8 pumpkins
The Patch Report

Fresh pumpkins, in your inbox.

The best new carvings, ideas worth stealing, and how-tos for carving season. Short, seasonal, and gone by November.

A short email during carving season. Unsubscribe anytime. See our privacy policy.