The 2026 contest winners are inGrand Prize, People's Choice and Most Creative, all crowned.
@ai_concepts
Sep 25, 2026
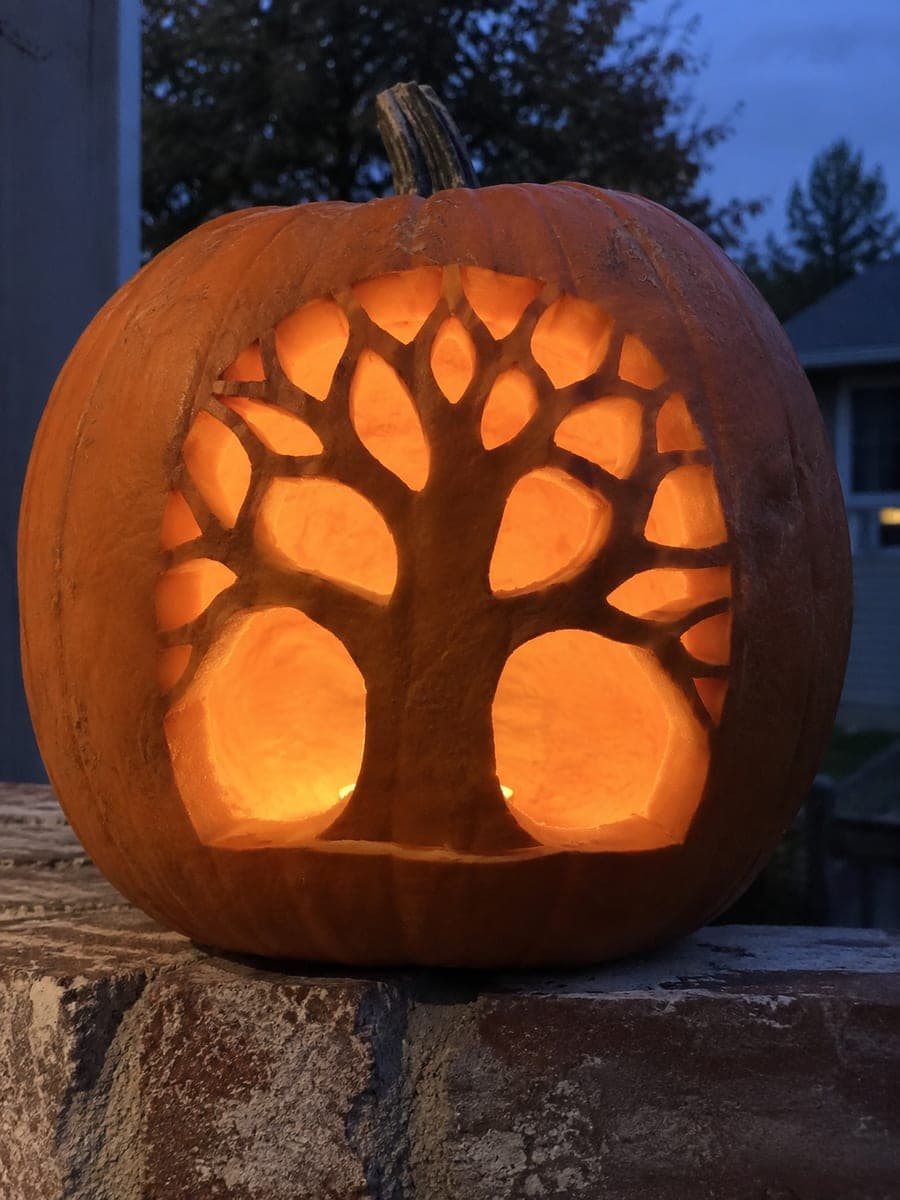
Arched Window Bare Tree PumpkinAI
0

Report this carving

Tell us what is wrong. Reports are private.

Arched Window Bare Tree Pumpkin

A retained broad bare tree with its trunk rooted at the base and stout branches joining both side rims and the top arch creates a dramatic window composition on this hard tree pumpkin carving, shown on a worn brick wall at blue hour. Establish all branch-to-rim connections before cutting any sky holes between branches, as those connections are what hold the retained tree in place. Round sky apertures should be cut last, working from the top of the arch downward. The brick wall setting at blue hour creates a moody contrast between the orange pumpkin and the cool ambient light.

No ratings yet · Sign in to rate
HardFall & SeasonalArtisticClassic Cutout
treeseasonalartisticarched-windowsky-holebare-treebrick-wallwindow

Save this design for carving night, then share a photo of your own jack-o'-lantern once it's glowing.

Comments (0)

  • No comments yet. Be the first.

Our tips for carving a similar design

The tree itself is retained uncut, supported by its trunk at the base and stout branches that bridge to both side rims and the top arch. The sky between the branches is removed as individual rounded apertures. Every branch-to-rim connection must be established before any sky holes are cut, since those connections are the sole structural support for the entire retained tree.

From pumpkin to porch

  1. Establish all branch-to-rim connections on paper

    Draw the arch, the trunk, and each branch line on paper and confirm every branch end touches the rim before the design is transferred. No branch should float freely inside the arch. Transfer the layout to the pumpkin with a grease pencil, marking each connection point clearly.

  2. Hollow to one-and-a-half inch walls

    Scoop to a consistent thick wall. The retained tree structure is wide and heavy relative to simpler designs, and the rim connections need substantial rind depth to hold that weight. Chill after hollowing.

  3. Trace your full template including arch outer edge

    Transfer the arch outline, trunk, branch lines, and sky hole positions. Double-trace every branch-to-rim connection so they are unmistakably clear when cutting begins.

  4. Cut the outer arch edge first

    Saw the outer boundary of the arched window opening along the top and sides. This defines the frame and makes the retained tree's lateral connections visible. Do not yet remove any sky holes between branches.

  5. Verify all six branch-to-rim bridges, then cut sky holes from top down

    Press each branch-to-rim connection firmly to confirm it is solid. Starting at the top of the arch, remove the topmost sky aperture first and work downward. This sequence prevents the upper portions of the retained tree from swinging inward once lower sky holes are opened.

  6. Light and display on brick wall

    Place a bright LED candle well back in the cavity and position the pumpkin against the brick wall. The blue-hour setting shows the warm orange glow against the cool brick tones beautifully. The retained tree projects its bare branch silhouette onto the wall behind.

Written with AI to match this design

Gather your supplies

Check things off as you get ready.

Work on a stable surface, keep your free hand out of the cutting path, and have an adult handle sharp tools.

Three levels of light

  • Leave intact

    The entire retained bare tree, including its trunk and all stout branches connecting to both side rims and the top arch, stays completely dark and uncut.

  • Peel & shade

    None. All light is from full through cuts.

  • Cut through

    All rounded sky apertures between the retained branches within the arched window are cut completely through.

Learn the carving basics

Before you start cutting

How thick do the branch-to-rim bridges need to be?

Each bridge should be at least one-and-a-half inches wide at the point where it meets the rim. The retained tree puts significant weight on these connections, especially after a few days when the rind begins to soften. Bridges narrower than an inch are at serious risk of snapping.

What if my arch comes out slightly uneven?

A slightly irregular arch actually reads as handmade and rustic, which suits the weathered brick wall setting. As long as the outer arch cut does not encroach on any branch-to-rim connection, minor asymmetry does not affect either the structure or the visual impact.

Can I add thin twigs to the retained tree?

Thin twigs are a structural risk on a carved pumpkin. A free-hanging twig of rind that is not connected at both ends will dry, curl, and snap within a day. If you want twig detail, use very short nubs no more than half an inch long that connect back into the main branch, rather than truly freehanging twig shapes.

Your take belongs here, too.

Changed a detail? Made it simpler? Share a photo of your version and tell the community what worked.

Share your pumpkin

Want more designs like this? Browse our full library of pumpkin carving ideas, or pick a free printable stencil. Every pattern and template in our own collection is free to print at home.

More pumpkins like this

You've reached the end · 8 pumpkins
The Patch Report

Fresh pumpkins, in your inbox.

The best new carvings, ideas worth stealing, and how-tos for carving season. Short, seasonal, and gone by November.

A short email during carving season. Unsubscribe anytime. See our privacy policy.