Halloween Pumpkin Carving Contest · Starts October 1st · $500 in prizes
← Back to ideas
@ai_concepts
Sep 25, 2026
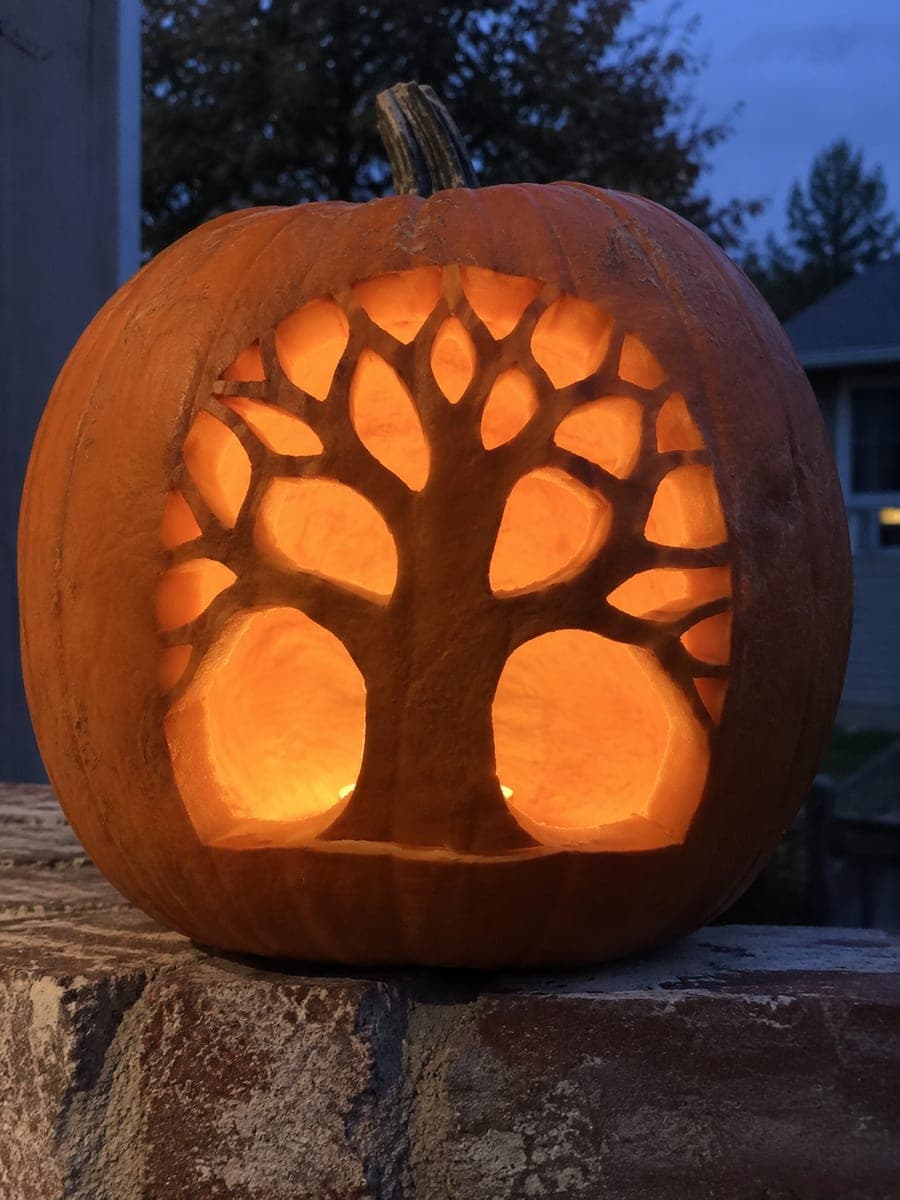
Oak Tree Pumpkin with Round Window FrameAI
0

Report this carving

Tell us what is wrong. Reports are private.

Oak Tree Pumpkin with Round Window Frame

A large retained oak tree inside a round cut-through window, with its thick trunk rooted into the bottom frame, stout limbs bridging six points around the arch, independent canopy sky apertures, and separate root apertures defines this expert tree pumpkin carving, placed on gravel near a garden shed at night. Map all six bridge connections to the frame before cutting anything, as these bridges are the sole structural support for the entire retained tree. Cut the round window frame first, then establish root and trunk, then canopy sky holes, working from structural to decorative throughout.

No ratings yet · Sign in to rate
Comments (0)

  • No comments yet — be the first.

Save without an account. Sign in to like or comment.

Our tips for carving a similar design

A large retained oak tree is anchored inside a round cut-through window by six wide bridge connections between the stout limbs and the circular frame. The thick trunk roots into the broad bottom of the frame, while canopy sky holes and short root apertures are all independent openings. Planning all six frame connections before any cutting is the single most important structural discipline in this design.

From pumpkin to porch

  1. Map all six bridge connections on paper

    Draw the full design to scale and trace a path from the tree through each of the six limb-to-frame bridges. Every bridge must connect the retained tree solidly to the circular frame. Verify minimum width of one-and-a-half inches at each bridge point. No bridge may narrow to less than that at any point along its length.

  2. Hollow to maximum available thickness

    Scoop to a two-inch wall and chill the pumpkin for several hours. A retained oak tree inside a full round window is one of the heaviest structural loads this style of carving produces. Every available millimeter of wall thickness contributes to structural integrity.

  3. Cut the round window frame first

    Score the full circle outline with a stylus before sawing. Cut the circular frame as one smooth continuous pass, turning the pumpkin rather than the blade when possible. A clean, even circle makes all subsequent bridge connection points easier to identify and cut to.

  4. Establish root and trunk outline cuts

    Outline the trunk and root zone without removing material between the root apertures yet. Cutting along the outer edges of the trunk and root ribs establishes the tree's base geometry. Test each root rib attachment to the bottom frame before continuing.

  5. Add canopy sky apertures between branches

    With the frame, trunk, and root structure confirmed, cut the canopy sky holes from the top of the frame downward, one at a time. After each sky hole, test all six bridge connections. If any bridge feels soft, do not cut the adjacent sky hole until the structure is assessed.

  6. Punch root apertures and add final lighting

    Cut the short root apertures last, leaving broad root ribs between each one. Place a bright LED candle at the center of the cavity so light reaches the full circular frame edge. Display on gravel near a garden shed after full dark for maximum visual impact.

Written with AI to match this design

Gather your supplies

Check things off as you get ready.

Work on a stable surface, keep your free hand out of the cutting path, and have an adult handle sharp tools.

Three levels of light

  • Leave intact

    The entire retained oak tree, including trunk, all stout limbs, and all root ribs, stays completely dark and uncut inside the glowing round frame.

  • Peel & shade

    None. All visual information is carried by full cutouts.

  • Cut through

    The round window frame ring, all canopy sky apertures between branches, and all short root apertures between root ribs are cut completely through.

Learn the carving basics

Before you start cutting

What is the safest way to cut a perfect circle for the window frame?

Score the circle outline completely with a stylus before picking up the saw. Make a loop of tape at the center of the planned circle and pin a compass to it, then use the compass to draw the outline if freehand looks uneven. Saw along the scored groove using short strokes, rotating the pumpkin by hand to keep the blade on the curve.

How do I handle the weight of the retained tree after the sky apertures are opened?

As sky apertures are removed, the retained tree transfers more of its weight to the remaining bridges. Support the tree from inside the cavity with a gloved hand while cutting the final one or two sky apertures. This prevents the tree from deflecting inward as the last material is removed.

Is this design suitable for display indoors?

Yes. Indoors on a gravel tray or dark surface, with an LED candle inside, the round frame creates a lantern effect that is stunning on a table or mantelpiece. Keep it away from heat sources like fireplaces or radiators, which accelerate the softening of the rind bridges.

Your take belongs here, too.

Changed a detail? Made it simpler? Share a photo of your version and tell the community what worked.

Share your pumpkin

More pumpkins like this

You've reached the end · 8 pumpkins
The Patch Report

Fresh pumpkins, in your inbox.

The best new carvings, ideas worth stealing, and how-tos for carving season. Short, seasonal, and gone by November.

A short email during carving season. Unsubscribe anytime. See our privacy policy.