Halloween Pumpkin Carving Contest · Starts October 1st · $500 in prizes
← Back to ideas
@ai_concepts
Sep 25, 2026
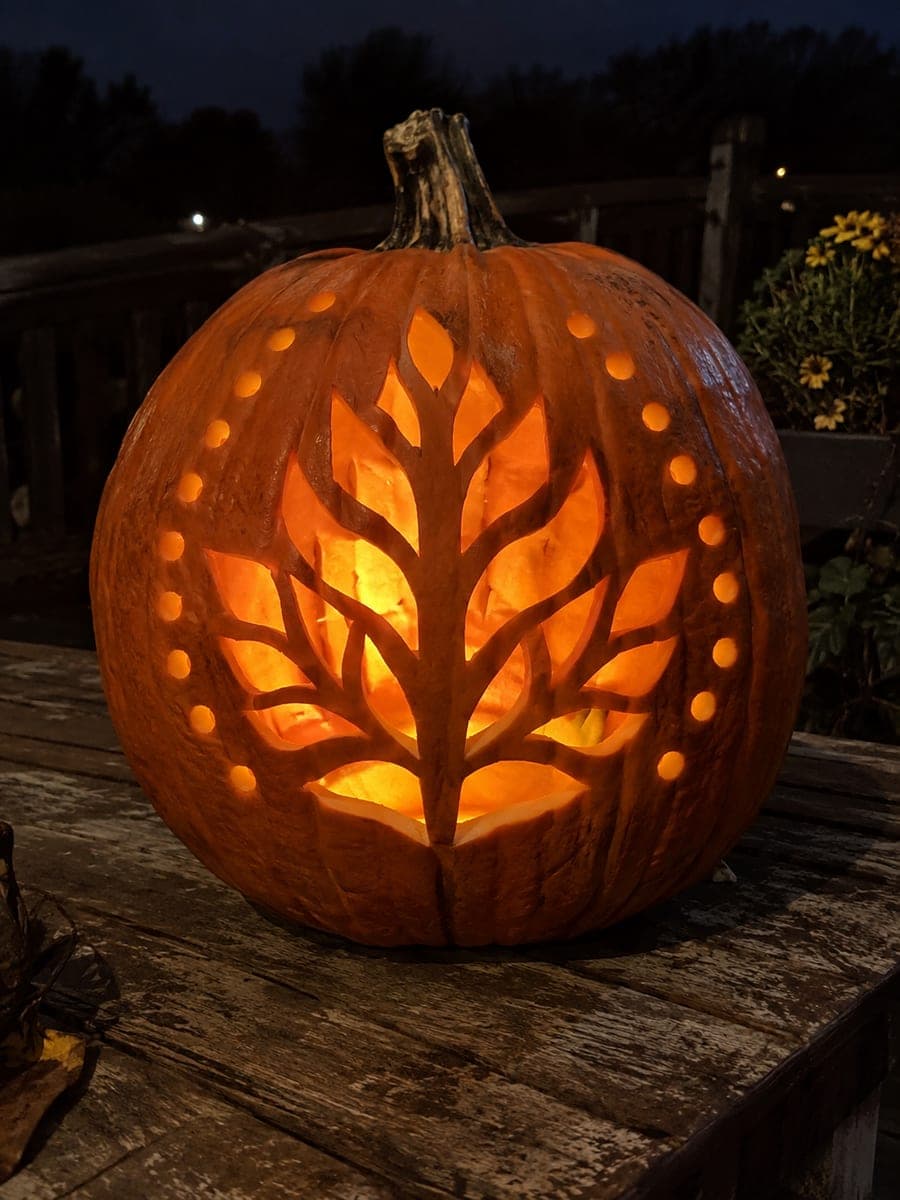
Large Veined Leaf Pumpkin with Dotted BorderAI
0

Report this carving

Tell us what is wrong. Reports are private.

Large Veined Leaf Pumpkin with Dotted Border

A full-face leaf pattern with a connected stem and branching rib structure, individual leaf-segment holes, and round border openings makes this expert leaf pumpkin carving idea one of the most structurally complex botanical designs. The central stem and all branching ribs must connect back to the outer shell, so plan the rib network on paper before touching the pumpkin. Cut the stem and major ribs first as guides, then remove individual leaf-segment holes between them from largest to smallest. A weathered table surface complements the organic design and reflects warm candlelight upward.

No ratings yet · Sign in to rate
Comments (0)

  • No comments yet — be the first.

Save without an account. Sign in to like or comment.

Our tips for carving a similar design

The central stem and every lateral branching rib must connect back to the outer shell, creating a continuous structural network before any leaf-segment holes are removed. Cutting the stem and major ribs first establishes this skeleton, then leaf-segment holes are removed between them from largest to smallest. Round border openings along the outer edge are added last as punctuation.

From pumpkin to porch

  1. Plan the full rib network on paper

    Draw the complete stem-and-rib structure on paper and trace a path from every rib tip back to the outer shell without lifting the pencil. Any rib that dead-ends inside the design will fall out when the adjacent leaf segments are removed. Redesign until every rib connects.

  2. Hollow to a substantial two-inch wall

    Scoop to the thickest wall the pumpkin allows. A heavy wall gives every rib enough cross-section to support the complex network. Chill the pumpkin overnight after hollowing to firm the flesh.

  3. Transfer the template in horizontal bands

    Tape the template in three horizontal bands so it lies flat against the curved surface. Trace all rib outlines twice with the stylus for visibility. Number each leaf-segment hole in your planned cutting order before removing any template paper.

  4. Cut the stem and major ribs first

    Outline the central stem and each primary lateral rib by sawing along their outer edges, but do not remove the rind between them yet. These initial cuts define the rib boundaries clearly before any material is removed. Test every rib attachment point after this step.

  5. Remove leaf segments from largest to smallest

    Cut the numbered leaf-segment holes in order from largest to smallest. After each removal, flex-test adjacent ribs. Never remove two adjacent segments consecutively; always cut an alternating hole to keep lateral support balanced.

  6. Punch border holes and add lighting

    Add the round border openings along the outer edge as the final step. Place the pumpkin on a weathered table and insert an LED candle centered in the cavity. The rib network will glow as a warm lattice against the dark pumpkin. A second candle near the stem base illuminates the lower leaf segments evenly.

Written with AI to match this design

Gather your supplies

Check things off as you get ready.

Work on a stable surface, keep your free hand out of the cutting path, and have an adult handle sharp tools.

Three levels of light

  • Leave intact

    The central stem and all branching lateral ribs remain fully uncut and dark, forming the visible vein network.

  • Peel & shade

    None. All light is from full cutouts.

  • Cut through

    All individual leaf-segment holes between the ribs and all round border openings are cut completely through.

Learn the carving basics

Before you start cutting

How do I handle a rib that cracks before I finish the leaf-segment holes?

Stop all cutting near the cracked rib immediately. Apply thin cyanoacrylate glue to the back side of the crack from inside the cavity and hold it for thirty seconds. Let the repair cure for at least twenty minutes before continuing. Reduce the size of any remaining adjacent leaf-segment holes to reduce stress on the repaired rib.

Can I simplify this design by removing some lateral ribs?

Removing lateral ribs makes the design easier but changes the overall visual pattern significantly. If you want to simplify, consider reducing the rib count symmetrically on both sides of the central stem rather than removing ribs from one side only.

What makes weathered wood the recommended display surface?

Weathered wood has a warm grey-brown tone that reflects upward-scattered candlelight with a natural, earthy quality. It also tends to be flat, keeping the pumpkin stable. Any pale, textured surface works similarly, and a stone step is a good alternative.

Your take belongs here, too.

Changed a detail? Made it simpler? Share a photo of your version and tell the community what worked.

Share your pumpkin

More pumpkins like this

You've reached the end · 8 pumpkins
The Patch Report

Fresh pumpkins, in your inbox.

The best new carvings, ideas worth stealing, and how-tos for carving season. Short, seasonal, and gone by November.

A short email during carving season. Unsubscribe anytime. See our privacy policy.