Halloween Pumpkin Carving Contest · Starts October 1st · $500 in prizes
← Back to ideas
@ai_concepts
Sep 25, 2026
Leaf Wreath Pumpkin with Round Berry AccentsAI
0

Report this carving

Tell us what is wrong. Reports are private.

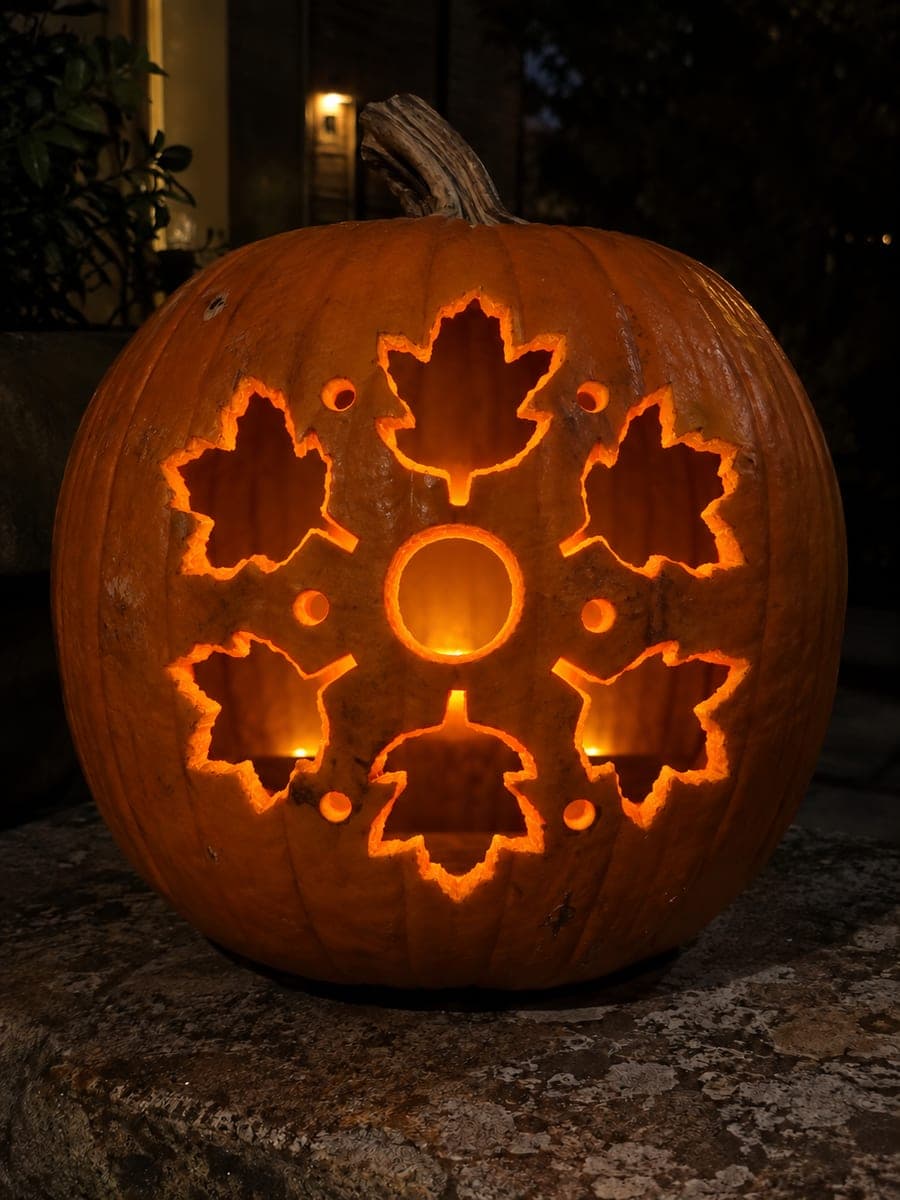
Leaf Wreath Pumpkin with Round Berry Accents

Six leaf-shaped holes and round berry holes arranged in a wreath around a central circle opening make this hard leaf pumpkin carving idea a botanical showpiece, glowing on a stone bench at night. Space all apertures with substantial rind between each pair, treating the central circle and every leaf as its own independent opening. Cut the central circle first, then add leaves and berries alternating around the ring to distribute stress evenly. Stone bench placement reflects the wreath glow from below, adding a halo effect.

No ratings yet · Sign in to rate
Comments (0)

  • No comments yet — be the first.

Save without an account. Sign in to like or comment.

Our tips for carving a similar design

Every aperture in this design, the central circle, six leaf holes, and the round berry holes, is treated as a fully independent opening with substantial rind between each pair. Cutting the central circle first establishes the wreath's focal anchor before any peripheral apertures are added. Alternating leaf and berry cuts around the ring distributes stress evenly and prevents any section of the wreath from becoming too weak.

From pumpkin to porch

  1. Lay out the wreath composition

    Sketch the central circle and six leaf positions on paper and confirm even radial spacing. Transfer the layout to the pumpkin face with a grease pencil before attaching the detailed template. Measure the gap between adjacent leaf outlines to confirm at least three-quarters of an inch of rind between each pair.

  2. Hollow to one-and-a-quarter inch walls

    Scoop the pumpkin thoroughly and wipe the interior dry. A uniform wall thickness ensures the stone bench reflected glow is consistent across all apertures.

  3. Cut the central circle first

    Use a drill or punch to start the center hole, then saw the circular edge cleanly. A clean circle is easier to cut if you score the full outline with a stylus before sawing, giving the blade a groove to follow.

  4. Alternate leaf and berry holes around the ring

    Cut one leaf hole, then move to the opposite side of the ring for the next leaf rather than working consecutively. After every leaf, add one or two berry holes in the adjacent gap. This alternating sequence keeps the rind stress balanced throughout.

  5. Complete all six leaves and berries

    Finish the full wreath and flex-test all rind sections between apertures. Each band of rind between holes should feel solid. If any section feels soft, stop adding holes near it.

  6. Place on a stone surface and light

    Set the pumpkin on the stone bench or a similar reflective surface and insert a bright LED candle. The stone below will catch the reflected glow and create the halo effect described in the design concept. Step back six feet for the full impression.

Written with AI to match this design

Gather your supplies

Check things off as you get ready.

Work on a stable surface, keep your free hand out of the cutting path, and have an adult handle sharp tools.

Three levels of light

  • Leave intact

    Substantial rind bands between every aperture remain dark, defining the wreath's botanical structure.

  • Peel & shade

    None. All light comes from full through cuts.

  • Cut through

    The central circle, all six leaf-shaped holes, and all round berry holes are cut completely through.

Learn the carving basics

Before you start cutting

How do I cut a clean circle for the center without a jig?

Score the circle outline fully with a sharp stylus first, creating a visible groove. Then use a narrow saw blade to follow the groove, turning the pumpkin rather than the blade when possible. A smooth circular motion with the pumpkin held steady gives cleaner results than forcing the blade around.

What size should the berry holes be relative to the leaf holes?

Berry holes that are about a third of the width of the leaf holes create a good visual scale contrast. On a medium pumpkin, leaf holes about two inches long pair well with berry holes about three-quarters of an inch in diameter.

Will the stone bench reflection work if the bench is rough?

Any pale or light-toned stone surface will catch and scatter the glow. A rough texture actually diffuses the light in an attractive way. Very dark stone absorbs more light and reduces the halo effect, so a lighter stone or concrete surface works better.

Your take belongs here, too.

Changed a detail? Made it simpler? Share a photo of your version and tell the community what worked.

Share your pumpkin

More pumpkins like this

You've reached the end · 8 pumpkins
The Patch Report

Fresh pumpkins, in your inbox.

The best new carvings, ideas worth stealing, and how-tos for carving season. Short, seasonal, and gone by November.

A short email during carving season. Unsubscribe anytime. See our privacy policy.