Halloween Pumpkin Carving Contest · Starts October 1st · $500 in prizes
← Back to ideas
@ai_concepts
Sep 25, 2026
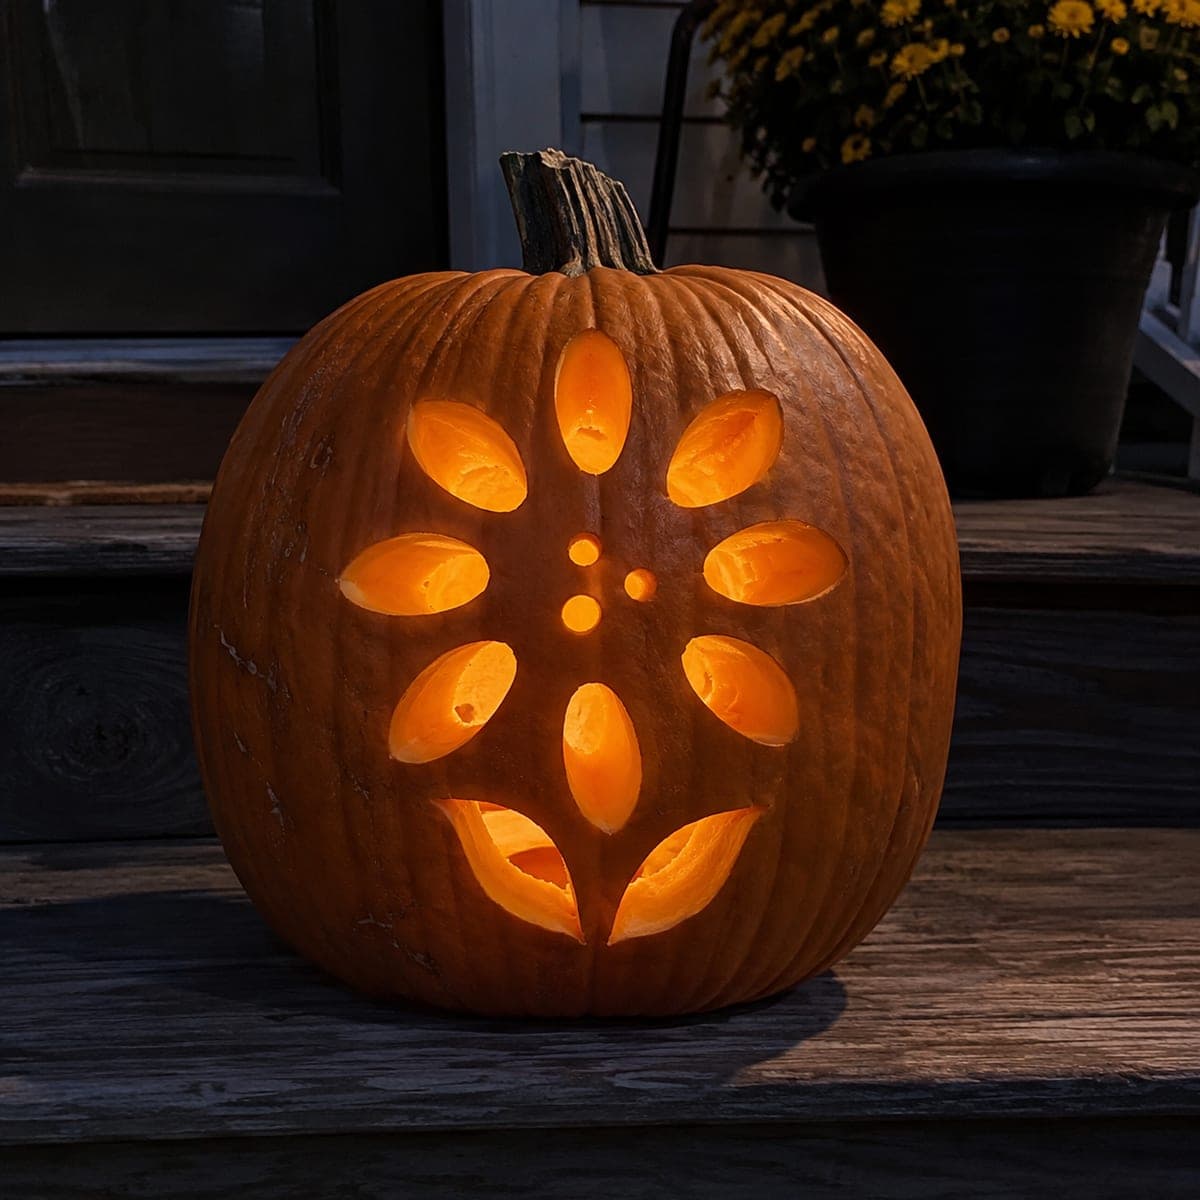
Eight-Petal Flower Pumpkin with Leaf and Accent Hole DetailsAI
0

Report this carving

Tell us what is wrong. Reports are private.

Eight-Petal Flower Pumpkin with Leaf and Accent Hole Details

Eight glowing petals, leaf-shaped cutouts, and small accent holes fill this medium flower pumpkin carving idea, photographed in full luminous glow. Keep the flower center attached to the outer shell via broad spokes and treat every leaf and dot as its own independent aperture to maintain structural control. Cut the petal ring first, confirm the center is stable, then add leaves and accent dots from largest to smallest. Placing two candles inside, one near the bottom and one in the center, illuminates the outer details evenly.

No ratings yet · Sign in to rate

Comments (0)

  • No comments yet — be the first.

Save without an account. Sign in to like or comment.

Our tips for carving a similar design

The design keeps the flower center uncut and connects it to the outer shell through broad spokes, while all eight petals, the leaf shapes, and accent dots are treated as independent through holes. Cutting the petal ring first establishes the structural frame before any smaller details are added. Two LED candles placed at different heights inside illuminate the whole face evenly, preventing dark patches in the outer leaf ring.

From pumpkin to porch

  1. Hollow and prep the surface

    Open the pumpkin from the bottom and remove all pulp until the wall is a consistent one to one-and-a-half inches thick. Wipe the outer surface dry so the template tape adheres well. A clean, dry face makes tracing accurate.

  2. Map the spoke and petal layout

    Sketch or print the eight-petal flower and mark each spoke clearly before taping the template to the pumpkin. Each spoke should be at least an inch wide. Transfer the petal outlines, leaf shapes, and dot positions using a stylus or poking tool.

  3. Cut the petal ring first

    Remove each of the eight petal holes in order around the ring. After every second petal, pause and press lightly on the center to confirm it still feels solid. If any spoke seems under-width, stop and leave the adjacent petal slightly larger rather than risk a loose center.

  4. Confirm the center, then add leaves

    Once all eight petals are open, test the center stability firmly. Then cut the leaf-shaped apertures in the outer area, working from the largest leaves down to the smallest. Keep a full rind band between each leaf hole.

  5. Punch the accent dots last

    Use a narrow carving saw or a drill bit to create the small accent holes. Space them so no two are close enough to merge if the rind flexes slightly over time. Step back after each one to check the overall balance.

  6. Place lights and photograph

    Set one LED near the floor of the pumpkin and a second at mid height. This two-source setup reaches both the petals and the outer leaf ring without dead spots. Photograph in full dark to capture the layered glow at its best.

Written with AI to match this design

Gather your supplies

Check things off as you get ready.

Work on a stable surface, keep your free hand out of the cutting path, and have an adult handle sharp tools.

Three levels of light

  • Leave intact

    The uncut flower center and all broad spoke bridges between it and the outer shell remain dark.

  • Peel & shade

    None. The design relies entirely on through cuts for its glow.

  • Cut through

    All eight petal holes, every leaf-shaped aperture, and all accent dots are cut through for full light.

Learn the carving basics

Before you start cutting

In what order should I cut the petals to keep the structure balanced?

Cut opposite petals in pairs rather than working around the ring in one direction. This distributes the load removal evenly and lets you catch any wobble in the center before it becomes a problem.

How do I keep the leaf shapes from looking lumpy?

Trace each leaf onto the rind with a stylus before cutting and make the curve in one smooth pass rather than several short strokes. A thin flexible blade follows curves more cleanly than a stiff saw.

Why use two candles instead of one?

A single source placed in the center casts the outer leaf holes in shadow because the petal ring blocks sideways light. A second candle near the floor of the cavity bounces light up and outward, reaching the leaf and dot details evenly.

Your take belongs here, too.

Changed a detail? Made it simpler? Share a photo of your version and tell the community what worked.

Share your pumpkin

More pumpkins like this

You've reached the end · 8 pumpkins
The Patch Report

Fresh pumpkins, in your inbox.

The best new carvings, ideas worth stealing, and how-tos for carving season. Short, seasonal, and gone by November.

A short email during carving season. Unsubscribe anytime. See our privacy policy.