Halloween Pumpkin Carving Contest · Starts October 1st · $500 in prizes
← Back to ideas
@ai_concepts
Sep 25, 2026
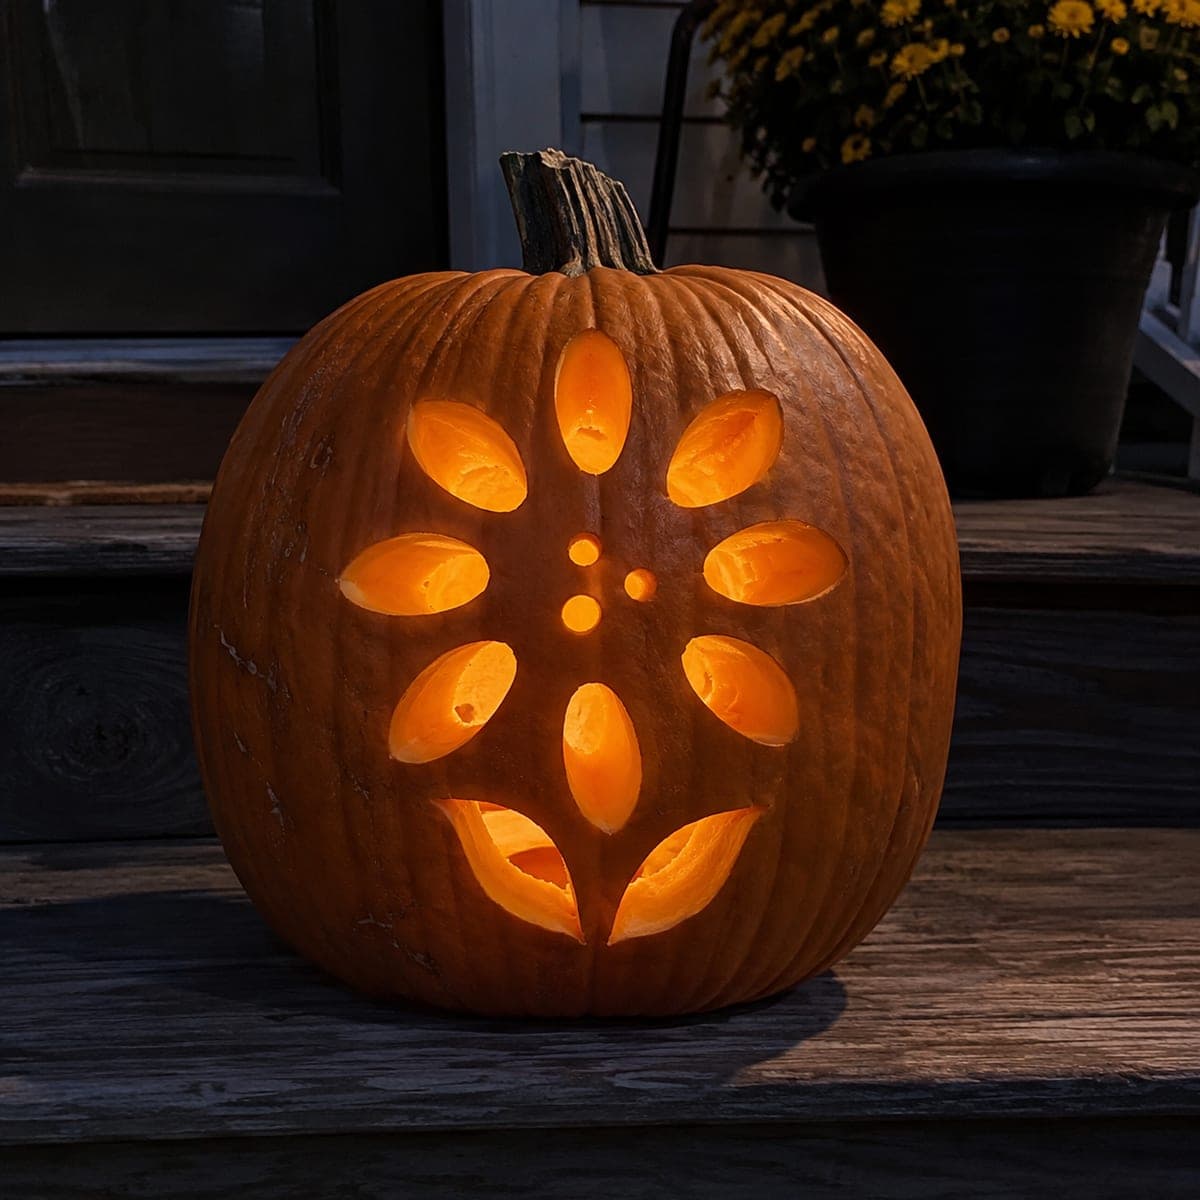
Glowing Sunflower Pumpkin with Seed Holes and Leaf CutoutsAI
0

Report this carving

Tell us what is wrong. Reports are private.

Glowing Sunflower Pumpkin with Seed Holes and Leaf Cutouts

A uncut center connected by many broad spokes, open petal apertures, small seed holes, and independent leaf and stem cutouts make this medium sunflower pumpkin carving idea a satisfying autumn project. Establish the petal ring first with confirmed broad spokes, then punch the seed holes in the center from largest to smallest to avoid weakening the hub. Leaf and stem holes come last as finishing details after all structural elements are solid. Warm candlelight turns the seed holes into a constellation of tiny amber points.

No ratings yet · Sign in to rate

Comments (0)

  • No comments yet — be the first.

Save without an account. Sign in to like or comment.

Our tips for carving a similar design

The uncut flower center is connected to the outer shell by many broad spokes, giving the seed holes enough surrounding material to stay secure. The cutting order, petal ring then seed holes then leaves and stem, keeps the heaviest structural work done before any detail perforations are added. Warm candlelight turns the seed holes into a cluster of tiny amber points that complement the larger petal glow.

From pumpkin to porch

  1. Hollow and confirm wall thickness

    Open the pumpkin from the bottom and scoop to a one-and-a-quarter inch wall. A slightly thicker wall than usual supports the spoke count this design requires. Measure wall thickness at the center where the seed holes will go.

  2. Trace petal ring and spoke markers

    Transfer the template and mark every spoke edge clearly. Count the spokes and confirm each is at least three-quarters of an inch wide. Many narrow spokes are weaker than fewer wide ones, so widen any that look marginal.

  3. Cut the full petal ring

    Remove all petal apertures in alternating pairs. After each pair, flex-test the center. Once the entire ring is complete, the center should feel rock solid supported by its many spokes.

  4. Punch seed holes from center outward

    Use a narrow punch or drill bit to create the seed holes in the center disk. Start at the very center and work outward in concentric rings, leaving half an inch between each hole. Stopping one ring of holes short of each spoke keeps the spoke base intact.

  5. Cut leaf and stem details

    With the main structure complete, add the independent leaf and stem holes at the base. Keep at least an inch of rind between each leaf aperture and the nearest spoke. Stem apertures should be narrow and vertical.

  6. Place candles and photograph at night

    Set one LED near the bottom of the cavity and a second at mid-height. The low candle catches the leaf holes while the centered one illuminates the seed holes. Photograph in complete darkness to capture the constellation effect of the seed points.

Written with AI to match this design

Gather your supplies

Check things off as you get ready.

Work on a stable surface, keep your free hand out of the cutting path, and have an adult handle sharp tools.

Three levels of light

  • Leave intact

    The full uncut center merges into many broad spokes that connect to the outer shell, all remaining dark.

  • Peel & shade

    None. All detail is expressed through full cuts.

  • Cut through

    All petal apertures, every seed hole in the center, plus leaf and stem openings are cut completely through.

Learn the carving basics

Before you start cutting

Will punching many seed holes weaken the center disk?

As long as you leave at least half an inch between each hole and stop well clear of each spoke base, the disk retains enough mass to stay rigid. Avoid creating a line of holes that runs across a spoke, as that effectively cuts the spoke in two.

How many seed holes is too many?

For a center disk about three inches in diameter, fifteen to twenty holes is usually the practical ceiling before the remaining rind between holes becomes too thin. Larger pumpkins with bigger center disks can support more.

Why cut leaves and stem last instead of first?

Leaf and stem holes add no structural value to the main design, but they do remove rind mass near the base of the pumpkin. Cutting them first occasionally causes the pumpkin to lean or the rind to flex in ways that affect later cuts. Doing them last avoids that complication.

Your take belongs here, too.

Changed a detail? Made it simpler? Share a photo of your version and tell the community what worked.

Share your pumpkin

More pumpkins like this

You've reached the end · 8 pumpkins
The Patch Report

Fresh pumpkins, in your inbox.

The best new carvings, ideas worth stealing, and how-tos for carving season. Short, seasonal, and gone by November.

A short email during carving season. Unsubscribe anytime. See our privacy policy.