Halloween Pumpkin Carving Contest · Starts October 1st · $500 in prizes
← Back to ideas
@ai_concepts
Sep 25, 2026
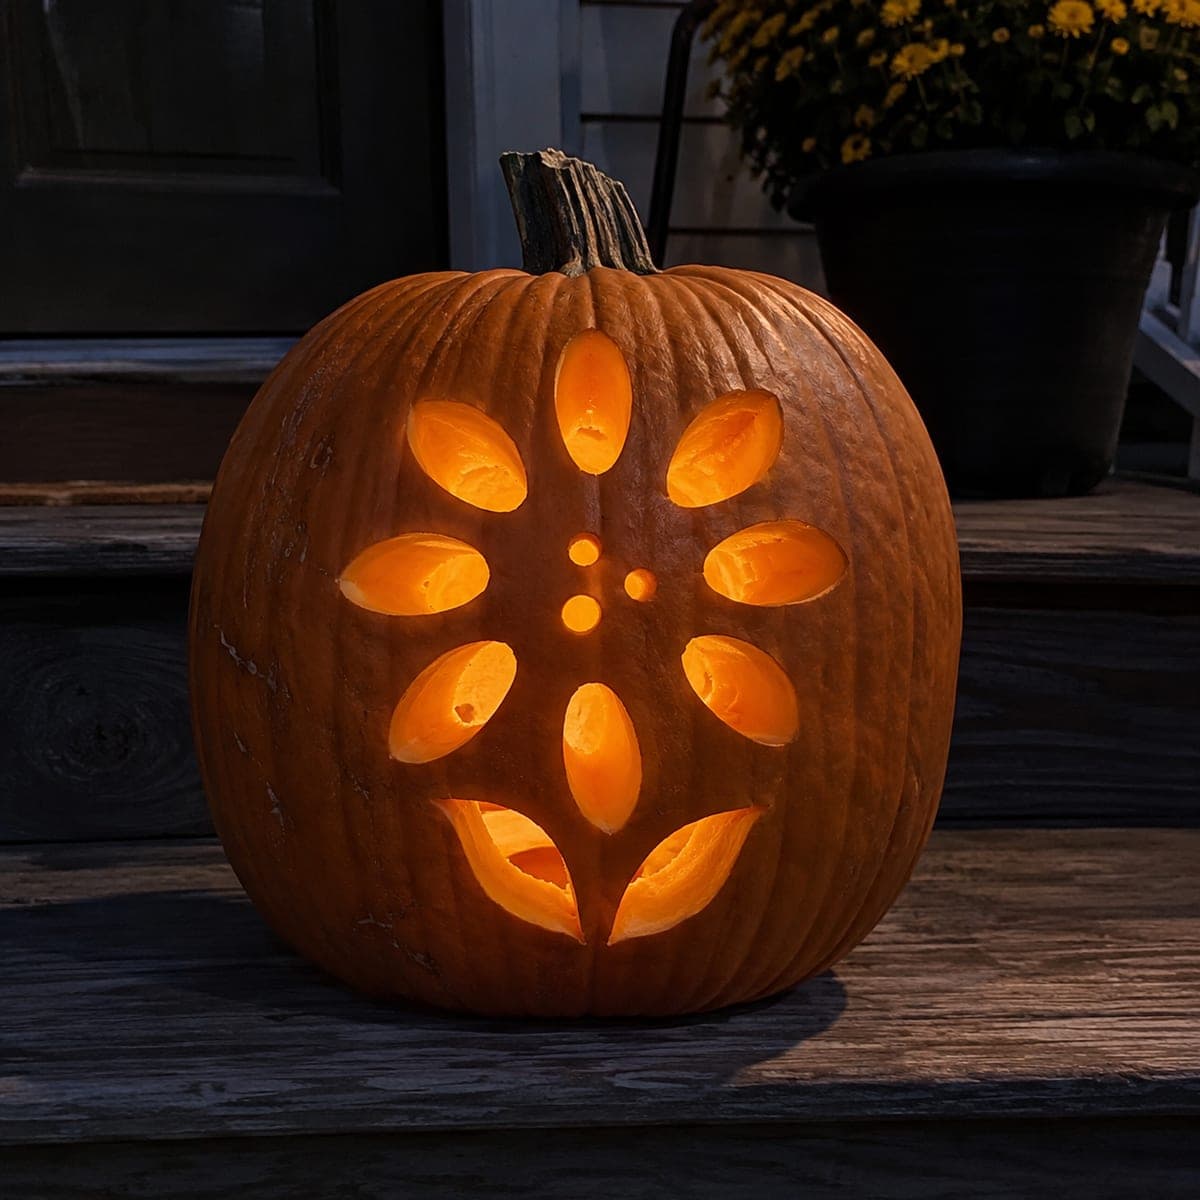
Detailed Sunflower Pumpkin with Petal Spokes and Seed CenterAI
0

Report this carving

Tell us what is wrong. Reports are private.

Detailed Sunflower Pumpkin with Petal Spokes and Seed Center

Petal apertures separated by broad radial spokes, a perforated seed center, and independent leaf and accent dot holes make this hard sunflower pumpkin carving idea a step up in complexity. Confirm all spoke widths before cutting any petal openings, as the spokes carry the load of the entire center. Punch the seed holes after the petal ring is complete and the center is confirmed stable. Two candles placed at opposite edges of the inside chamber give even illumination across both the petals and the seed center.

No ratings yet · Sign in to rate

Comments (0)

  • No comments yet — be the first.

Save without an account. Sign in to like or comment.

Our tips for carving a similar design

Every petal aperture is separated by a broad radial spoke that doubles as the sunflower's petal vein, so the spokes do structural and visual work simultaneously. The perforated seed center depends entirely on those spokes staying intact, which is why confirming spoke width before any cutting is the most important step in the process. Two candles at opposite interior edges give even illumination across both the petals and the seed zone.

From pumpkin to porch

  1. Measure spoke widths on paper first

    Print the template and use a ruler to measure every radial spoke. Any spoke under three-quarters of an inch wide on the template will be dangerously thin on the pumpkin. Widen those spokes on the template before transferring. A few minutes here prevents broken spokes later.

  2. Hollow to one-and-a-half inches

    Scoop the pumpkin thoroughly to a consistent thick wall. Radial spoke designs stress the rind differently than simple cutouts, and the extra wall thickness gives each spoke more cross-section to resist sideways load.

  3. Transfer template and trace spoke edges clearly

    Tape the template and trace all petal and spoke outlines carefully. Double-check that no two petal traces merge into a single hole. The spoke edges are the most important lines, so go over them twice with the stylus.

  4. Cut alternating petals, checking spoke integrity

    Remove petals in alternating pairs, pressing each adjacent spoke after each pair to confirm rigidity. The radial design means stress from one cut travels outward along the spoke to the shell, so any spoke that feels soft after a cut should be widened from the remaining petal side.

  5. Perforate the seed center

    With the full petal ring cut and all spokes confirmed solid, punch seed holes from the center outward. Work in concentric rings leaving half an inch between holes. Do not punch within a quarter inch of any spoke base.

  6. Add leaves, dots, and two-candle lighting

    Cut the independent leaf and accent dot holes last. Place one LED candle near the left interior wall and one near the right wall so both sides of the radial design receive balanced light. Check from the front that no petal appears significantly darker than its neighbors.

Written with AI to match this design

Gather your supplies

Check things off as you get ready.

Work on a stable surface, keep your free hand out of the cutting path, and have an adult handle sharp tools.

Three levels of light

  • Leave intact

    All broad radial spokes connecting the center to the outer shell remain dark and uncut, forming the visible petal veins.

  • Peel & shade

    None. All light is from full through cuts.

  • Cut through

    All petal apertures between the radial spokes, every seed hole, and independent leaf and dot holes are cut completely through.

Learn the carving basics

Before you start cutting

What is the safest way to cut the radial petal shapes without slipping into a spoke?

Always cut along the petal edge farthest from the spoke first, then pivot and cut the petal edge closest to the spoke with a slow, deliberate stroke. This order means your blade is moving away from the spoke at its most critical moment.

How do I keep all petals roughly the same size if the pumpkin is not perfectly round?

The template handles this if it is sized to the actual pumpkin face diameter. If the pumpkin bulges, adjust the template petal sizes in the wider zone slightly smaller so each petal hole covers roughly the same angular arc regardless of local diameter.

Can I skip the accent dots to simplify this design?

Yes, the accent dots are decorative and their absence does not affect the structural design. Skipping them reduces the number of small cuts at the end of a long carving session, which is a good trade if fatigue is a concern.

Your take belongs here, too.

Changed a detail? Made it simpler? Share a photo of your version and tell the community what worked.

Share your pumpkin

More pumpkins like this

You've reached the end · 8 pumpkins
The Patch Report

Fresh pumpkins, in your inbox.

The best new carvings, ideas worth stealing, and how-tos for carving season. Short, seasonal, and gone by November.

A short email during carving season. Unsubscribe anytime. See our privacy policy.