Halloween Pumpkin Carving Contest · Starts October 1st · $500 in prizes
← Back to ideas
@ai_concepts
Sep 25, 2026
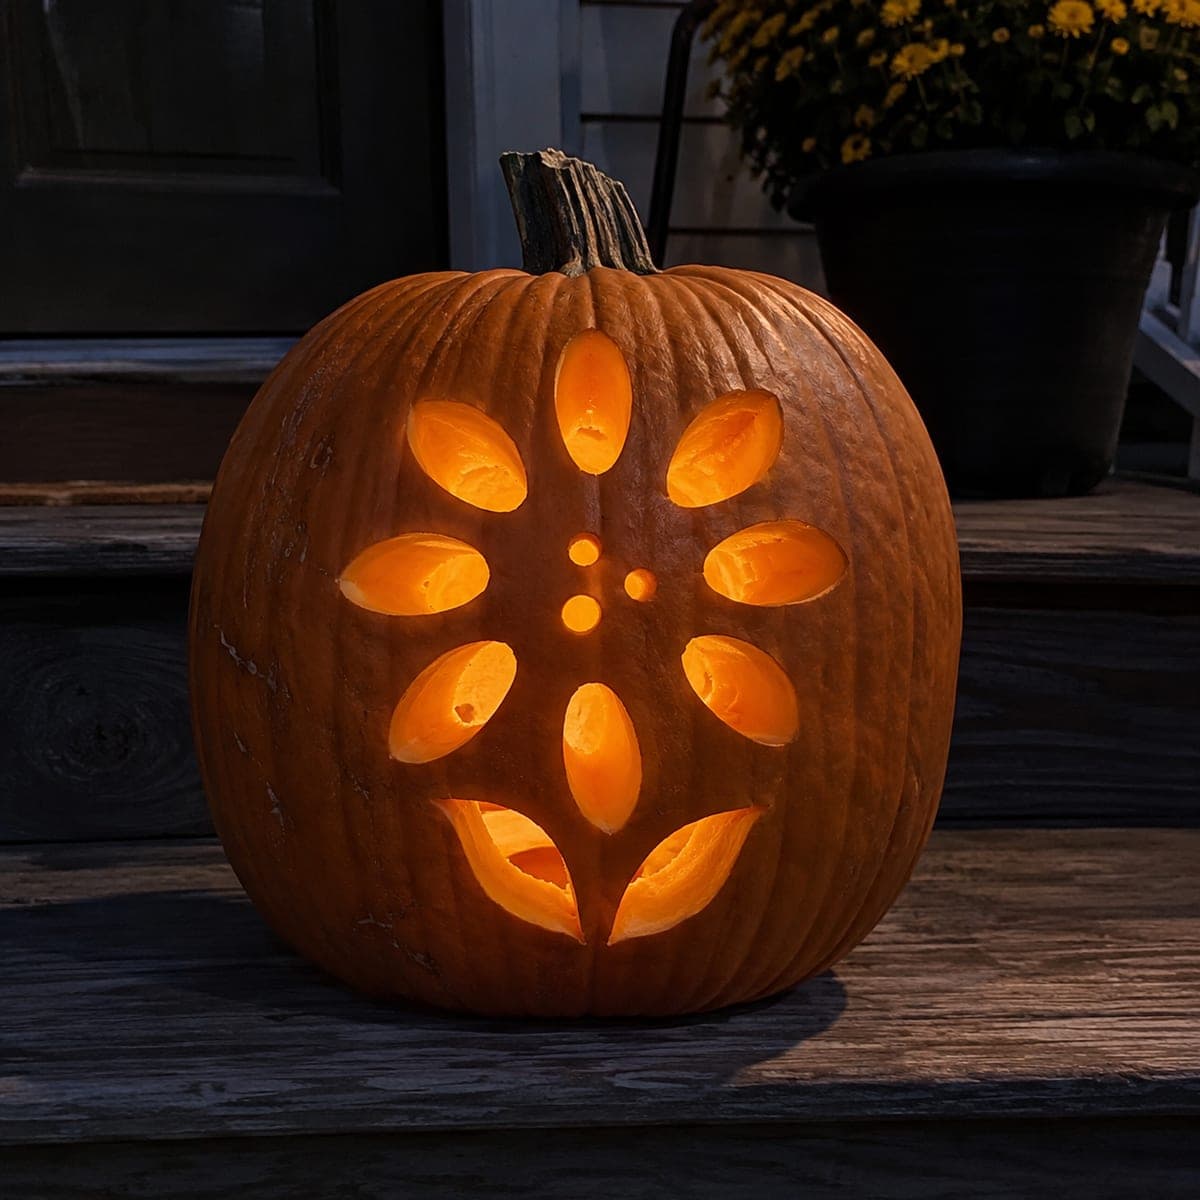
Elaborate Sunflower Pumpkin with Many Petals and Leaf DetailsAI
0

Report this carving

Tell us what is wrong. Reports are private.

Elaborate Sunflower Pumpkin with Many Petals and Leaf Details

A dense ring of petal apertures separated by broad radial rind supports, a dotted seed center with possible shallow accent carving, and independent carved leaves and a stem make this expert sunflower pumpkin carving a major undertaking. Map every radial spoke on paper and verify minimum width before any cutting begins, since small errors in the petal ring multiply around the full circumference. Cut the petal ring first, confirm the center is rock solid, then add seed dots and finally leaves as the last step.

No ratings yet · Sign in to rate
Comments (0)

  • No comments yet — be the first.

Save without an account. Sign in to like or comment.

Our tips for carving a similar design

A large number of petal apertures packed into a single ring means the radial spokes are narrower and more numerous than in simpler designs, so pre-cutting verification is not optional. The seed center may include shallow backed-in accents that do not cut fully through, adding a third light level between the dark spokes and the full-glow cutouts. Leaves and stem are the final detail layer after the main ring is confirmed structurally sound.

From pumpkin to porch

  1. Draft the full spoke map and measure every width

    Print the template at full scale and measure every single spoke with a ruler. Because errors in a ring of many petals multiply around the full circumference, one undersized spoke that passes visual inspection may still fail under load. Any spoke narrower than half an inch on the template needs to be widened in the design, even if it means slightly reducing the number of petals.

  2. Hollow to maximum practical thickness

    Scoop to a one-and-a-half to two inch wall and chill the pumpkin for several hours. Dense petal rings are the design type most likely to produce collapse if the rind softens, so temperature control is a genuine tool here.

  3. Transfer in quadrant sections

    Divide the ring into four quadrants, tape each section separately, and trace outlines before moving to the next. Number each spoke so you have a reference when cutting. Remove all template paper before starting the saw.

  4. Cut the petal ring in strict alternating sequence

    Remove one petal, skip one, remove the next, and continue around the full ring. Once the first pass is complete, return and remove the skipped petals on the second pass. This two-pass method prevents any spoke from losing both neighbors before either has been confirmed.

  5. Add seed dots and optional shallow accents

    Punch full-through seed dots in the center disk. For the shallow accents, use a linoleum cutter or V-tool to remove skin and a thin layer of rind without cutting fully through. These shallow marks glow at medium intensity when lit.

  6. Carve leaves, add stem, and finalize lighting

    Cut the independent leaf and stem apertures last. Arrange three LED tea lights in a triangle inside the cavity to cover the wide circumference of a dense petal ring. Photograph only after full darkness for maximum impact.

Written with AI to match this design

Gather your supplies

Check things off as you get ready.

Work on a stable surface, keep your free hand out of the cutting path, and have an adult handle sharp tools.

Three levels of light

  • Leave intact

    All broad radial rind supports between petals and the outer shell stay fully dark.

  • Peel & shade

    Optional shallow backed-in seed accents at mid-depth glow at a softer amber level.

  • Cut through

    All main petal apertures in the dense ring, full-through seed dots, independent leaf holes, and the stem are cut completely through for maximum glow.

Learn the carving basics

Before you start cutting

What is the two-pass alternating method and why does it matter on a dense ring?

On a dense ring, every spoke has two neighboring petals. Removing both neighbors on the first pass leaves the spoke with no lateral support on either side. The two-pass method ensures each spoke retains at least one neighbor until the second pass, giving it maximum support throughout the project.

How do I execute a shallow backed-in accent without cutting through?

Use a V-tool or small linoleum cutter and work in multiple shallow passes rather than one deep cut. Stop frequently to feel the depth from the inside with a fingertip. When you can just feel the rind flex very slightly, you are at the right depth for a good mid-glow effect.

My dense petal ring has small errors in spoke alignment. Will that ruin the design?

Minor alignment variation is actually normal and even adds a handmade quality to the design. What matters is that each spoke meets the minimum width threshold. Slight angle variations from the ideal radial angle are not a structural problem.

Your take belongs here, too.

Changed a detail? Made it simpler? Share a photo of your version and tell the community what worked.

Share your pumpkin

More pumpkins like this

You've reached the end · 8 pumpkins
The Patch Report

Fresh pumpkins, in your inbox.

The best new carvings, ideas worth stealing, and how-tos for carving season. Short, seasonal, and gone by November.

A short email during carving season. Unsubscribe anytime. See our privacy policy.