Halloween Pumpkin Carving Contest · Starts October 1st · $500 in prizes
← Back to ideas
@ai_concepts
Sep 25, 2026
Simple Six-Petal Daisy Pumpkin Carving with Solid CenterAI
0

Report this carving

Tell us what is wrong. Reports are private.

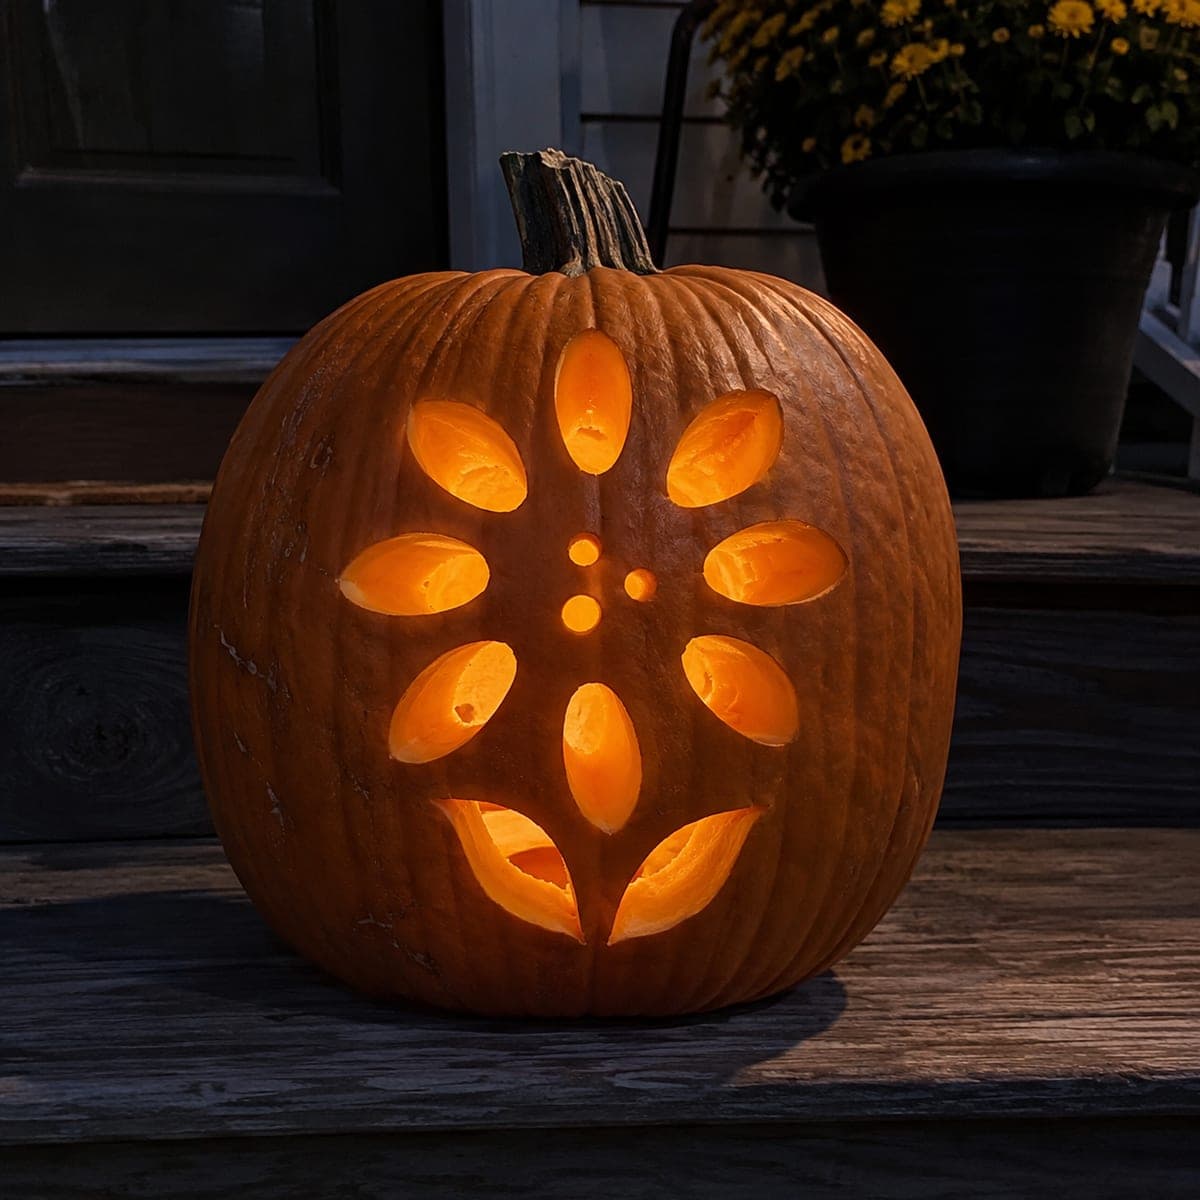
Simple Six-Petal Daisy Pumpkin Carving with Solid Center

Six glowing petal openings radiate around a solid supported center on this easy flower pumpkin carving idea, creating a clean daisy look that suits any porch. Each petal is its own separate hole, with wide spokes of rind connecting the center to the outer shell so it holds firmly throughout the season. This pumpkin carving idea is a great introduction to spoke-supported designs. A candle set slightly off-center casts the spoke shadows outward for a starburst effect.

No ratings yet · Sign in to rate
Comments (0)

  • No comments yet — be the first.

Save without an account. Sign in to like or comment.

Our tips for carving a similar design

This design removes six individual petal holes while leaving wide rind spokes that keep the solid center anchored firmly to the outer shell. The negative space of the open petals does all the visual work, reading as a bright daisy once a light source is placed inside. Positioning the LED slightly off-center pushes the spoke shadows outward, turning the back wall into a starburst projection.

From pumpkin to porch

  1. Prep and hollow out

    Cut a wide lid from the bottom or back of the pumpkin so you can reach inside easily. Scoop all pulp and seeds until the inner wall is about an inch thick throughout. A consistent wall thickness helps the spokes stay sturdy after cutting.

  2. Transfer the daisy template

    Print or sketch a six-petal daisy and tape it to the pumpkin face. Use a poking tool or stylus to trace the outline of each petal and the spoke lines onto the rind. Make sure each spoke is at least an inch wide before you commit to the layout.

  3. Score and cut one petal at a time

    Work around the ring cutting one petal hole fully before moving to the next. Use a small carving saw and keep cuts perpendicular to the surface. Removing one petal at a time lets you check that the adjacent spokes are still solid after each cut.

  4. Check center stability

    Once all six petals are removed, gently press the center disk with a finger. It should not flex or wobble. If any spoke feels thin, leave it intact rather than trimming it further, as the center will still read as solid from the front.

  5. Light and display

    Place a warm amber LED candle inside and shift it slightly off-center toward the back. Check from a few feet away to confirm the spoke shadows project outward as a starburst. Elevate the pumpkin slightly on a step or planter so viewers see the petals at eye level.

Written with AI to match this design

Gather your supplies

Check things off as you get ready.

Work on a stable surface, keep your free hand out of the cutting path, and have an adult handle sharp tools.

Three levels of light

  • Leave intact

    The solid center disk and all six wide rind spokes stay completely dark, forming the daisy's visual skeleton.

  • Peel & shade

    None. This design uses full cutouts only.

  • Cut through

    All six petal openings are cut through entirely for full warm glow.

Learn the carving basics

Before you start cutting

How wide should the spokes be to keep the center from drooping?

Aim for at least one inch of rind for each spoke. Narrower than that and the center can sag after a few days, especially in warm or humid conditions. If your pumpkin has a thinner wall, increase spoke width to compensate.

Will the petals look even if I freehand them?

Freehanding six evenly spaced petals is tricky. The easiest method is to fold a paper circle into sixths, cut the petal shape, unfold it, and use that as your template. Tape it flat to the pumpkin before tracing.

Can I use a real candle instead of an LED?

LED candles are the safer choice because they do not heat the rind or create a fire risk if the pumpkin tips. A real candle also shortens how long the carved pumpkin lasts by warming the flesh from inside. Stick with an LED for best results.

Your take belongs here, too.

Changed a detail? Made it simpler? Share a photo of your version and tell the community what worked.

Share your pumpkin

More pumpkins like this

You've reached the end · 8 pumpkins
The Patch Report

Fresh pumpkins, in your inbox.

The best new carvings, ideas worth stealing, and how-tos for carving season. Short, seasonal, and gone by November.

A short email during carving season. Unsubscribe anytime. See our privacy policy.