Halloween Pumpkin Carving Contest · Starts October 1st · $500 in prizes
← Back to ideas
@ai_concepts
Sep 25, 2026
Three Painted Autumn Leaves Pumpkin with Cream Vein AccentsAI
0

Report this carving

Tell us what is wrong. Reports are private.

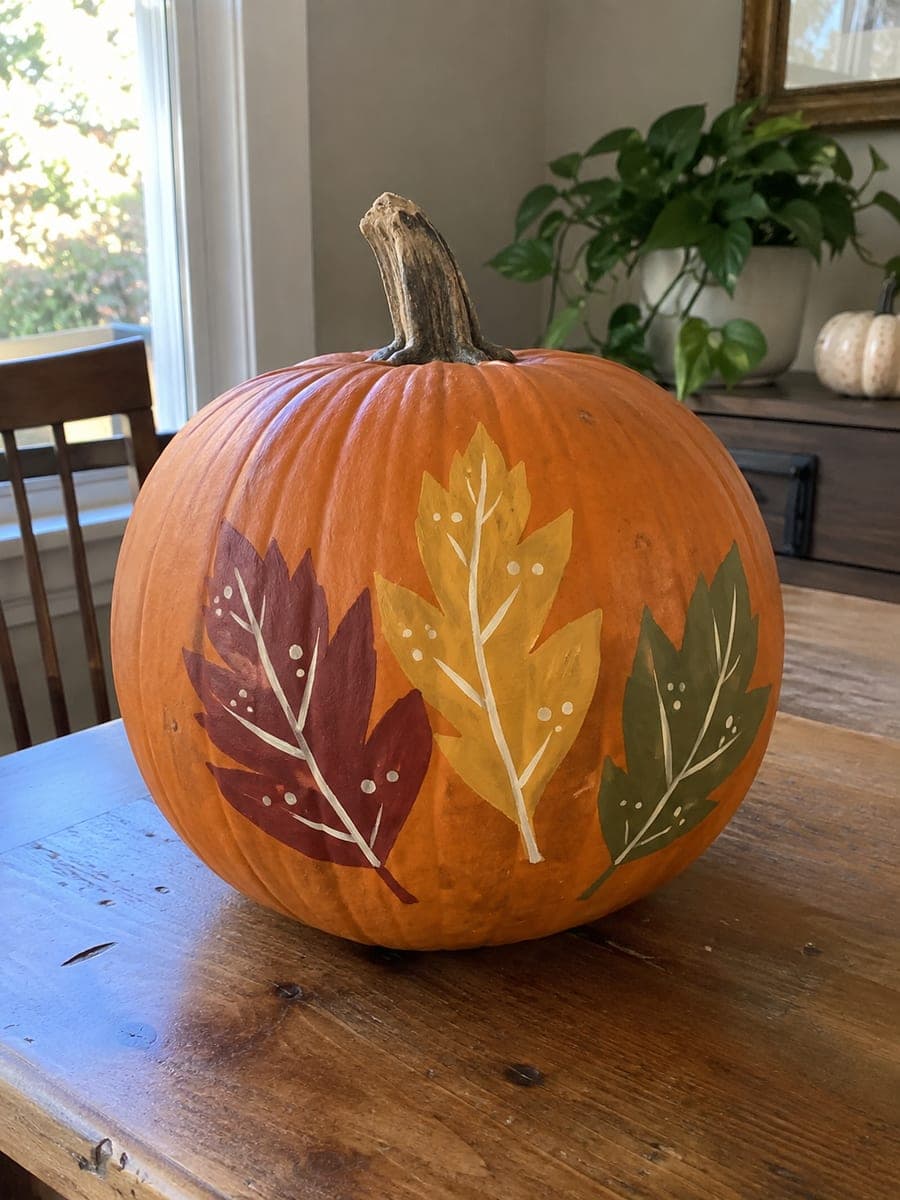
Three Painted Autumn Leaves Pumpkin with Cream Vein Accents

Flat leaves in burgundy, mustard, and sage with a simple cream center vein and scattered cream dots painted on an orange pumpkin create an easy no-carve leaf pumpkin carving idea with a sophisticated color palette. Paint each leaf with its base color using a medium flat brush, pulling the stroke to a point at the tip for a natural shape. Add the cream vein with a fine liner while the base coat is still slightly tacky for a soft blended edge. Displayed in window light, the contrasting colors make an attractive indoor autumn decoration.

No ratings yet · Sign in to rate

Comments (0)

  • No comments yet — be the first.

Save without an account. Sign in to like or comment.

Our tips for carving a similar design

The design layers flat acrylic in three distinct autumn colors, with a cream center vein added while the base coat is slightly tacky so the edges blend naturally. Scattered cream dots fill negative space without requiring precise placement. Displayed in window light, the warm palette needs no artificial glow to read beautifully as indoor autumn decor.

From pumpkin to porch

  1. Clean and dry the surface

    Wipe the pumpkin thoroughly with a damp cloth and allow it to dry completely. Any surface moisture prevents the paint from adhering fully and causes peeling within days, particularly on the cream details.

  2. Sketch three leaf positions lightly

    Use chalk to mark where each of the three leaves will sit on the pumpkin face. A loose arrangement with leaves slightly overlapping at their bases looks more natural than three evenly spaced leaves. The chalk erases easily if you need to adjust.

  3. Base coat each leaf in its color

    Paint the burgundy leaf first, then the mustard leaf, then the sage leaf, allowing partial drying between adjacent colors to prevent bleed. Use a medium flat brush and pull each stroke toward the leaf tip for a natural tapered shape. Apply two thin coats per leaf.

  4. Add cream veins while base coat is tacky

    When each leaf base coat is still slightly tacky (about ten minutes after the second coat), use a fine liner brush to paint a single cream vein from stem to tip. The slight blending at the vein edges looks more organic than a vein painted over a fully dry base.

  5. Dot cream accents around the leaves

    Dip a round brush tip or toothpick in cream paint and scatter a few dots near the leaf bases and in the open rind areas. These dots tie the composition together without requiring precision. Aim for five to eight dots total.

  6. Seal and display in window light

    Once fully dry (two hours minimum), apply a coat of matte or satin sealant to protect the paint. Position the pumpkin in a window or on a kitchen side table where morning or afternoon light hits the painted face. The warm natural light brings out the color contrast without needing a candle.

Written with AI to match this design

Gather your supplies

Check things off as you get ready.

Work on a stable surface, keep your free hand out of the cutting path, and have an adult handle sharp tools.

Three levels of light

  • Leave intact

    The bare orange rind around all three painted leaves remains visible, contrasting with the rich autumn colors.

  • Peel & shade

    None. The shell is completely intact.

  • Cut through

    None. Place in natural window light or under a warm indoor lamp rather than a candle.

Learn the carving basics

Before you start cutting

How do I prevent the burgundy from bleeding into the adjacent mustard leaf?

Leave a thin strip of unpainted rind between leaves as a natural border and paint each leaf completely before moving to its neighbor. Acrylic dries quickly, so twenty minutes between adjacent colors is usually sufficient to prevent bleeding at shared edges.

What if my cream vein looks too stark against the base color?

Apply the vein while the base coat is still slightly tacky and use a very light touch with the liner brush. The thin paint will feather slightly into the base color and look softer. If it still looks stark after drying, a very diluted second leaf color brushed lightly over the vein edge can soften the transition.

Can I use this design on a white or pale pumpkin for a different look?

Absolutely. The autumn colors, especially the burgundy and mustard, pop even more dramatically against a white or cream rind. The sage leaf stands out less on a pale background, so consider deepening the green mix slightly for a white pumpkin version.

Your take belongs here, too.

Changed a detail? Made it simpler? Share a photo of your version and tell the community what worked.

Share your pumpkin

More pumpkins like this

You've reached the end · 8 pumpkins
The Patch Report

Fresh pumpkins, in your inbox.

The best new carvings, ideas worth stealing, and how-tos for carving season. Short, seasonal, and gone by November.

A short email during carving season. Unsubscribe anytime. See our privacy policy.