Halloween Pumpkin Carving Contest · Starts October 1st · $500 in prizes
← Back to ideas
@ai_concepts
Sep 14, 2026
Ribbon Christmas Tree PumpkinAI
0

Ribbon Christmas Tree Pumpkin

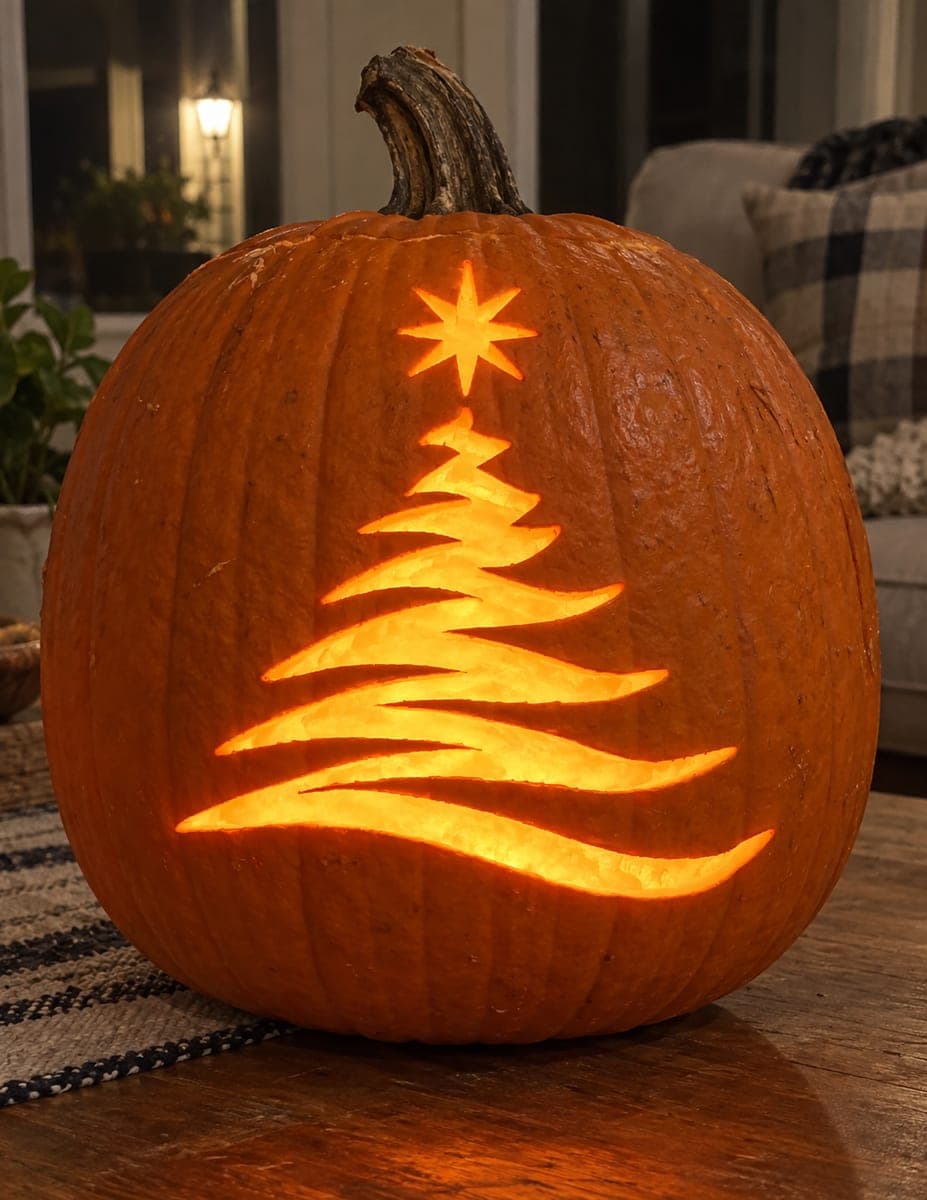
A stylized Christmas tree built from stacked horizontal wave-like ribbon cuts narrows from a wide base to a pointed top crowned by a six-pointed star burst in this elegant seasonal pumpkin carving idea. All the ribbon layers and the star are pierced through, so the lit jack-o-lantern mimics the look of a modernist holiday tree. Carve the small star points first while the pumpkin wall is solid around them, then cut downward through the ribbon layers one at a time from top to bottom.

This is an AI-generated concept image: a realistic, carvable design idea rather than a photo of a finished carve. AI concepts are always labeled and sit out the leaderboard and the contest.

No ratings yet · Sign in to rate

Comments (0)

  • No comments yet — be the first.

Save without an account. Sign in to like or comment.

Our tips for carving a similar design

The whole design works because a Christmas tree is suggested by nothing more than a stack of curved horizontal slivers, each one a little longer as you go down, capped by a pointed star. The trick is treating the gaps between ribbons as sturdy bridges that hold the shape together, so you never carve one giant hole. Cut the small star and top ribbons while the wall is still solid, then work downward layer by layer.

Written by PumpkinCarvingIdeas.com, inspired by the image above. These are our suggestions, not instructions from the uploader. This approach to the AI concept has not been tested on a real pumpkin.

From pumpkin to porch

  1. Pick a smooth, tall pumpkin and open the back

    Choose a pumpkin with a fairly flat, blemish-free front panel since the ribbon cuts need clean room to read. Cut an access hole in the back rather than the top so the front stays uninterrupted. Scrape the inside wall behind the design down to about one inch thick with a loop tool. A thinner wall makes the narrow ribbon cuts far easier to control.

  2. Transfer the stencil

    Tape your ribbon tree pattern flat against the front, easing out wrinkles so the star sits high and centered. Poke closely spaced dots along every ribbon edge and each star point with a poker tool. Peel the paper and lightly connect the dots in pencil so you can see all the bridges between ribbons before any blade touches the skin. Double check that each gap between ribbons stays intact as a supporting bridge.

  3. Carve the star first

    Start at the top with the six-pointed star while the surrounding wall is still solid and strong. Use a small detail saw and cut each narrow point slowly, pulling the blade straight in and out rather than twisting. Keep the star points a touch thicker at their base so they do not snap. Doing this delicate piece first means you are not fighting a weakened, floppy wall later.

  4. Cut the ribbon layers top to bottom

    Work down the tree one ribbon at a time, cutting each curved sliver fully through the skin. Move from the short top ribbons toward the wide base ribbons, which keeps the most fragile bridges supported the longest. Follow the natural wave of each line and let the ends taper to fine points. Leave the widest, longest base cut for last since it removes the most material.

  5. Clean the edges and test the light

    Go back and gently bevel the inside of each cut edge at a slight angle so more light spills through. Brush away loose pulp and check that every bridge is still firmly attached. Drop in an LED light, never a candle, and view it in a dim room. If any ribbon reads too faint, widen it a hair from the inside edge.

  6. Stage and photograph

    Set the pumpkin on a wood surface indoors or on a covered porch for a cozy holiday backdrop. Warm white or amber LEDs give that soft firelit glow seen in modernist tree decor. Shoot in near darkness with the room lights low so the tree and star carry the frame. A light coat of petroleum jelly on the cut edges slows drying and keeps it crisp for photos.

Gather your supplies

Check things off as you get ready.

Work on a stable surface, keep your free hand out of the cutting path, and have an adult handle sharp tools.

Three levels of light

  • Leave intact

    The broad orange body of the pumpkin around the tree stays as untouched skin and reads dark.

  • Peel & shade

    Optional shallow scraping just outside a ribbon edge can add a faint halo, but this design relies mostly on clean cuts.

  • Cut through

    Every ribbon sliver and all six star points are pierced through for the brightest glow.

Learn the carving basics

Before you start cutting

How thin can I make the ribbon cuts before they get risky?

Keep each ribbon opening at least a quarter inch tall at its widest so the light reads and the bridge above it stays strong. The tapered tips can narrow to a point, but do not extend them so far that the bridge between two ribbons gets paper thin. On a wall scraped to about one inch, that balance holds up well.

Do I really need to carve the star before the ribbons?

Yes, the star sits at the top where the wall gets weakest once the ribbons below are open. Cutting its fine points while everything around them is solid gives you a stable surface to steady your blade. If you saved it for last, the panel could flex and the points might crack.

This is a concept image, so will a real pumpkin hold all these bridges?

It can if you respect the gaps. The stacked ribbon look depends on the untouched strips between cuts acting as bridges, so never merge two ribbons into one big hole. Work top to bottom and leave the widest base cut for last so the structure stays supported throughout.

Your take belongs here, too.

Changed a detail? Made it simpler? Share a photo of your version and tell the community what worked.

Share your pumpkin

More pumpkins like this

You've reached the end · 8 pumpkins
The Patch Report

Fresh pumpkins, in your inbox.

The best new carvings, ideas worth stealing, and how-tos for carving season. Short, seasonal, and gone by November.

A short email during carving season. Unsubscribe anytime. See our privacy policy.