Halloween Pumpkin Carving Contest · Starts October 1st · $500 in prizes
← Back to ideas
@ai_concepts
Jul 21, 2026
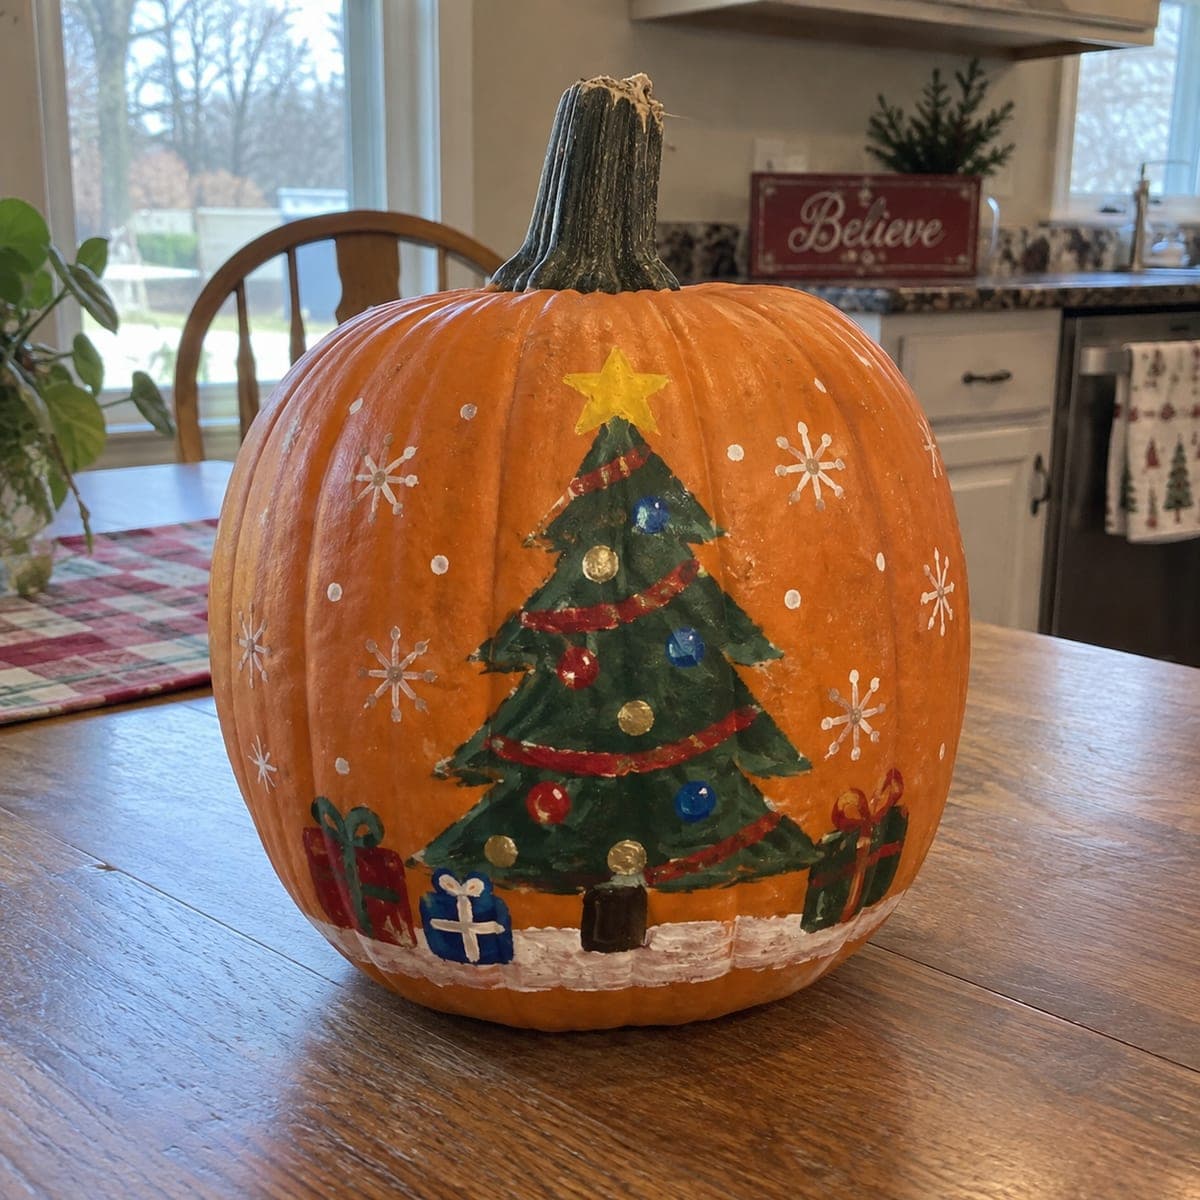
Snowy Christmas Tree Painted PumpkinAI
0

Snowy Christmas Tree Painted Pumpkin

A folk-art Christmas tree with a yellow star, red garland swags, and shiny ornaments stands in painted snow on this no-carve pumpkin, surrounded by white snowflakes. It is an easy way to carry a fall pumpkin into December: paint the tree triangle first, then dot ornaments and snowflakes with the handle end of a brush. Little presents in red and blue at the base finish the scene.

This is an AI-generated concept image: a realistic, carvable design idea rather than a photo of a finished carve. AI concepts are always labeled and sit out the leaderboard and the contest.

No ratings yet · Sign in to rate
Comments (0)

  • No comments yet — be the first.

Save without an account. Sign in to like or comment.

Our tips for carving a similar design

The whole charm here is folk-art paint on a clean orange surface, so the pumpkin skin itself becomes the sky. Block in a simple green triangle for the tree, add red garland swags and dotted ornaments, then scatter white snowflakes and little gift boxes at the base. Because nothing is cut, the plan is mostly about layering colors from background to fine details.

Written by PumpkinCarvingIdeas.com, inspired by the image above. These are our suggestions, not instructions from the uploader. This approach to the AI concept has not been tested on a real pumpkin.

From pumpkin to porch

  1. Clean and sketch

    Wipe the pumpkin with a damp cloth and let it dry fully so paint grips. Lightly pencil a tall triangle in the center for the tree, a star at the top, and a wavy snow line near the bottom. Keep the shapes simple and a little uneven, since folk-art looks best when it is not perfect. Step back to check the tree is centered on the smoothest face.

  2. Base the tree and snow

    Fill the triangle with green acrylic in two coats, letting each dry before the next. Paint a soft white band along the bottom for snow, using short dabbing strokes for texture. Add the yellow star at the peak while the green is dry so colors do not bleed. A hair dryer on low speeds up drying between layers.

  3. Add garland and branch lines

    With a thin brush, swag red garland across the tree in gentle curves that dip in the middle. Add a few darker green lines to suggest branch layers and give the tree depth. Keep the swags evenly spaced from top to bottom. Wipe the brush often so the red stays crisp against the green.

  4. Dot the ornaments and snowflakes

    Dip the handle end of a brush in paint and press to make round ornaments in blue, red, and gold on the tree. Use the same dotting trick for round snow dots in the sky, then add six-armed snowflakes with a thin brush. Vary the snowflake sizes so the background feels lively. Let everything dry before touching it.

  5. Paint the gifts at the base

    Add small red and blue present boxes sitting in the snow around the tree trunk. Give each a contrasting ribbon and a simple bow with a few strokes. A little brown rectangle under the tree reads as the trunk or a gift crate. Keep these low so the tree stays the star of the scene.

  6. Seal and stage

    Once fully dry, brush on a thin coat of clear acrylic sealer to protect the paint from smudges and moisture. Set the pumpkin on a table where the whole scene faces the room. If you want a soft glow, place a battery LED string beside it rather than inside. Snap your photo in daylight so the colors read true.

Gather your supplies

Check things off as you get ready.

Work on a stable surface, keep your free hand out of the cutting path, and have an adult handle sharp tools.

Three levels of light

  • Leave intact

    The bare orange skin around the tree stays untouched and acts as the warm sky behind the snowflakes.

  • Peel & shade

    This is a no-carve design, so instead of peeling you simply leave gaps of plain skin between painted elements for contrast.

  • Cut through

    Nothing is cut on the front; at most, add a small hidden hole in the back only if you want to tuck in an LED for a faint glow.

Learn the carving basics

Before you start cutting

Do I need to carve anything at all?

No, this is a fully painted design, so the skin stays intact. That actually helps the pumpkin last longer since there are no cut openings to dry out or rot. If you crave a little light, set a battery LED beside it rather than cutting into it.

What paint works best on a pumpkin?

Standard acrylic craft paint sticks well to a clean, dry pumpkin and dries fast. Use two thin coats instead of one thick coat so colors stay bright and do not run. A clear acrylic sealer at the end keeps everything from smudging.

How do I get such neat round ornaments and dots?

Dip the handle end of a brush or a pencil eraser into the paint and press straight down for a clean circle. Reload the paint between each dot so they stay uniform. Practice a few on scrap paper first to find the size you like.

Your take belongs here, too.

Changed a detail? Made it simpler? Share a photo of your version and tell the community what worked.

Share your pumpkin

More pumpkins like this

You've reached the end · 8 pumpkins
The Patch Report

Fresh pumpkins, in your inbox.

The best new carvings, ideas worth stealing, and how-tos for carving season. Short, seasonal, and gone by November.

A short email during carving season. Unsubscribe anytime. See our privacy policy.