@toothpick_tessa
Sep 5, 2026
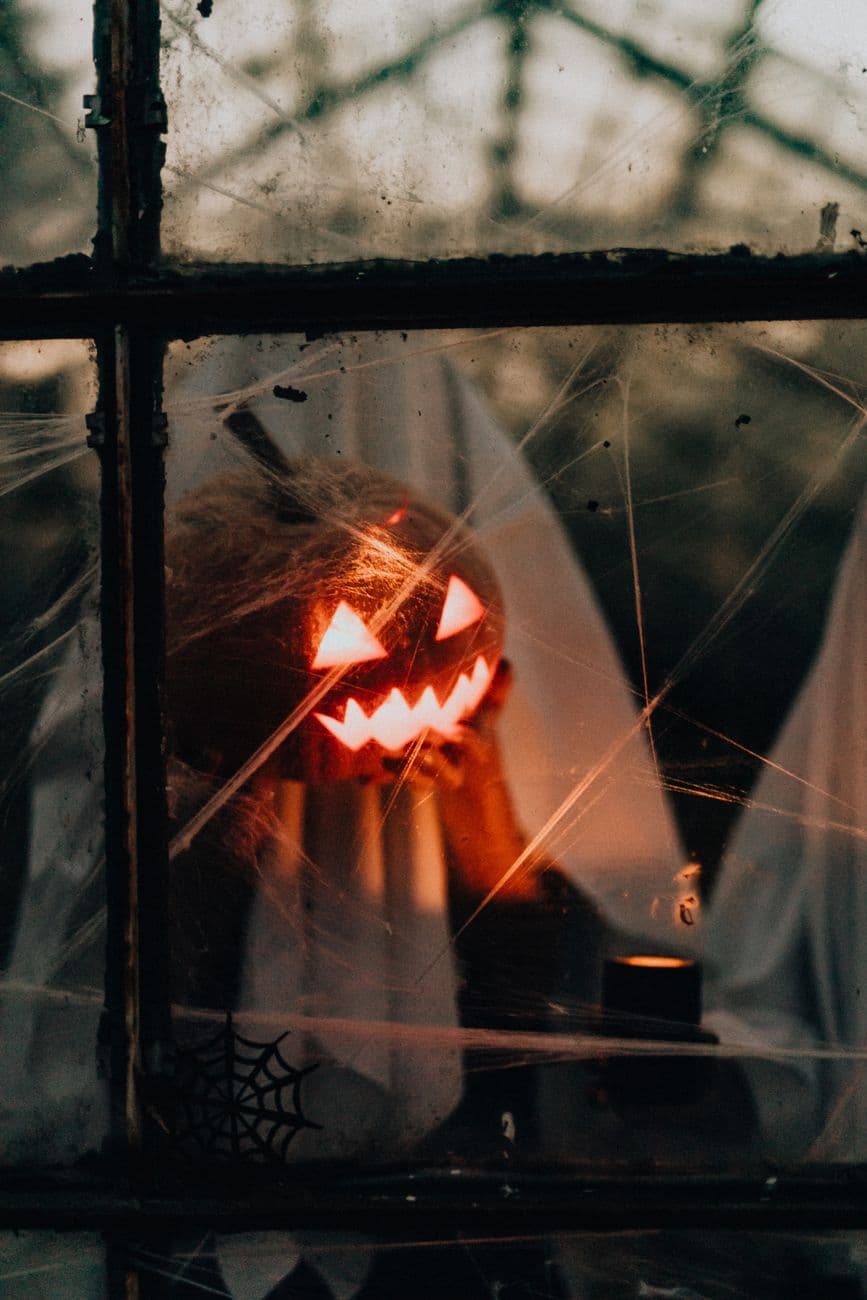
Behind the greenhouse glass
A red-glowing jack held up behind cobwebbed greenhouse panes. The old glass does half the haunting.
No ratings yet · Sign in to rate
A red-glowing jack held up behind cobwebbed greenhouse panes. The old glass does half the haunting.
The whole effect leans on a simple, classic face: triangle eyes, a small triangle nose, and a jagged sawtooth mouth cut all the way through so a red light blasts out. The real trick is the staging, setting the finished jack behind old glass and stretched cobwebs so the light glows and the details go soft and eerie. Keep the cuts clean and symmetrical, then let the window and webbing do the rest of the haunting.
Written by PumpkinCarvingIdeas.com, inspired by @toothpick_tessa's photo above. These are our suggestions, not instructions from the uploader, and this approach hasn't been tested on their exact carve.
Choose a medium round pumpkin with a smooth front for a clear face. Cut a lid from the top at an angle so it rests without falling in, or cut a hatch in the back if you prefer a cleaner front. Scoop the insides and scrape the front wall down to about one inch thick. A thinner wall makes the triangle cuts easier and lets more light through.
Tape a stencil with two triangle eyes, a small triangle nose, and a wide sawtooth grin onto the front. Poke the outlines with a pin or a nail, spacing dots close together on the zigzag teeth. Peel the paper and you should see the full face dotted on the skin. Step back to check the eyes line up level before you cut.
Use a small serrated carving saw and work slowly around each triangle. Cut the two eyes and the nose first while the pumpkin is still strong. Push the pieces out gently from the inside so the edges stay crisp. Angling the blade slightly outward widens the opening on the inside and helps light spread.
Save the big grin for last since it removes the most material. Cut each tooth point carefully, following your dots, and leave the peaks and valleys sharp. Support the mouth area with your free hand as you finish so it does not crack. If a tooth feels weak, leave a tiny bit extra rather than snapping it thin.
Drop in a battery LED, ideally an orange or red one, or wrap a warm LED with a bit of red gel for that fiery look. Set the pumpkin on a shelf or table behind a window pane. Never use a real candle, especially near webbing or fabric.
Stretch pull-apart spider webbing across the glass in thin, uneven strands so the light catches them. Dust the window lightly or shoot through slightly dirty glass for that hazy greenhouse mood. Turn off room lights and photograph in near darkness so the red glow reads strong. Move the light a little closer or farther to control how bright the face burns.
Check things off as you get ready.
Work on a stable surface, keep your free hand out of the cutting path, and have an adult handle sharp tools.
The full outer skin of the pumpkin stays dark and lets the face read as a floating glow.
Optionally shave a thin halo around the eyes and mouth for a soft rim of dim orange.
The two triangle eyes, the nose, and the jagged mouth are cut through for the brightest red light.
Use a red or orange LED, or tape a small piece of red lighting gel over a warm white LED. Shooting through dusty or slightly dirty glass deepens the color and softens it. Keeping the room dark makes the red look far more intense in photos.
It can if the teeth get too skinny or the wall is thick and you force the pieces out. Thin the inside wall to about an inch first, cut the mouth last, and support it with your hand while you work. Leave each tooth a touch thicker than the stencil if you are worried.
Stretch them across the glass in front of the pumpkin, not on the carved face, so they blur the details and catch the light. Pull the webbing thin and uneven for a realistic look. Keep webbing away from any heat source, which is one more reason to use an LED and never a candle.
Changed a detail? Made it simpler? Share a photo of your version and tell the community what worked.
The best new carvings, ideas worth stealing, and how-tos for carving season. Short, seasonal, and gone by November.





Comments (0)