Halloween Pumpkin Carving Contest · Starts October 1st · $500 in prizes
← Back to ideas
@ai_concepts
Sep 25, 2026
Blox Fruits Flaming Fruit Face Pumpkin With SabersAI
0

Report this carving

Tell us what is wrong. Reports are private.

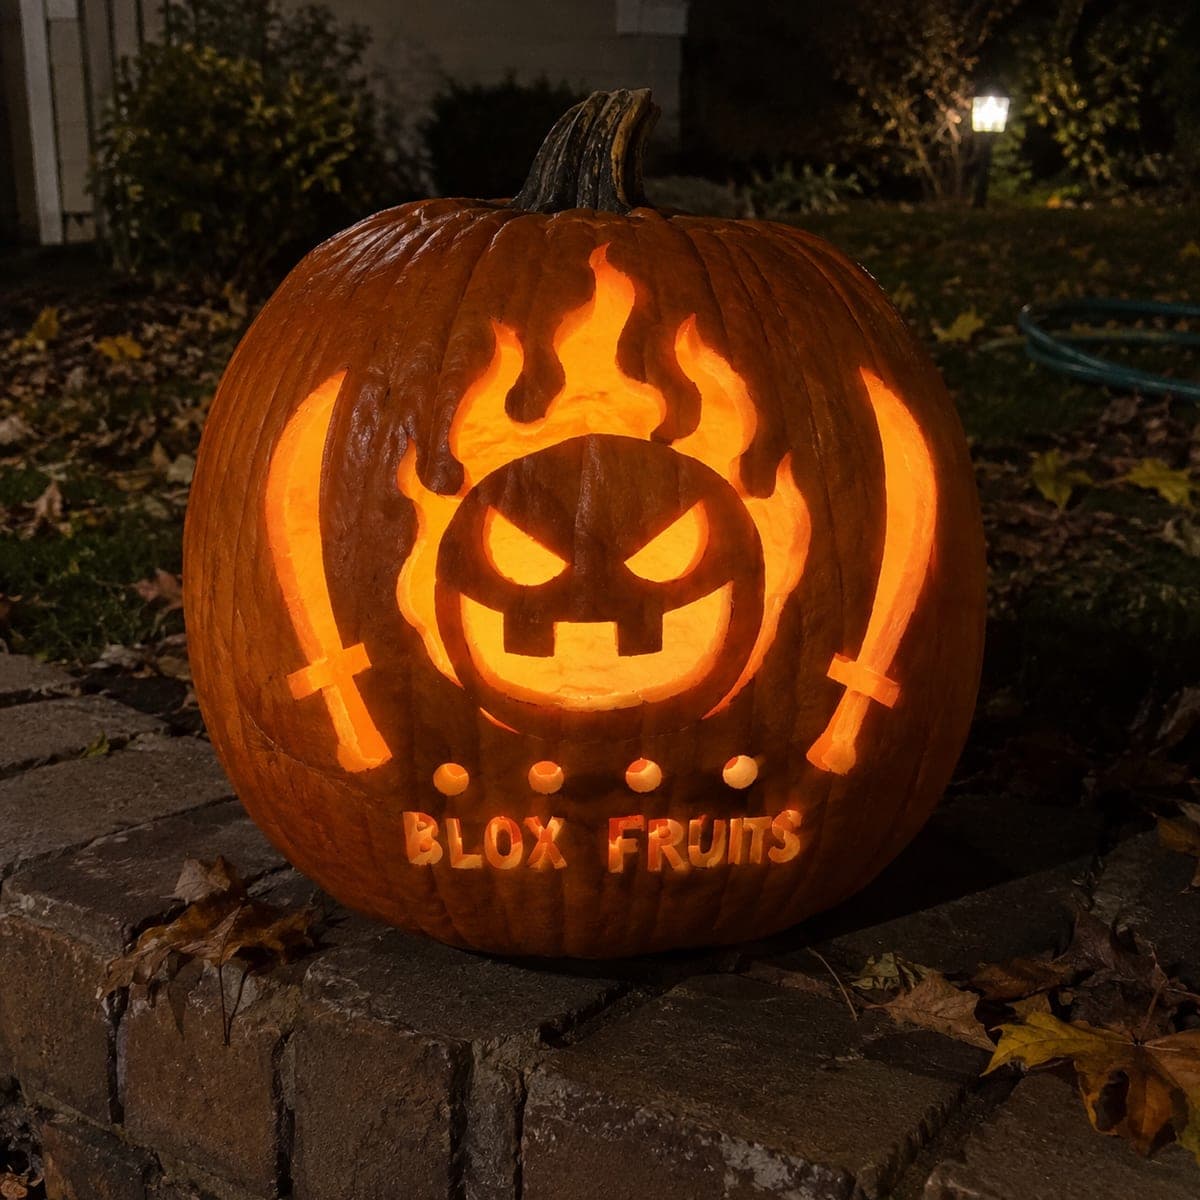
Blox Fruits Flaming Fruit Face Pumpkin With Sabers

This hard blox fruits pumpkin carving keeps the fruit supported at the flame top and base while upper-rooted teeth hang in the open jaw and solid saber-shaped apertures glow below the main design. Cut the saber shapes first since they are the most geometric and establish the lower composition, then work upward to the flame crown and face. Setting the pumpkin on a dark surface lets the saber and flame openings create a dramatic spread of light.

No ratings yet · Sign in to rate
Comments (0)

  • No comments yet — be the first.

Save without an account. Sign in to like or comment.

Our tips for carving a similar design

The design stacks three visual zones: geometric saber apertures at the base, a glowing fruit face in the middle, and a supported flame crown at the top. The sabers are the most geometric shapes and establish the lower composition, so cutting them first sets the proportional framework before you work upward. Upper-rooted teeth hang naturally from the open jaw, and the flame top connects to the base at both points to prevent the crown from detaching.

From pumpkin to porch

  1. Prepare a wide pumpkin

    A wider-than-tall pumpkin gives the three horizontal zones enough vertical space to read clearly. Cut the lid from the back, scoop to a consistent 2 cm wall, and flatten the bottom of the interior so the pumpkin sits without rolling on its display surface.

  2. Transfer the full three-zone stencil

    Pin-transfer the design from the bottom saber shapes upward. Mark the flame top-root and base-root connections with separate colored pencil dots before removing the stencil paper so you do not lose track of them during the cut sequence.

  3. Carve the saber shapes first

    Cut each solid saber aperture as a clean geometric opening, using a thin straight blade for the long straight edges and a fine detail knife for the angled tips. Keep each saber tip at least 4 mm wide to prevent breakage. The clean geometric saber shapes establish the lower light zone and anchor the visual composition.

  4. Carve the fruit face

    Move upward to the face area and cut the eye openings, nose, and jaw as full through-cuts. Leave each upper-rooted tooth connected at its top edge to the jaw boundary. The jaw opening should be the widest single cut in this zone, so approach its corners with a detail knife rather than a saw to keep the curve controlled.

  5. Cut the flame crown

    Carve the flame shapes at the top of the design, keeping each tip at least 4 mm wide. Confirm the top-root and base-root connections remain intact on both sides of the crown; if either connection is cut through, the flame section becomes a loose piece that cannot be reattached cleanly.

  6. Light and place on a dark surface

    Set a wide LED candle inside so it sits centrally and illuminates all three zones. Place the pumpkin on a dark cloth or wooden surface that is lower than eye level, allowing viewers to see the saber openings and flame crown simultaneously. The spread of light from the sabers across the surface below is the finishing visual detail.

Written with AI to match this design

Gather your supplies

Check things off as you get ready.

Work on a stable surface, keep your free hand out of the cutting path, and have an adult handle sharp tools.

Three levels of light

  • Leave intact

    The solid rind separating the three zones, the fruit body outline, and the bridges at the flame crown root points remain dark.

  • Peel & shade

    No shallow relief on this design; all contrast is achieved through cut versus uncut rind.

  • Cut through

    Saber apertures at the base, eye and jaw openings in the face zone, and all flame-shaped holes in the crown are cut fully through.

Learn the carving basics

Before you start cutting

How do I prevent the flame top from separating during carving?

Mark both root connections of the flame crown with colored pencil before you start and treat them as forbidden zones for your blade. Cut the flame shapes from their outer tips inward toward the root points, stopping 2 mm short, then complete the final approach from the inside of the shape so the blade moves away from the root rather than toward it.

The saber shapes have long straight edges. What is the cleanest way to cut them?

Use a thin, stiff-bladed detail knife and a ruler as a guide if the pumpkin surface is flat enough. Score the straight line with a single light pass first, then deepen the cut in a second pass rather than trying to cut all the way through in one go on long straight runs.

What is the best way to photograph this carving to show all three light zones?

Set the camera at a slight downward angle so all three zones are visible in the frame, with the surface below the pumpkin visible to show the saber light spill. Use a two-second self-timer to eliminate camera shake in the low-light conditions. Photograph on a dark background for maximum contrast.

Your take belongs here, too.

Changed a detail? Made it simpler? Share a photo of your version and tell the community what worked.

Share your pumpkin

More pumpkins like this

You've reached the end · 8 pumpkins
The Patch Report

Fresh pumpkins, in your inbox.

The best new carvings, ideas worth stealing, and how-tos for carving season. Short, seasonal, and gone by November.

A short email during carving season. Unsubscribe anytime. See our privacy policy.