Halloween Pumpkin Carving Contest · Starts October 1st · $500 in prizes
← Back to ideas
@ai_concepts
Jul 15, 2026
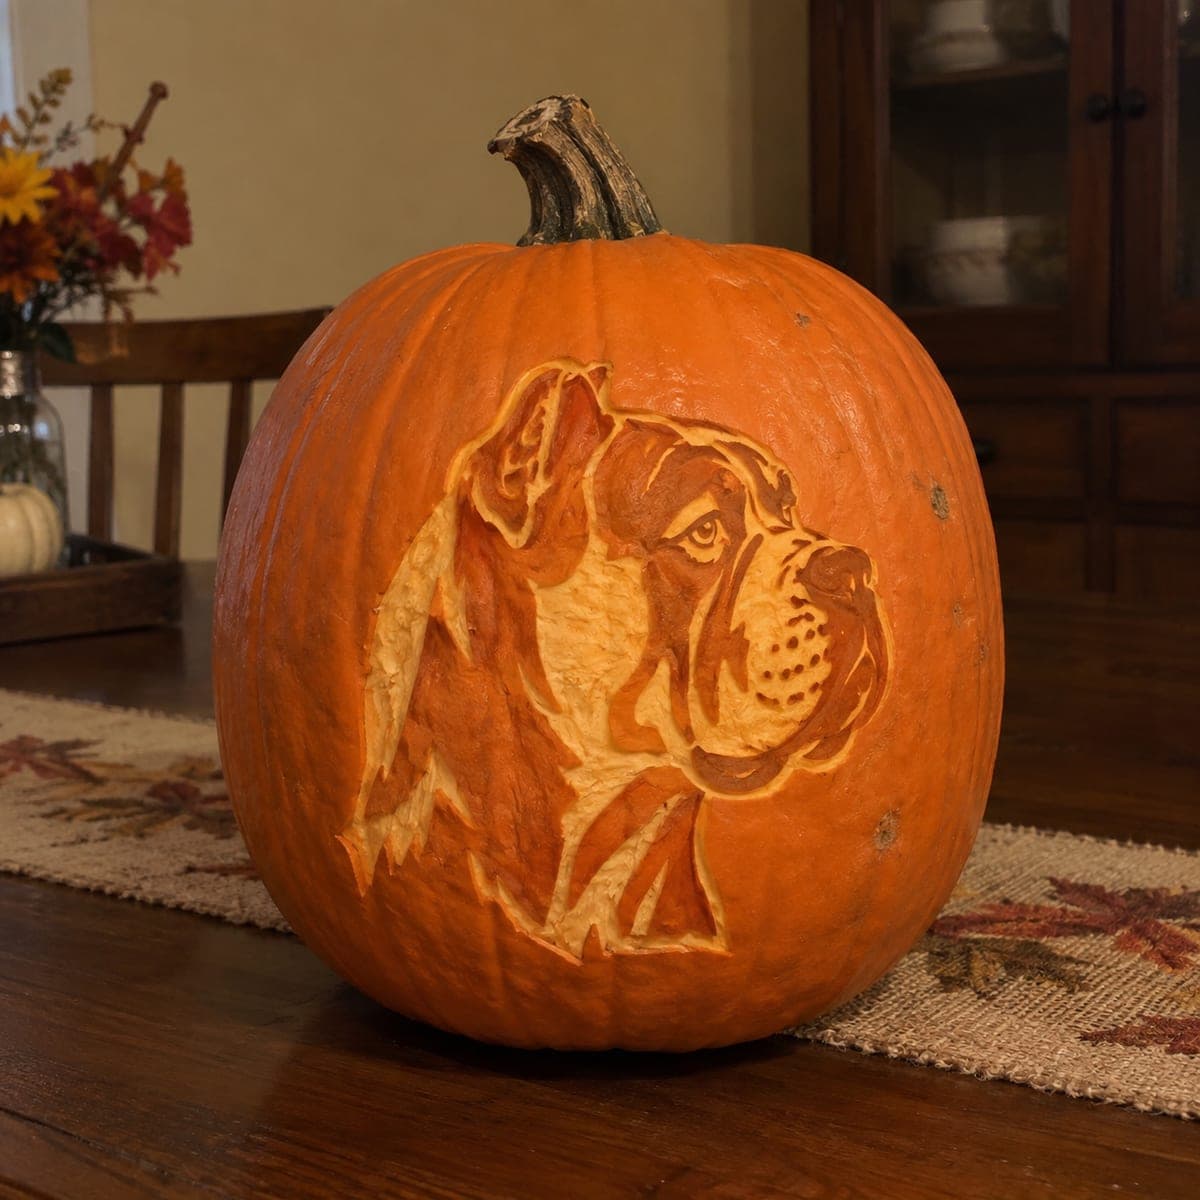
Boxer Dog Profile Etched Pumpkin PortraitAI
0

Boxer Dog Profile Etched Pumpkin Portrait

The noble profile of a boxer, jowls and all, is etched into this pumpkin with the skin peeled away in layers to model the muzzle and chest. Two depths do most of the work here: a shallow peel for the light face patches and a deeper one for the pale highlights around the jaw. Work from a side-view photo of your dog, and leave plenty of untouched orange skin, since the dark areas define the likeness.

This is an AI-generated concept image: a realistic, carvable design idea rather than a photo of a finished carve. AI concepts are always labeled and sit out the leaderboard and the contest.

No ratings yet · Sign in to rate
Comments (0)

  • No comments yet — be the first.

Save without an account. Sign in to like or comment.

Our tips for carving a similar design

The core trick here is a portrait built entirely from surface shading, with no light shining through. You leave large areas of untouched orange skin for the dark markings, then peel two depths of skin to model the muzzle, cheek, and chest. Think of the pumpkin skin as the dark ink and the peeled flesh as the light, so the likeness comes from how much you remove rather than what you cut open.

Written by PumpkinCarvingIdeas.com, inspired by the image above. These are our suggestions, not instructions from the uploader. This approach to the AI concept has not been tested on a real pumpkin.

From pumpkin to porch

  1. Prep and pick your reference

    Choose a smooth, tall pumpkin with a broad flat face for the portrait. Cut a lid or a bottom access hole and scrape the inside wall behind the design down to about one inch thick so peeled areas glow evenly. Work from a clear side-view photo of a boxer so you understand where the light face patches, dark jowls, and shadow lines fall. Keep the photo taped nearby the whole time.

  2. Transfer the stencil

    Tape your printed pattern flat against the pumpkin and poke through the main outlines with a pin or a transfer tool. Mark the edges of the ear, the eye, the muzzle, the folds of the jowls, and the line of the chest. Pull the paper away and connect the dots lightly with a washable marker. Label which zones stay dark and which get peeled so you do not lose track once flesh starts coming off.

  3. Score the outlines

    With a fine detail blade, trace shallow cuts along your main boundary lines, just deep enough to break the skin. These score lines act as stopping edges so a peel in one zone does not creep into the dark skin next to it. Take special care around the eye and the tight folds near the mouth. Adults should handle all the sharp tools here.

  4. Peel the shallow layer

    Using a lino or ribbon tool, scrape away only the orange skin across the light face patches and the shaded parts of the muzzle and chest. This shallow peel turns those areas a dim, soft glow and is the bulk of your work. Keep an even pressure so the surface reads smooth, and stop at your score lines. Leave every dark marking, the ear interior, and the shadow under the jaw as untouched skin.

  5. Deepen the highlights

    Go back into the brightest spots, the top of the muzzle, the front of the jaw, and the chest edge, and scrape a little deeper to thin the wall further. The thinner flesh reads noticeably lighter and gives the face its rounded, three dimensional look. Blend the transition between the shallow and deep zones with light feathering strokes so there is no hard step. Step back often to check the balance against your photo.

  6. Clean up and light it

    Wipe away marker lines with a damp cloth and tidy any ragged edges with your detail blade. Rub a thin coat of petroleum jelly on the cut flesh to slow drying and keep the tones rich. Set a battery LED puck inside, since an open flame is a fire risk and will not light a shaded portrait well. Photograph it in a dim room so the layered glow shows the boxer clearly.

Gather your supplies

Check things off as you get ready.

Work on a stable surface, keep your free hand out of the cutting path, and have an adult handle sharp tools.

Three levels of light

  • Leave intact

    The dark jowls, the ear interior, the eye, and the shadow under the jaw stay as untouched orange skin to define the likeness.

  • Peel & shade

    The light face patches and shaded muzzle and chest get a shallow skin peel for a soft dim glow.

  • Cut through

    No full cutouts here; instead the brightest highlights on the muzzle top and jaw are scraped deeper for the lightest tone.

Learn the carving basics

Before you start cutting

Why are there no cut-through openings on this design?

This is a shaded portrait, so all the detail comes from removing skin at different depths rather than making holes. Full cutouts would blow out the soft tones and flatten the face. Keeping the wall intact lets the LED glow evenly through the thinned areas.

How thin should I make the deepest highlights?

Aim to leave the deep highlight zones roughly a quarter inch thick, thinner than the surrounding shallow peel but not so thin it tears. Check by holding your light inside as you work. Stop as soon as the area reads clearly lighter than its neighbors.

My boxer has different markings. Can I adapt this?

Yes, that is the whole point of working from your own dog's photo. Map your dog's dark patches to untouched skin and its lighter fur to peeled areas. The technique stays the same even if the exact pattern of light and dark shifts.

Your take belongs here, too.

Changed a detail? Made it simpler? Share a photo of your version and tell the community what worked.

Share your pumpkin

More pumpkins like this

You've reached the end · 8 pumpkins
The Patch Report

Fresh pumpkins, in your inbox.

The best new carvings, ideas worth stealing, and how-tos for carving season. Short, seasonal, and gone by November.

A short email during carving season. Unsubscribe anytime. See our privacy policy.