@porchglow
Sep 5, 2026

Candlelit grin
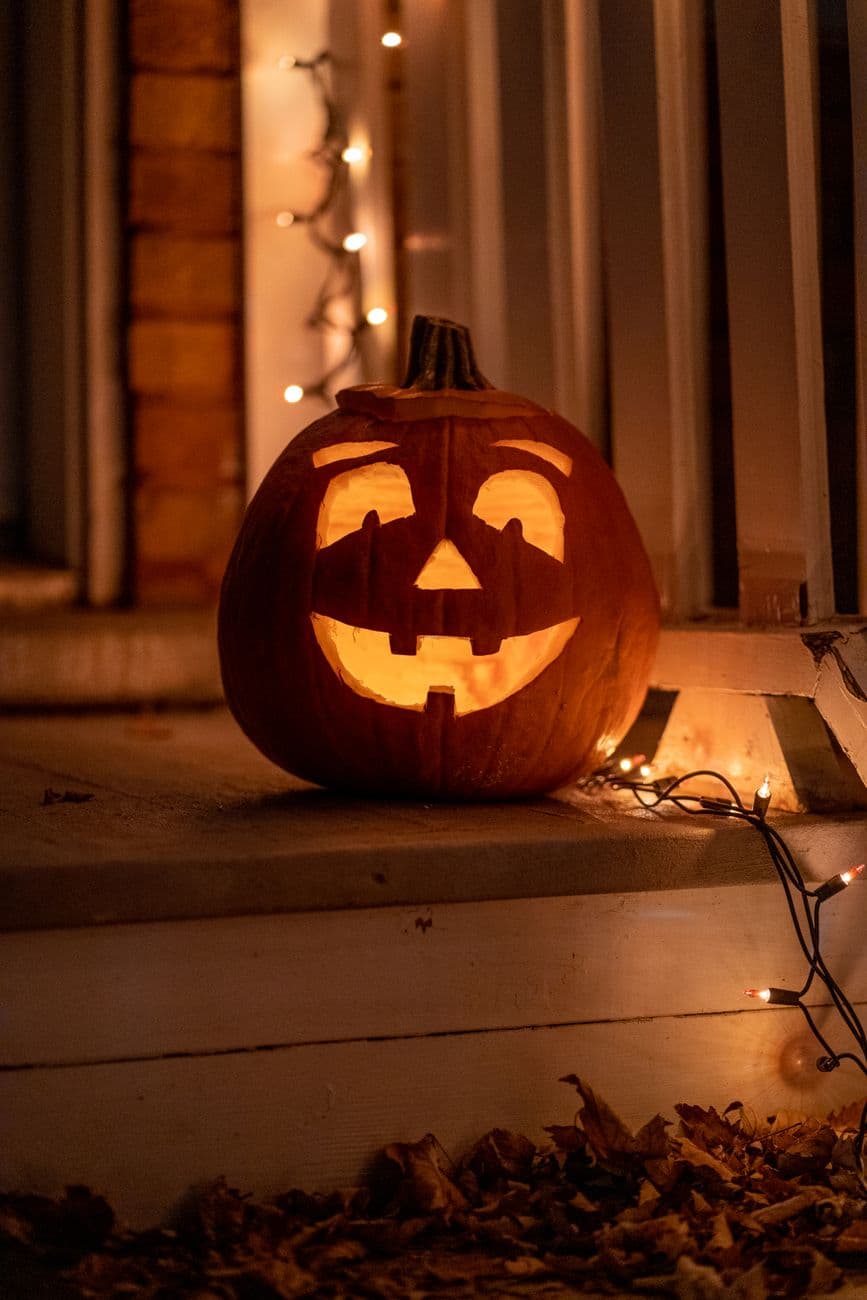
Furnace-bright from the inside, with heavy brows, a crooked front tooth, and two stumpy bottom teeth catching the light.
No ratings yet · Sign in to rate
Furnace-bright from the inside, with heavy brows, a crooked front tooth, and two stumpy bottom teeth catching the light.
The core trick here is a bold, wide-open face that lets the light pour out, with a few chunky teeth left uncut to break up the glow. You carve angled triangle eyes, a small triangle nose, and one long crescent mouth, then leave one crooked upper tooth and two stumpy lower teeth attached as solid bridges. Keep every opening big and clean so the inside reads as furnace-bright.
Written by PumpkinCarvingIdeas.com, inspired by @porchglow's photo above. These are our suggestions, not instructions from the uploader, and this approach hasn't been tested on their exact carve.
Choose a large round pumpkin with a smooth, flat-ish front face and a sturdy wall. Cut a lid from the bottom instead of the top so the pumpkin sits over the light cleanly, and angle the cut inward so the piece does not fall through. Scoop out all the seeds and pulp, then thin the inside front wall to about one inch with a metal scraper. A thinner wall carves easier and glows brighter.
Sketch or tape on a stencil with two large angled triangle eyes, a small triangle nose, and one wide crescent mouth. Mark the teeth as shapes you will keep, not cut: one narrow crooked tooth hanging from the top and two short stumpy blocks rising from the bottom. Use a poker tool or pushpin to dot the outlines onto the skin. Step back and check the brows angle down toward the nose for that classic mean grin.
An adult should handle the sharp saw tools. Start with the smaller shapes first, the nose and then each eye, sawing with gentle steady strokes and letting the blade do the work. Cut straight in, then push the pieces out from the inside so the edges stay crisp. Doing the small openings before the big mouth keeps the face strong while you work.
Save the mouth for last since it is the biggest opening. Cut the top curve and bottom curve of the crescent, but stop and go around each tooth so those blocks stay connected to the pumpkin. Leave the crooked upper tooth attached at the top edge and the two lower teeth attached at the bottom edge, each acting as a solid bridge. Remove the open mouth pieces carefully so you do not snap a tooth.
Trim any ragged edges and gently bevel the inside of the openings so more light escapes. If you want a softer secondary glow, lightly peel the outer skin in a thin border around the eyes with a shaving tool. Set a battery LED light or two inside, never a candle, and aim for a warm flickering bulb to mimic that furnace look. Close up the bottom lid to trap the glow.
Take your pumpkin into a dark room or shoot after sunset so the interior light really pops. Get low and close to fill the frame with the grin, the way this design shines best. Expose for the glow so the uncut skin falls to black and the teeth stand out as dark shapes. Snap a few frames and pick the one where the crooked tooth catches the light.
Check things off as you get ready.
Work on a stable surface, keep your free hand out of the cutting path, and have an adult handle sharp tools.
The outer face skin and the heavy brow ridges stay untouched so they read as solid black around the glow.
An optional thin shaved border around the eyes gives a soft dim orange halo.
The triangle eyes, nose, and wide crescent mouth are cut fully through for the brightest furnace light.
Leave it attached along its full top edge instead of cutting all the way around it. Treat it as a bridge of solid pumpkin, not a free-floating piece. Cut slowly near it and push waste pieces away from the tooth, not against it.
A bottom lid lets you set the pumpkin down right over the light so the glow fills the whole face evenly. It also keeps the top wall unbroken, which looks cleaner in a close-up photo. Just angle the cut inward so the pumpkin does not slip down onto the light.
Use one or two battery powered LED lights rather than a candle, both for safety and for a steadier, brighter glow. Warm colored or flickering LEDs mimic firelight nicely. Thinning the inside wall also helps far more light escape through the cuts.
Changed a detail? Made it simpler? Share a photo of your version and tell the community what worked.
The best new carvings, ideas worth stealing, and how-tos for carving season. Short, seasonal, and gone by November.






Comments (0)