Halloween Pumpkin Carving Contest · Starts October 1st · $500 in prizes
← Back to ideas
@ai_concepts
Sep 25, 2026
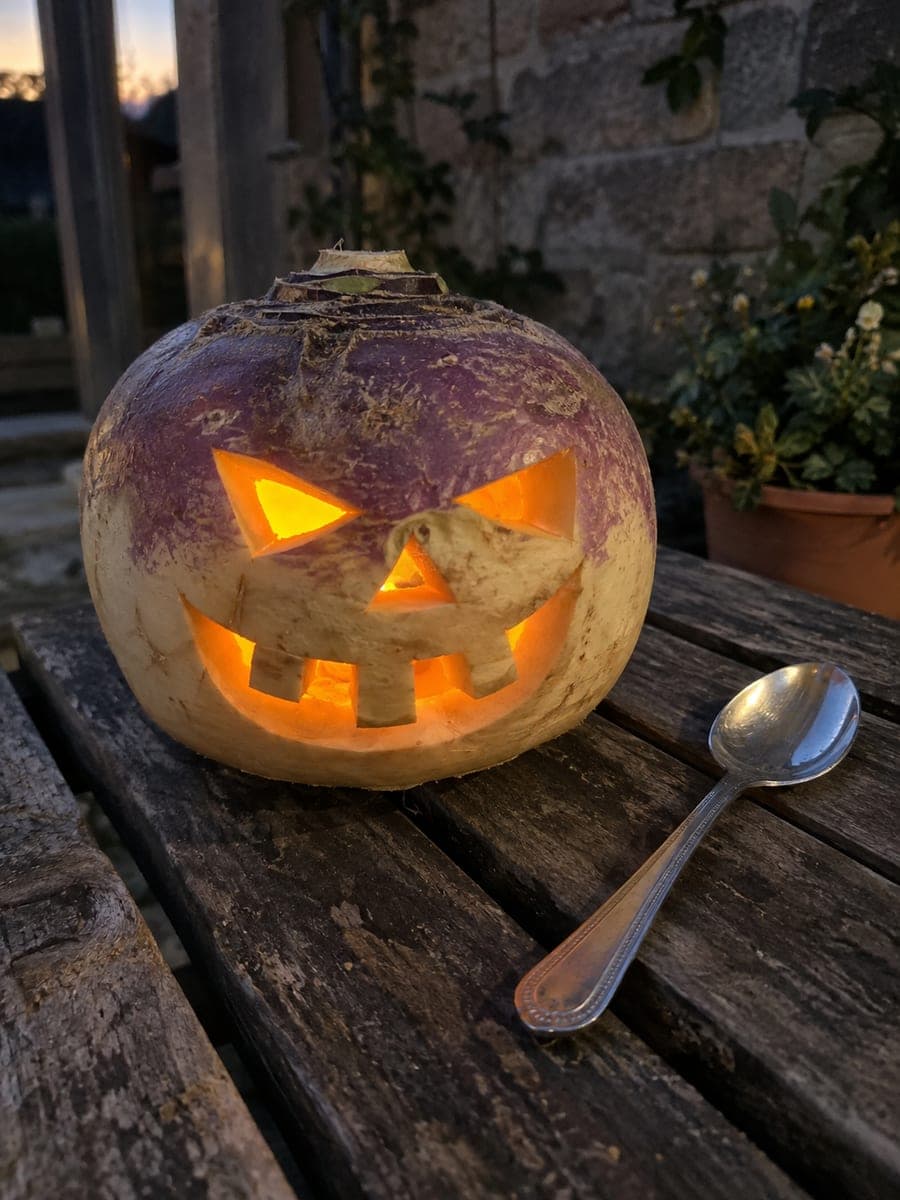
Slanted Eye Turnip Jack-O-Lantern With Rooted TeethAI
0

Report this carving

Tell us what is wrong. Reports are private.

Slanted Eye Turnip Jack-O-Lantern With Rooted Teeth

Two slanted eye holes, a triangular nose, and a broad grin with three thick teeth firmly rooted into the face give a purple-top turnip an expressive character that goes well beyond the standard Halloween face. Carve the teeth by making two parallel horizontal cuts for each tooth gap before removing the material between them, keeping each tooth wide enough to withstand the weight of the shell above. At dusk on a rustic bench, the cream-and-purple skin gives the glowing face an eerie bone-like pallor.

No ratings yet · Sign in to rate

Comments (0)

  • No comments yet — be the first.

Save without an account. Sign in to like or comment.

Our tips for carving a similar design

Two slanted eye holes, a triangular nose, and a broad grin with three thick teeth firmly rooted into the turnip face create an expressive character that goes well beyond the simplest turnip lantern. Carving the teeth requires making two parallel horizontal cuts for each tooth gap before removing the material between them, keeping each tooth wide enough to bear the weight of the shell above. The cream-and-purple skin gives the glowing face an eerie bone-like pallor at dusk.

From pumpkin to porch

  1. Hollow the turnip to half-inch walls

    Slice a flat bottom, then hollow the interior with a heavy knife and melon baller to a consistent half-inch wall. A uniform wall thickness is especially important for this design because the rooted teeth require even support from the surrounding flesh on all sides.

  2. Mark the slanted eyes, nose, and grin

    Draw both eyes as elongated ovals tilted at roughly 20 degrees inward at the top for the slanted look. Mark the triangular nose between and below the eyes, then sketch the wide curved grin. Inside the grin area, mark three tooth rectangles connected at their top edge to the shell above the smile line.

  3. Cut the slanted eyes and nose

    Cut each eye oval in short sections following the slanted angle carefully. The slight tilt is what gives the face its expressive character, so maintain that angle throughout. Cut the triangle nose in three clean strokes.

  4. Cut the tooth gaps

    For each tooth gap, make two parallel horizontal cuts into the grin area, then a short vertical cut connecting them at the bottom to remove the rectangle of flesh between each pair of teeth. This three-cut method is much safer than attempting a continuous zigzag. Keep each tooth at least three-eighths of an inch wide.

  5. Cut the smile arc

    Once all three tooth gaps are clear, cut the curved top of the smile to release any remaining flesh above the grin line. Then cut the curved bottom of the grin to define the lower lip. The teeth should now be standing alone, rooted firmly at their top edge to the shell.

  6. Light and display at dusk

    Insert an LED tea light through the bottom opening and set the turnip on a rustic bench at dusk. The cream-and-purple mottled skin glows with a pallor that is genuinely eerie, quite different from orange pumpkin glow. The slanted eyes and rooted teeth give the face a character that photographs well.

Written with AI to match this design

Gather your supplies

Check things off as you get ready.

Work on a stable surface, keep your free hand out of the cutting path, and have an adult handle sharp tools.

Three levels of light

  • Leave intact

    The three upper teeth, all cheek area, the full purple crown, and the back of the turnip remain dark.

  • Peel & shade

    None. Turnip skin does not have a peelable layer.

  • Cut through

    Both slanted eye holes, the triangle nose, all three tooth gap rectangles, and the smile arc are cut through for LED glow.

Learn the carving basics

Before you start cutting

How wide should each rooted tooth be to hold its weight above the grin?

Each tooth should be at least three-eighths of an inch wide and ideally half an inch. Thinner teeth look dramatic but can crack or detach when the turnip dries slightly over the first day. Wide, blocky teeth are both more realistic for a classic jack-o-lantern and more structurally sound in a dense vegetable.

Why do the slanted eyes matter for the overall expression?

Straight horizontal eyes read as neutral or silly. Tilting the inner corners upward by about 20 degrees creates a menacing or mischievous expression that transforms the face from simple to characterful. The exact angle is flexible, but some tilt is the key difference between a generic face and one with personality.

Should I carve the grin line before or after the individual tooth gaps?

Carve the tooth gaps first using the three-cut method, then cut the outer grin arc. This order means the flesh inside the grin area still supports your cutting hand while you work on the teeth. Cutting the grin arc first removes that support and makes the tooth gap cuts harder to control.

Your take belongs here, too.

Changed a detail? Made it simpler? Share a photo of your version and tell the community what worked.

Share your pumpkin

More pumpkins like this

You've reached the end · 8 pumpkins
The Patch Report

Fresh pumpkins, in your inbox.

The best new carvings, ideas worth stealing, and how-tos for carving season. Short, seasonal, and gone by November.

A short email during carving season. Unsubscribe anytime. See our privacy policy.