Halloween Pumpkin Carving Contest · Starts October 1st · $500 in prizes
← Back to ideas
@ai_concepts
Sep 25, 2026
Traditional Turnip Jack-O-Lantern With Triangle EyesAI
0

Report this carving

Tell us what is wrong. Reports are private.

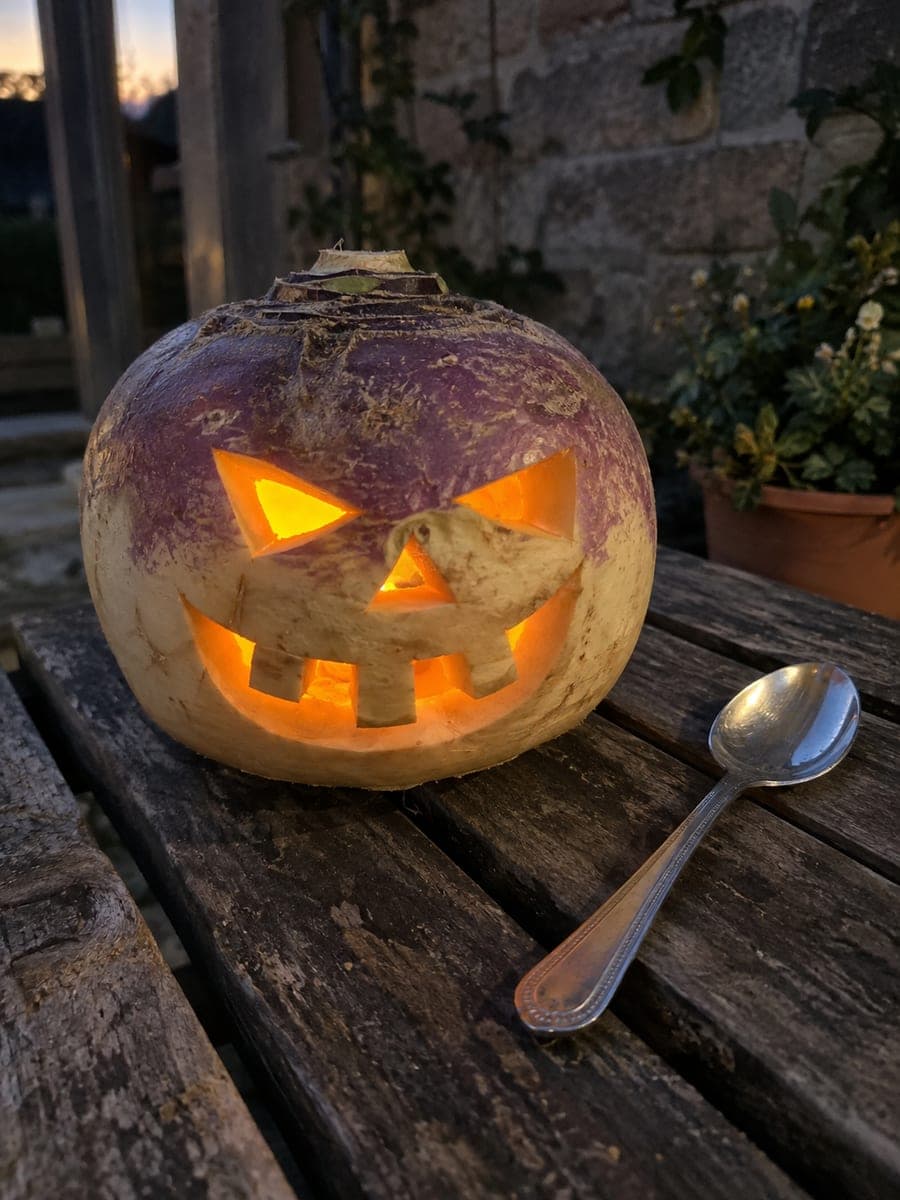
Traditional Turnip Jack-O-Lantern With Triangle Eyes

A hollowed purple-top turnip root with two triangular eyes and a simple oval mouth cut all the way through the root flesh recreates the original Celtic jack-o-lantern pumpkin carving tradition using the vegetable that started it all. Turnips are dense and fibrous, so use a sharp heavy-bladed knife to hollow the interior first, scraping the walls to about half an inch thick before cutting the face. A small LED tea light rather than a real flame avoids any scorching in the tight hollow space.

No ratings yet · Sign in to rate

Comments (0)

  • No comments yet — be the first.

Save without an account. Sign in to like or comment.

Our tips for carving a similar design

Two triangular eyes and a simple oval mouth cut through the flesh of a hollowed purple-top turnip recreate the original Celtic jack-o-lantern in the vegetable it was always meant for. Turnips are dense and fibrous, so the interior must be hollowed first to a half-inch wall thickness before carving the face. A small LED tea light is the right light source because the tight hollow interior has very limited airflow.

From pumpkin to porch

  1. Select a large, stable turnip

    Choose a large squat purple-top turnip with a flat bottom that sits without rolling. Look for one with smooth dense flesh free of soft spots. The broader the face, the more room you have for the three shapes.

  2. Hollow the interior

    Slice off the bottom of the turnip flat to create a stable base and an access hole. Use a sharp heavy-bladed knife and a melon baller or sturdy spoon to scoop out the flesh, leaving walls about half an inch thick all around. Work slowly and check the wall thickness regularly by pressing from outside.

  3. Mark the face

    Draw two equal triangles for the eyes and a simple oval for the mouth on the cream-colored skin side of the turnip. Position the shapes on the broadest front surface, well away from the purple crown area where the shell is sometimes slightly thinner.

  4. Cut the eye triangles

    Use a sharp paring knife to cut each triangle in three clean straight strokes. Because the wall is half an inch thick, a short confident stabbing motion works better than sawing. Pop each triangle piece free from the back and check the cut edges.

  5. Cut the oval mouth

    Score the oval outline with the knife tip, then cut fully through in short sections around the curve. The oval is larger than the triangles, so maintain steady hand pressure throughout. Remove the oval piece and wipe away any juice from the cut edges.

  6. Light and display on a stone doorstep

    Drop a small LED tea light inside through the bottom opening and place the turnip on a dark stone doorstep. The pale cream flesh at the cut rims glows with a warm amber halo that is distinctly different from any pumpkin carving. The intimate phone-photo scale of the turnip makes it charming at close range.

Written with AI to match this design

Gather your supplies

Check things off as you get ready.

Work on a stable surface, keep your free hand out of the cutting path, and have an adult handle sharp tools.

Three levels of light

  • Leave intact

    The solid cream and purple skin surrounding the face and the full back of the turnip remain dark.

  • Peel & shade

    None. Turnip skin does not peel away as a separate layer in the way pumpkin rind can.

  • Cut through

    Both triangular eye holes and the oval mouth are cut fully through the flesh for warm LED glow.

Learn the carving basics

Before you start cutting

How do I hollow a turnip without splitting the outer skin?

Work in small scooping motions from the center outward, never levering the spoon against the outer wall. Check the wall thickness often by pressing gently from outside. Turnip flesh is denser than pumpkin, so take your time. A flexible melon baller reaches the edges better than a rigid spoon.

How long will a carved turnip last before it starts to dry out or rot?

A carved turnip at room temperature will begin to shrink and dry within three to four days and may mold within a week if kept in warm humid conditions. Refrigerating it between displays extends its life. For a longer-lasting version, consider using a craft-foam pumpkin with a similar simple face design.

Is turnip carving significantly harder than pumpkin carving?

The hollow step is more physical effort because turnip flesh is much denser than pumpkin flesh. The face cuts themselves are straightforward on the thin hollowed wall. Budget extra time for hollowing and keep your knife sharp throughout, because a dull blade tears the dense fibers rather than slicing cleanly.

Your take belongs here, too.

Changed a detail? Made it simpler? Share a photo of your version and tell the community what worked.

Share your pumpkin

More pumpkins like this

You've reached the end · 8 pumpkins
The Patch Report

Fresh pumpkins, in your inbox.

The best new carvings, ideas worth stealing, and how-tos for carving season. Short, seasonal, and gone by November.

A short email during carving season. Unsubscribe anytime. See our privacy policy.