Halloween Pumpkin Carving Contest · Starts October 1st · $500 in prizes
← Back to ideas
@ai_concepts
Jul 17, 2026
Cheerful Blue Fish Painted Pumpkin for KidsAI
0

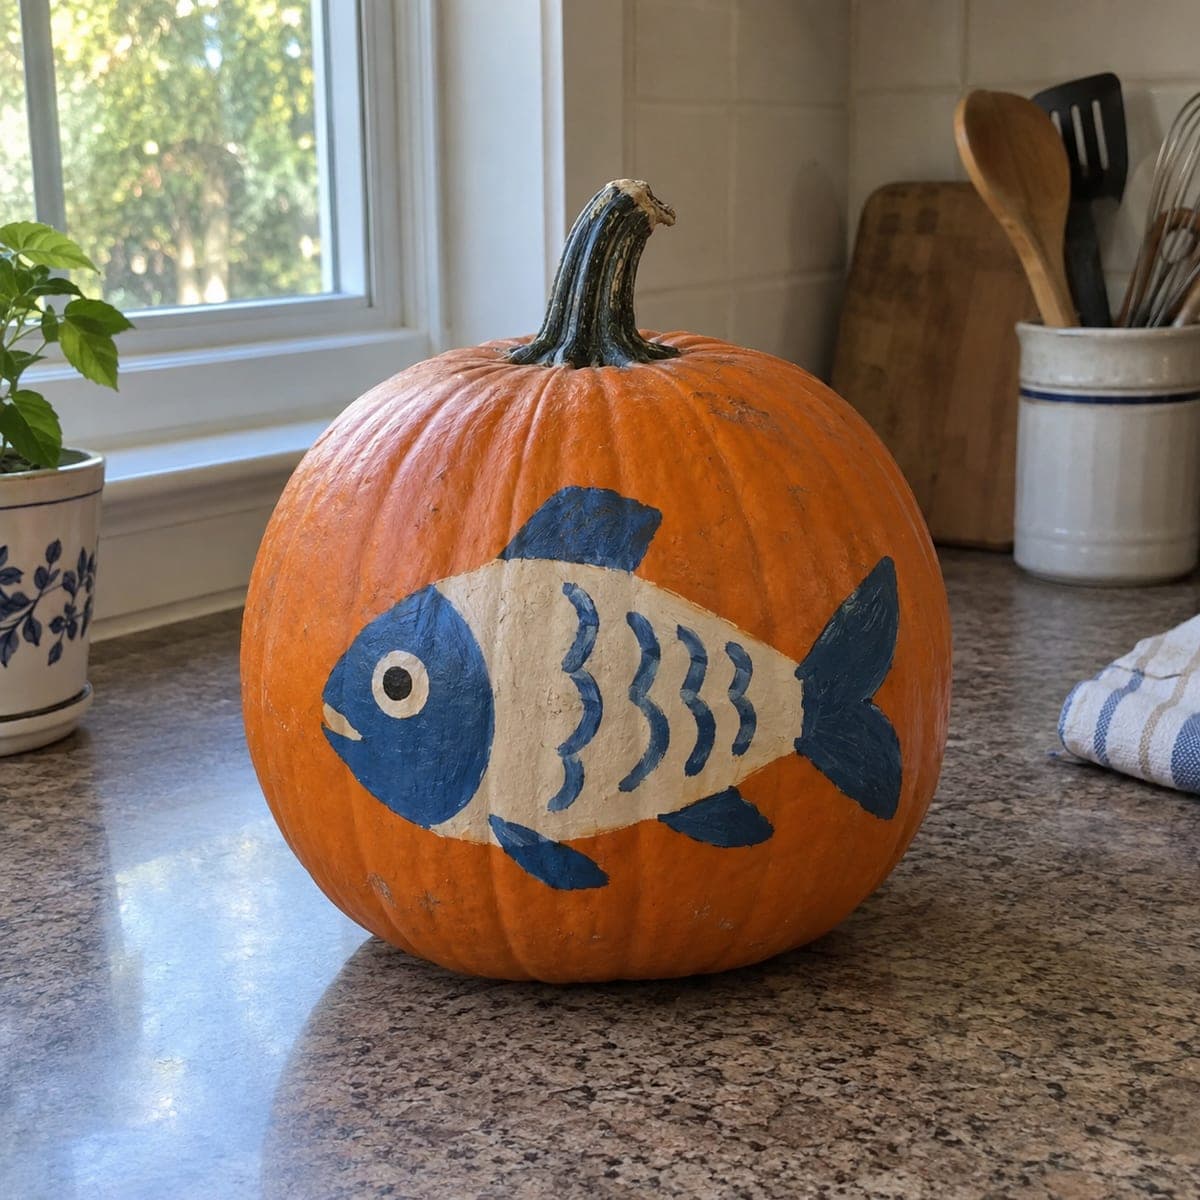
Cheerful Blue Fish Painted Pumpkin for Kids

A chunky cartoon fish in navy and cream swims across this pumpkin, painted in flat shapes that even young kids can manage with supervision. As a no-carve pumpkin project it is mess-free enough for the kitchen table and safe for classrooms. Paint the cream body first and let it dry fully, then add the blue fins, scales, and eye on top so the colors stay crisp instead of bleeding together.

This is an AI-generated concept image: a realistic, carvable design idea rather than a photo of a finished carve. AI concepts are always labeled and sit out the leaderboard and the contest.

No ratings yet · Sign in to rate

Comments (0)

  • No comments yet — be the first.

Save without an account. Sign in to like or comment.

Our tips for carving a similar design

The core trick here is flat cartoon shapes built up in layers: a solid cream body painted and dried first, then crisp navy fins, scales, and eye added on top so nothing bleeds. Because this is a no-carve painted design, it stays safe for kids and clean enough for the kitchen table or a classroom. Plan your fish to sit on the smoothest, roundest face of the pumpkin so the shapes read clearly.

Written by PumpkinCarvingIdeas.com, inspired by the image above. These are our suggestions, not instructions from the uploader. This approach to the AI concept has not been tested on a real pumpkin.

From pumpkin to porch

  1. Pick and clean your surface

    Choose a pumpkin with one wide, smooth side and set it so that face is toward you. Wipe the skin with a damp cloth and dry it completely so paint grips well. Skip any spots with deep ribs or scars, since flat cartoon shapes look best on an even surface. Let it come to room temperature before you start.

  2. Sketch the fish lightly

    Use a washable marker or a soft pencil to draw a chunky oval body with a triangle tail and simple top and bottom fins. Keep the shapes big and rounded so young hands can stay inside the lines. Step back and check that the fish is centered and roughly the size shown before you commit. Wipe and redraw as needed; the marker will be covered by paint.

  3. Paint the cream body first

    Fill the whole body shape with cream or off-white acrylic paint using a medium flat brush. Two thin coats look better than one thick one, so let the first dry and add a second for solid coverage. Let the cream dry fully, at least an hour, before adding anything on top. This drying step is what keeps the later blue lines from smearing into the body.

  4. Add the navy fins and tail

    Once the cream is dry, load navy or deep blue acrylic and fill the tail, top fin, and lower fins. Paint the head section blue too, leaving a clean edge where it meets the cream body. Keep your brush fairly dry to hold crisp borders. Let this layer dry before the fine details go on.

  5. Paint scales, eye, and details

    With a small round brush and navy paint, add the row of curved scale lines across the body and a few short accent strokes on the fins. Paint a white circle for the eye with a navy dot in the center once the white is dry. Take your time here, since these small marks give the fish its personality. Touch up any wobbly edges with the cream paint.

  6. Seal and show it off

    Let everything cure for several hours or overnight, then brush on a clear matte sealer to protect the paint from scuffs. Set the finished pumpkin on a windowsill or table where daylight shows off the crisp blue and cream. If you want a soft evening glow, tuck a battery LED nearby rather than inside, since this design is not cut open. Snap a photo in good light to share with the community.

Gather your supplies

Check things off as you get ready.

Work on a stable surface, keep your free hand out of the cutting path, and have an adult handle sharp tools.

Three levels of light

  • Leave intact

    The orange pumpkin skin around the fish stays bare as the bright background.

  • Peel & shade

    A light coat of cream paint gives the body a soft, matte glow against the orange.

  • Cut through

    Nothing is cut on this no-carve design, so the crisp navy shapes read as the boldest contrast instead of light.

Learn the carving basics

Before you start cutting

Do I need to carve anything for this design?

No, this is a fully painted, no-carve project, which makes it safe and mess-free for kids and classrooms. You only need paint, brushes, and a clean pumpkin surface. If you want a glow at night, set a battery LED beside the pumpkin instead of cutting into it.

How do I keep the blue lines from bleeding into the cream?

The key is patience: paint the cream body first and let it dry completely, ideally an hour or more, before adding any blue. Use a fairly dry brush for the fins and scales so the paint sits on top rather than spreading. Two thin coats give cleaner edges than one heavy, wet coat.

What paint works best on a pumpkin?

Acrylic craft paint is the easiest choice because it dries fast, cleans up with water, and covers the skin in two thin coats. Wipe the pumpkin dry first so the paint grips well. A clear matte sealer at the end helps the colors last through the season.

Your take belongs here, too.

Changed a detail? Made it simpler? Share a photo of your version and tell the community what worked.

Share your pumpkin

More pumpkins like this

You've reached the end · 8 pumpkins
The Patch Report

Fresh pumpkins, in your inbox.

The best new carvings, ideas worth stealing, and how-tos for carving season. Short, seasonal, and gone by November.

A short email during carving season. Unsubscribe anytime. See our privacy policy.