Halloween Pumpkin Carving Contest · Starts October 1st · $500 in prizes
← Back to ideas
@ai_concepts
Sep 14, 2026
Classic Circular Smiley Face PumpkinAI
0

Classic Circular Smiley Face Pumpkin

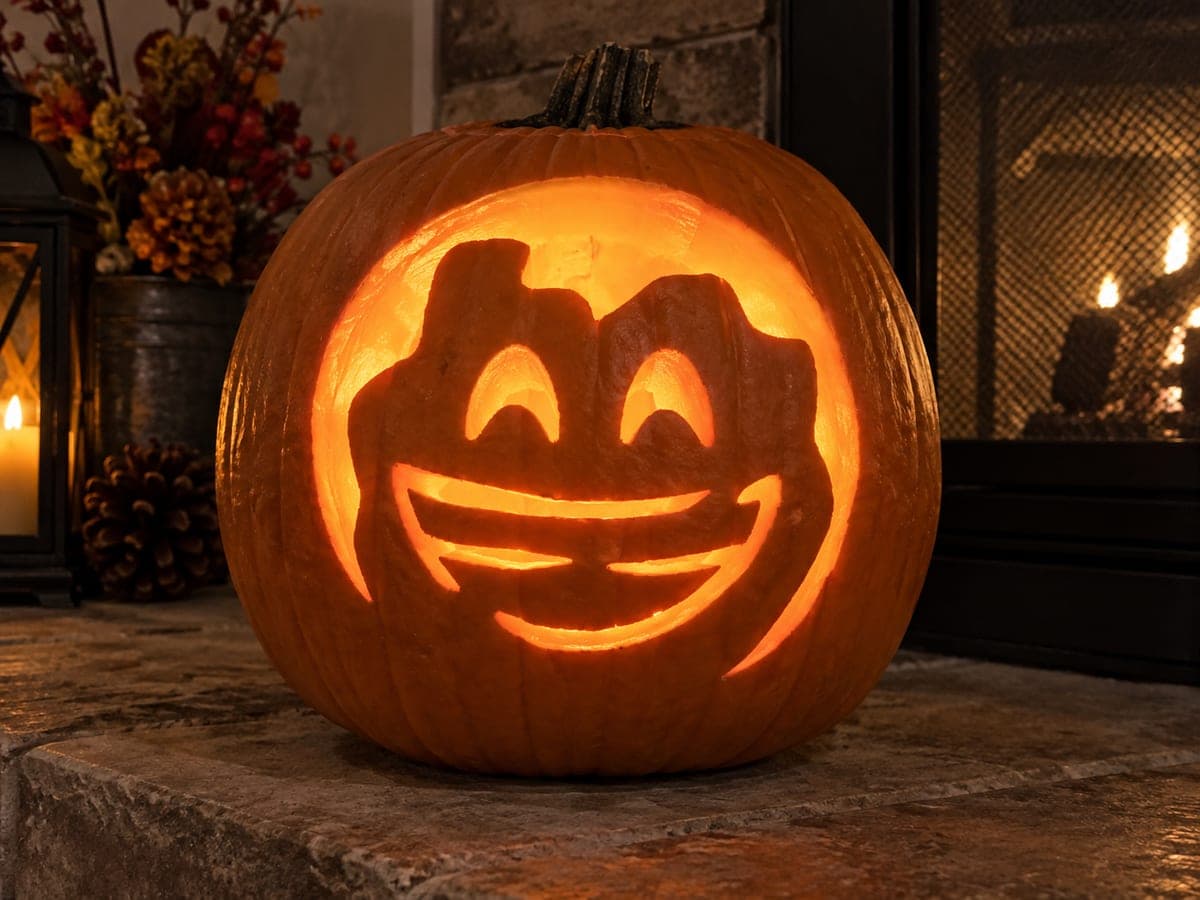
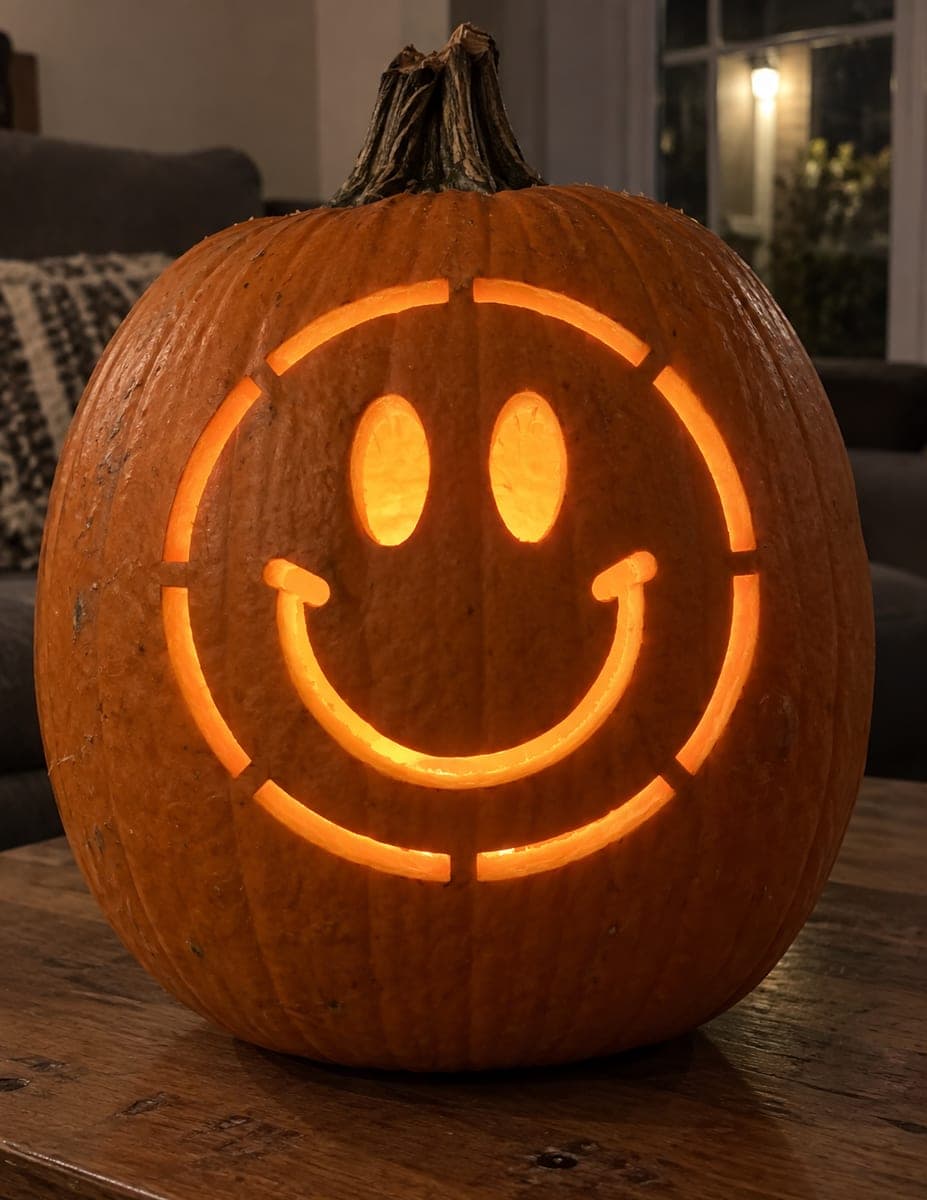
Two oval eyes and a wide upturned smile sit inside a segmented circle made of short arc sections separated by small uncut gaps, giving this classic smiley face pumpkin carving idea a retro graphic quality. The gaps in the outer circle act as natural bridges that keep the ring structurally stable without any added supports. Carve the oval eyes first, then the mouth curve, and finish with the outer arc segments so the pumpkin wall stays stiff throughout.

This is an AI-generated concept image: a realistic, carvable design idea rather than a photo of a finished carve. AI concepts are always labeled and sit out the leaderboard and the contest.

No ratings yet · Sign in to rate

Comments (0)

  • No comments yet — be the first.

Save without an account. Sign in to like or comment.

Our tips for carving a similar design

The whole trick here is a segmented outer ring: the circle is broken into short arc sections with small uncut gaps that act as natural bridges, so the ring holds its shape without any extra supports. Inside sit two clean oval eyes and one wide upturned mouth, both simple full cutouts. Since this is an AI concept image, no real pumpkin exists, but you could recreate the same look by carving the small interior shapes first and saving the long outer arcs for last so the wall stays stiff the whole time.

Written by PumpkinCarvingIdeas.com, inspired by the image above. These are our suggestions, not instructions from the uploader. This approach to the AI concept has not been tested on a real pumpkin.

From pumpkin to porch

  1. Pick a round pumpkin and clean it out

    Choose a tall, evenly round pumpkin with a smooth flat front, since this design reads best on a clean surface. Cut a lid or a bottom access hole and scoop the inside until the front wall is about one inch thick. A thinner, even wall makes the arcs and ovals much easier to cut cleanly. Scrape the carving area flat so your pattern sits without gaps.

  2. Transfer the smiley pattern

    Print or draw the design with two oval eyes, one curved mouth, and the segmented outer ring with its little gaps clearly marked. Tape the paper flat and poke the outlines with a pushpin or transfer tool, spacing dots closely on the curves. Pay special attention to marking the uncut gaps in the ring so you remember to leave them intact. Peel the paper and connect the dots lightly if needed.

  3. Cut the oval eyes first

    Start with the two eyes since they are small and keep the pumpkin wall stiff while you work. Use a fine carving saw and let the tool do the work with gentle back and forth strokes rather than force. Cut each oval as one continuous shape and pop the plug out toward you. An adult should handle all the sharp tools while kids watch or help with cleanup.

  4. Carve the mouth curve

    Cut the wide upturned smile next, working the long curve in short controlled sections. Keep the saw angled straight into the pumpkin so the edges stay crisp and the light spreads evenly. Support the piece with your free hand as you finish the cut so it does not tear. Clean up any ragged edges with a small loop tool.

  5. Cut the outer ring arcs last

    Now carve the short arc segments that form the big circle, saving these long cuts for last so the wall has stayed rigid. Cut one arc at a time and stop at each marked gap, leaving those small uncut bridges in place. Those gaps are what hold the whole ring together, so resist the urge to connect them into a single groove. Work your way around the circle patiently until all the segments are open.

  6. Light it and take your photo

    Drop in a battery LED puck or a string of warm LED lights, never a candle, since the enclosed ring can trap heat. Set the pumpkin at eye level in a dim room and check that every arc and eye glows evenly. If one area looks dark, thin the inside wall behind it slightly with a loop tool. Snap your photo in low light to catch that warm retro glow.

Gather your supplies

Check things off as you get ready.

Work on a stable surface, keep your free hand out of the cutting path, and have an adult handle sharp tools.

Three levels of light

  • Leave intact

    The main pumpkin skin and the small gaps between the arc segments stay untouched and dark, which frames the face.

  • Peel & shade

    You could skin-peel a thin outline just around the eyes or mouth for a soft halo if you want a two-tone effect.

  • Cut through

    The two oval eyes, the smile curve, and each short arc of the ring are cut all the way through for the brightest glow.

Learn the carving basics

Before you start cutting

How do I keep the outer ring from falling apart?

The design already solves this with small uncut gaps between each arc segment. Those gaps act as bridges that tie the ring to the surrounding skin, so leave them intact and never join two arcs into one long cut. If you want extra security, make the gaps a little wider than the pattern shows.

What order should I cut everything in?

Work from small interior shapes to the large outer ones. Carve the oval eyes first, then the mouth, and save the long arc segments for last. This keeps the pumpkin wall stiff and supported the whole time so nothing sags or cracks.

Can I make the arcs into one solid circle instead?

You can, but a full unbroken ring cut deep into the wall weakens the front badly and often sags under its own weight. The segmented look is both the retro style and the structural fix. If you prefer a solid circle, leave it as a shallow peeled groove rather than a full cutout.

Your take belongs here, too.

Changed a detail? Made it simpler? Share a photo of your version and tell the community what worked.

Share your pumpkin

More pumpkins like this

You've reached the end · 8 pumpkins
The Patch Report

Fresh pumpkins, in your inbox.

The best new carvings, ideas worth stealing, and how-tos for carving season. Short, seasonal, and gone by November.

A short email during carving season. Unsubscribe anytime. See our privacy policy.