Halloween Pumpkin Carving Contest · Starts October 1st · $500 in prizes
← Back to ideas
@ai_concepts
Sep 8, 2026
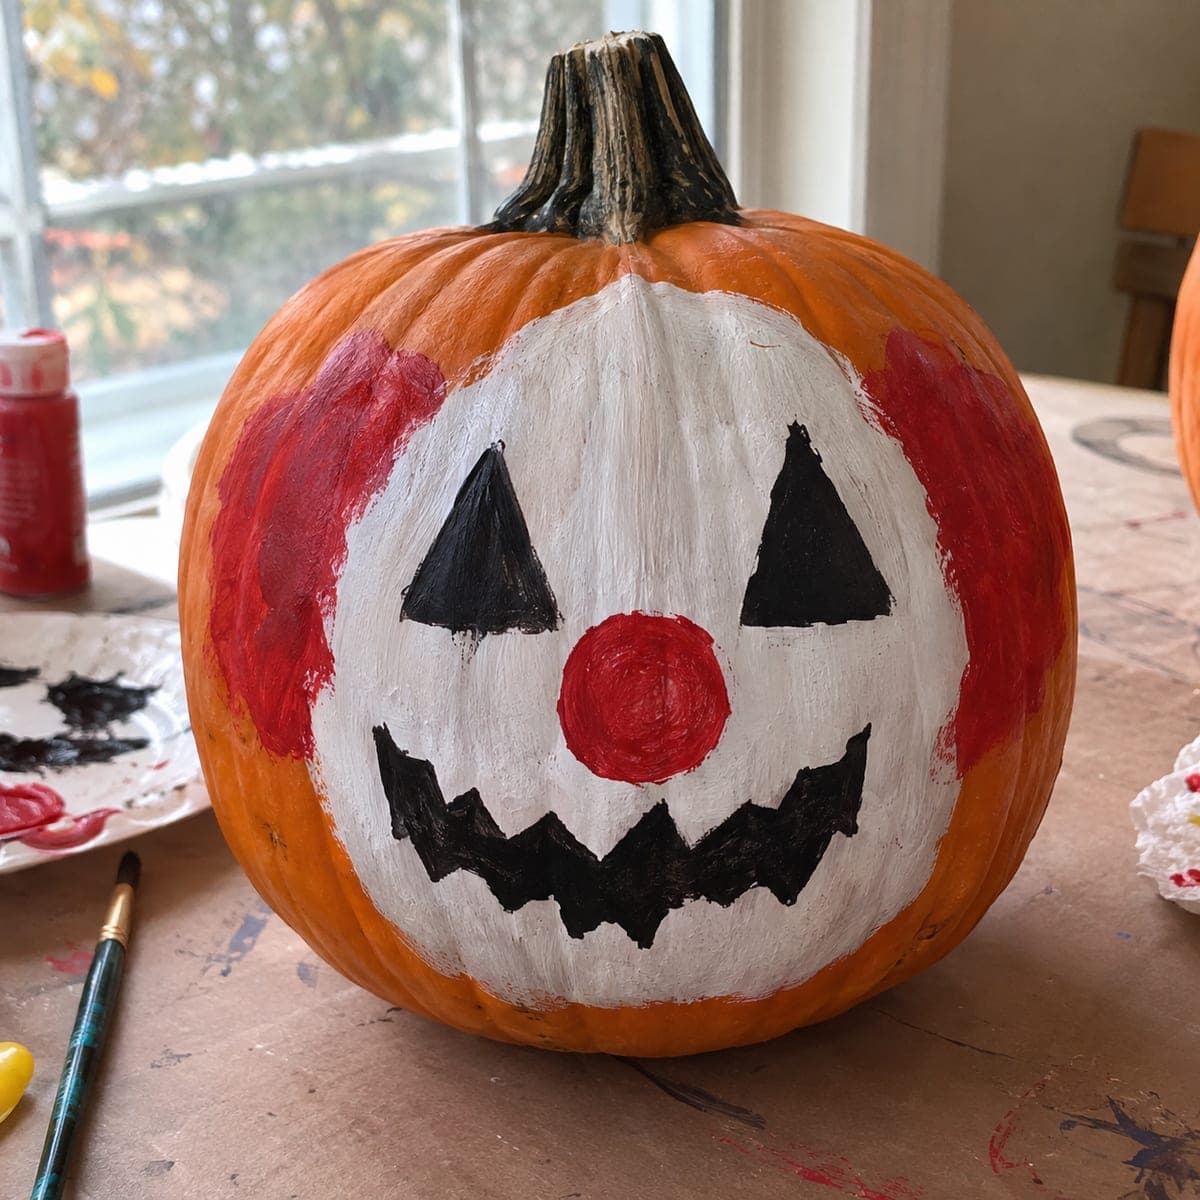
Classic Clown Face Painted PumpkinAI
0

Classic Clown Face Painted Pumpkin

A cheerful clown face takes over this no-carve pumpkin, with a white painted mug, red side curls, a round red nose, and traditional triangle eyes above a zigzag grin. It borrows the classic jack-o-lantern features, which makes it an easy afternoon craft with a small paint set. Lay down the white base coat and let it dry completely before adding the black features, then finish with the red hair and nose so the colors stay crisp.

This is an AI-generated concept image: a realistic, carvable design idea rather than a photo of a finished carve. AI concepts are always labeled and sit out the leaderboard and the contest.

No ratings yet · Sign in to rate

Comments (0)

  • No comments yet — be the first.

Save without an account. Sign in to like or comment.

Our tips for carving a similar design

The whole trick here is a bright white painted mug that turns a plain pumpkin into a clown face, with bold black triangle eyes and a zigzag grin borrowed straight from the classic jack-o-lantern. Since this is a no-carve design, you build it in dry paint layers, white first, then black features, then the red curls and nose last so nothing smears. Plan your colors so each coat dries fully before the next one goes on.

Written by PumpkinCarvingIdeas.com, inspired by the image above. These are our suggestions, not instructions from the uploader. This approach to the AI concept has not been tested on a real pumpkin.

From pumpkin to porch

  1. Prep and sketch the face

    Wipe the pumpkin clean and dry so paint grips well. Pick the flattest, roundest side as your face. Use a pencil to lightly sketch the oval white area, the two triangle eyes, the round nose, and the zigzag mouth. Keep the eyes high and the grin wide so the clown reads clearly from a few feet away.

  2. Lay the white base coat

    Paint the large oval white area first with a flat brush, following your pencil outline. Two thin coats look smoother than one thick one and hide the orange better. Let each coat dry completely, usually an hour or more, before moving on. Resist adding features until the white is bone dry so the black lines stay crisp.

  3. Add the black features

    Once the white is dry, fill in the two triangle eyes and the zigzag grin with black using a smaller round brush. Outline each shape first, then fill toward the center so the edges stay sharp. Keep the mouth points even and pointed for that classic grin. Let the black dry before touching those areas again.

  4. Paint the red nose and curls

    Add the round red nose in the center, building it up in a couple coats for a solid, glossy look. Then paint the two red side curls just outside the white oval where a clown's hair would sit. A slightly loose, textured stroke gives the hair some life. Let everything dry hard before handling.

  5. Touch up and seal

    Check for any orange peeking through the white or wobbly edges, and touch them up with a fine brush. If you want the colors to last, brush on a thin coat of clear matte sealer once dry. This also helps if the pumpkin will sit outside under a porch.

  6. Style and photograph

    Set the clown on a table or step with soft, even light so the white face pops. Because there are no cutouts, skip candles entirely and let the paint do the work. Snap your photo straight on to show off the symmetrical grin and share it with the community.

Gather your supplies

Check things off as you get ready.

Work on a stable surface, keep your free hand out of the cutting path, and have an adult handle sharp tools.

Three levels of light

  • Leave intact

    The orange skin around the face and the red curls stay unpainted-dark in tone, framing the mug.

  • Peel & shade

    For a subtle glow variation, you could lightly scrape the skin inside the eyes and mouth so they read softer than the paint.

  • Cut through

    If you want real light, an adult could carve through the triangle eyes and zigzag grin and drop in an LED, cutting those big openings last.

Learn the carving basics

Before you start cutting

Do I need to carve anything for this clown?

No, this is a fully painted, no-carve design, which is why it works for kids and first-timers. You only need paint and brushes. If you later want a glow, an adult can cut the eyes and mouth and add an LED light.

Why paint white before the black and red?

The white oval is the clown's face and everything else sits on top of it, so it has to go down first and dry completely. Painting black eyes or a red nose over wet white will smear and turn muddy. Let each layer dry fully and your lines stay crisp.

Will the paint hold up outside?

Acrylic paint handles a covered porch reasonably well, especially with a coat of clear matte sealer over the top. Keep it out of direct rain and harsh sun so the white does not dull. A real pumpkin will still soften over a couple weeks no matter what, so paint close to Halloween.

Your take belongs here, too.

Changed a detail? Made it simpler? Share a photo of your version and tell the community what worked.

Share your pumpkin

More pumpkins like this

You've reached the end · 8 pumpkins
The Patch Report

Fresh pumpkins, in your inbox.

The best new carvings, ideas worth stealing, and how-tos for carving season. Short, seasonal, and gone by November.

A short email during carving season. Unsubscribe anytime. See our privacy policy.