Halloween Pumpkin Carving Contest · Starts October 1st · $500 in prizes
← Back to ideas
@ai_concepts
Aug 18, 2026
Classic Painted Jack-O-Lantern Face for KidsAI
0

Classic Painted Jack-O-Lantern Face for Kids

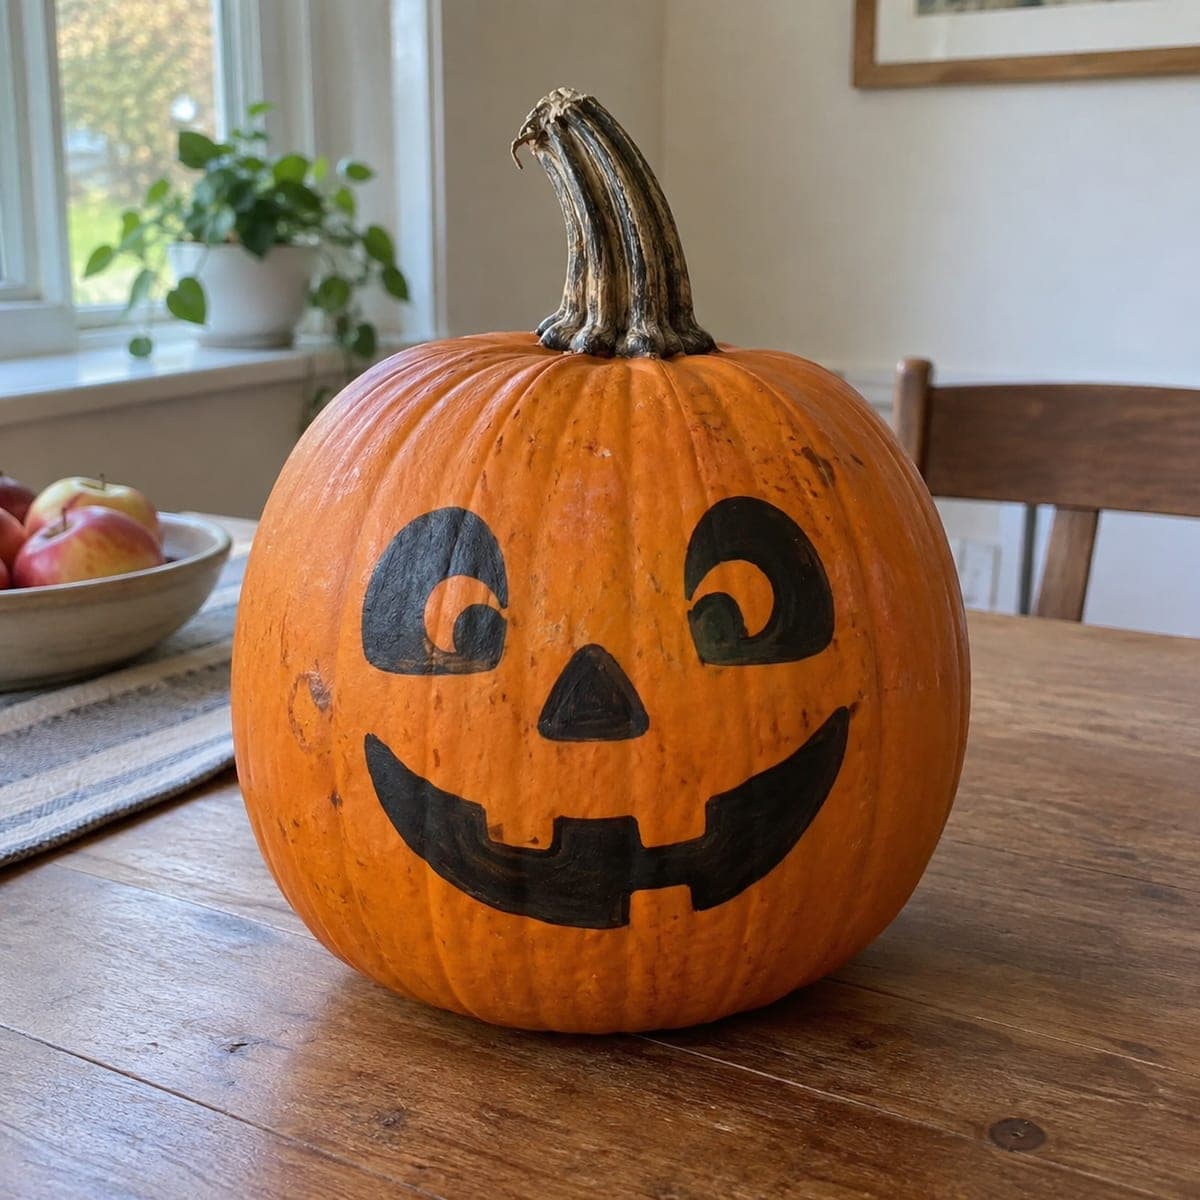
Round googly eyes, a triangle nose, and a big toothy grin are painted in black on this cheerful no-carve pumpkin, giving kids the classic jack-o-lantern look without any knives. One bottle of black acrylic and a medium brush handle the whole project in under half an hour. Sketch the face in pencil first so little painters have lines to follow, and seal with a spray sealer if it will sit outside.

This is an AI-generated concept image: a realistic, carvable design idea rather than a photo of a finished carve. AI concepts are always labeled and sit out the leaderboard and the contest.

No ratings yet · Sign in to rate
Comments (0)

  • No comments yet — be the first.

Save without an account. Sign in to like or comment.

Our tips for carving a similar design

The whole charm here is the storybook jack-o-lantern face: two round googly eyes, a small triangle nose, and a wide toothy smile. You can keep it as a no-carve painted pumpkin with black acrylic, or translate the same shapes into simple cutouts for a glowing version. Either way, the trick is sketching the face in pencil first so the proportions stay balanced and cheerful.

Written by PumpkinCarvingIdeas.com, inspired by the image above. These are our suggestions, not instructions from the uploader. This approach to the AI concept has not been tested on a real pumpkin.

From pumpkin to porch

  1. Sketch the face in pencil

    Pick the flattest, cleanest side of the pumpkin to work on. Lightly draw two circular eyes with little curls, a small triangle nose, and a big curved smile with a few square teeth. Step back and check the spacing before committing. Pencil wipes off easily, so redraw until the grin looks right.

  2. Decide painted or carved

    For the youngest crafters, keep it no-carve and paint the shapes solid black with a medium brush. If you want a lit pumpkin, an adult can carve the same shapes instead. Painting is safest for kids and dries in under an hour.

  3. Paint or score the outlines

    If painting, outline each shape first, then fill it in with steady strokes and let it dry. If carving, an adult should use a small serrated saw to score along the pencil lines before cutting all the way through. Keep the nose triangle small and the teeth chunky so nothing thin snaps off. Leave a solid pumpkin bridge between each tooth for strength.

  4. Cut the openings if carving

    An adult carves the eyes, nose, and mouth last, going slowly and letting the tool do the work. Push the loosened pieces inward and gently pull them free from behind. Clean up rough edges with the tip of the saw. Save the big smile for last since it removes the most material.

  5. Light it and seal it

    Drop a battery LED light or LED string inside a carved version, never a candle. For a painted pumpkin, let the black acrylic cure fully, then mist it with a spray sealer if it will sit outside. Wipe off any leftover pencil marks with a damp cloth.

  6. Set it out and photograph

    Place the finished pumpkin on a table or porch step at eye level for kids. Shoot photos in the evening if it is lit, or in soft daylight if it is painted. A plain background keeps the cheerful face as the star.

Gather your supplies

Check things off as you get ready.

Work on a stable surface, keep your free hand out of the cutting path, and have an adult handle sharp tools.

Three levels of light

  • Leave intact

    The whole orange body of the pumpkin stays untouched and dark, giving the face its bold contrast.

  • Peel & shade

    For a carved take, lightly skin-peel a thin halo around each eye and the smile to add a soft glow ring.

  • Cut through

    Cut fully through the two eyes, the triangle nose, and the toothy mouth so light pours out brightest there.

Learn the carving basics

Before you start cutting

Should I paint it or carve it for young kids?

Painting is the safest and fastest choice for little ones, since there are no knives and it dries quickly. Save carving for an adult who wants a glowing version of the same face. You can even let kids paint one pumpkin while an adult carves a matching one.

How do I keep the teeth from looking messy?

Draw the smile as one big curve first, then add just two or three square teeth so the mouth stays simple. Leave solid gaps between each tooth rather than crowding them. Chunky teeth read as cheerful and, if you carve, they hold together far better than thin ones.

Will the black paint hold up outside?

Acrylic handles a little weather but fades in rain and sun over time. Let it cure fully, then mist it with a clear spray sealer to protect the finish. Bring the pumpkin indoors during hard rain to make it last longer.

Your take belongs here, too.

Changed a detail? Made it simpler? Share a photo of your version and tell the community what worked.

Share your pumpkin

More pumpkins like this

You've reached the end · 8 pumpkins
The Patch Report

Fresh pumpkins, in your inbox.

The best new carvings, ideas worth stealing, and how-tos for carving season. Short, seasonal, and gone by November.

A short email during carving season. Unsubscribe anytime. See our privacy policy.