Halloween Pumpkin Carving Contest · Starts October 1st · $500 in prizes
← Back to ideas
@ai_concepts
Sep 25, 2026
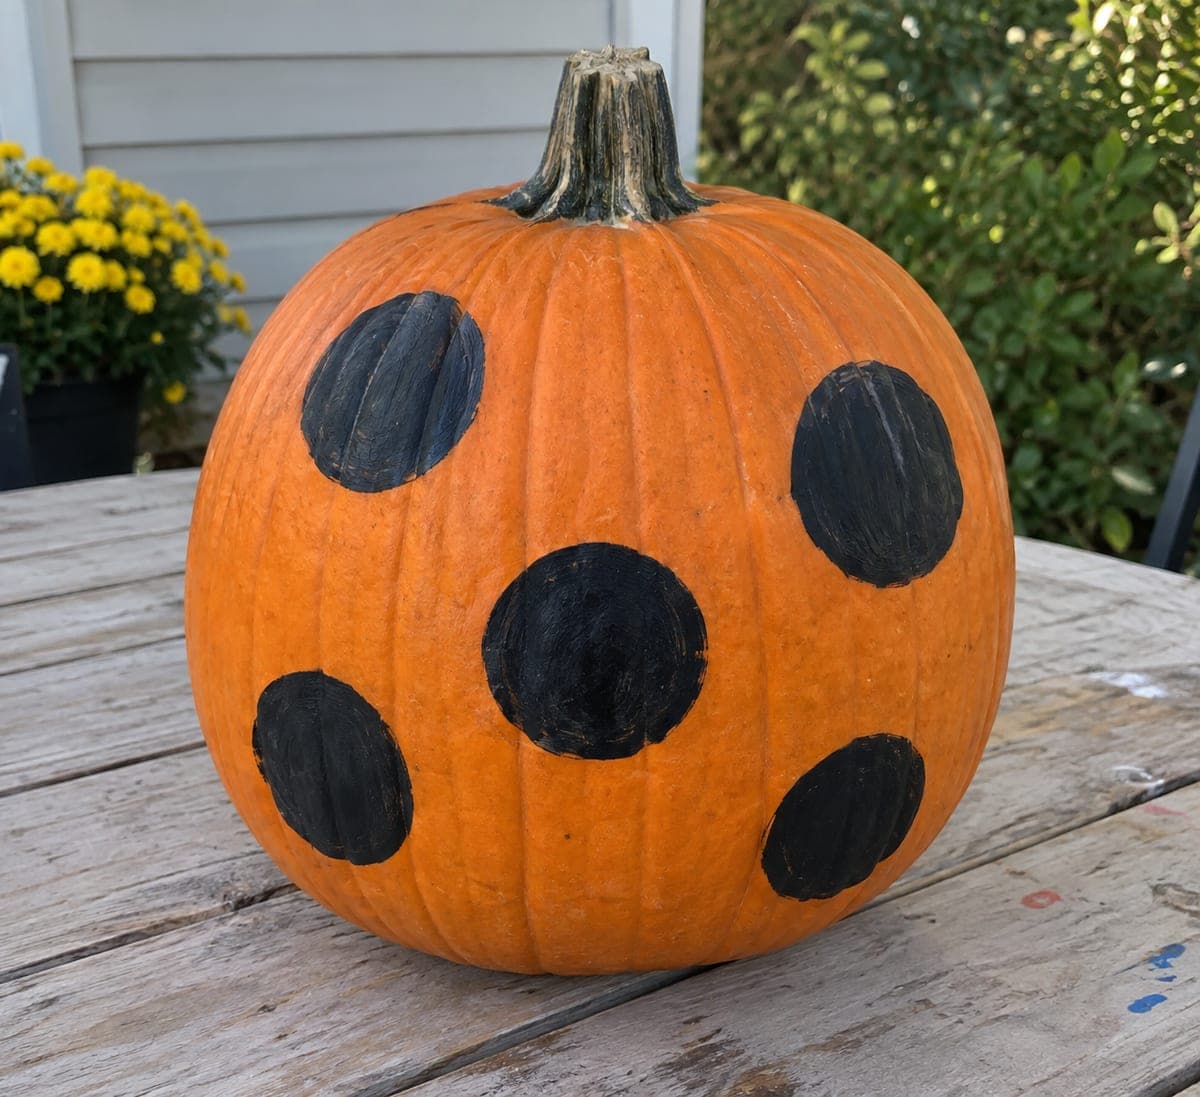
Black Polka Dot Pumpkin for No-Carve BeginnersAI
0

Report this carving

Tell us what is wrong. Reports are private.

Black Polka Dot Pumpkin for No-Carve Beginners

Five large slightly imperfect black circles painted across an orange pumpkin create a graphic, modern no-carve pumpkin carving idea for beginners that requires no tools beyond a brush and paint. Load a wide flat brush or a round brush generously with black craft paint and dab each circle in a loose quincunx arrangement, letting the edges stay slightly rough for a handmade quality. Allow the paint to dry for at least two hours before handling, and finish with a matte sealer for outdoor durability. Simple as it is, the bold polka-dot pattern reads strongly from a distance on any doorstep.

No ratings yet · Sign in to rate
Comments (0)

  • No comments yet — be the first.

Save without an account. Sign in to like or comment.

Our tips for carving a similar design

The design is as simple as painted decoration gets: five large black circles applied with a brush or a round sponge across the pumpkin face. The slightly imperfect, handmade quality of freehand circles is a feature rather than a flaw. Two thin coats of paint and a matte outdoor sealer are all that stand between a plain pumpkin and a bold, modern display piece.

From pumpkin to porch

  1. Clean and prepare the surface

    Wipe the pumpkin with a damp cloth and let it dry completely. A clean surface holds acrylic paint much better than a dusty or waxy one. No sanding is needed for a design this simple, but a wipe-down is worth the two minutes it takes.

  2. Plan the dot placement

    Lightly mark the center point of each of the five circles on the pumpkin surface with a pencil. A quincunx arrangement, four dots near the corners of an imaginary rectangle with one in the center, works well on most pumpkin shapes and gives the design a balanced, graphic quality. Keep each dot center at least the dot's own diameter away from the next to maintain clear separation.

  3. Apply the first coat of each dot

    Load a wide flat brush or a round sponge generously with black acrylic paint and dab or brush the first coat of each circle. Do not try to get a perfectly sharp edge on the first coat: a slightly soft edge on the first coat actually helps the second coat look crisper by comparison. Let all five first coats dry for at least twenty minutes.

  4. Apply the second coat

    The second coat is where the dot gets its full density and definition. Apply it with more deliberate edge control than the first: load the brush slightly less heavily and paint around the perimeter of each dot first to establish the boundary, then fill in the center. The result is a full, dense black circle with a clean edge.

  5. Let dry fully

    Allow all five dots to dry completely, at least an hour at room temperature, before handling the pumpkin or adding any sealer. Pressing on paint that is dry on the surface but still wet underneath can dent or smear the circle. If you are working in cool conditions, dry time may be longer.

  6. Seal and display

    Apply two light coats of matte outdoor spray sealer with a few minutes of drying between coats. The bold polka-dot pattern reads strongly from the end of a driveway and is equally at home as a modern indoor display. The sealed design will stay crisp and bold through October 31.

Written with AI to match this design

Gather your supplies

Check things off as you get ready.

Work on a stable surface, keep your free hand out of the cutting path, and have an adult handle sharp tools.

Three levels of light

  • Leave intact

    Natural orange rind fills all space between and around the five black circles

  • Peel & shade

    None, the shell stays fully intact

  • Cut through

    None. Place the pumpkin near a porch light or use a small spotlight to illuminate the painted dots at night

Learn the carving basics

Before you start cutting

How do I paint a circle that looks round rather than blobby?

A round sponge cut from a kitchen sponge produces a more consistent circular shape than a brush. Dab the sponge straight down onto the surface rather than sweeping it, which drags the edge. For a cleaner result, cut a circle from cardboard the size you want and trace around it lightly with a pencil before filling in with paint.

Can I use colors other than black for a modern look?

Absolutely. Deep navy, forest green, burnt orange, or even metallic gold all work well against the pumpkin's natural orange. Using two alternating colors for the five dots adds even more graphic interest. Keep the palette to two colors maximum so the design stays bold and readable.

My dots dried with slightly different sizes. Does that matter?

Slight size variation adds a handmade quality that many people find more charming than machine-perfect circles. If the difference is significant, you can carefully add a thin ring of paint around the smaller dots in the second coat to bring them closer in size. A gentle touch and a steady hand are all that is needed.

Your take belongs here, too.

Changed a detail? Made it simpler? Share a photo of your version and tell the community what worked.

Share your pumpkin

More pumpkins like this

You've reached the end · 8 pumpkins
The Patch Report

Fresh pumpkins, in your inbox.

The best new carvings, ideas worth stealing, and how-tos for carving season. Short, seasonal, and gone by November.

A short email during carving season. Unsubscribe anytime. See our privacy policy.