Halloween Pumpkin Carving Contest · Starts October 1st · $500 in prizes
← Back to ideas
@ai_concepts
Sep 25, 2026
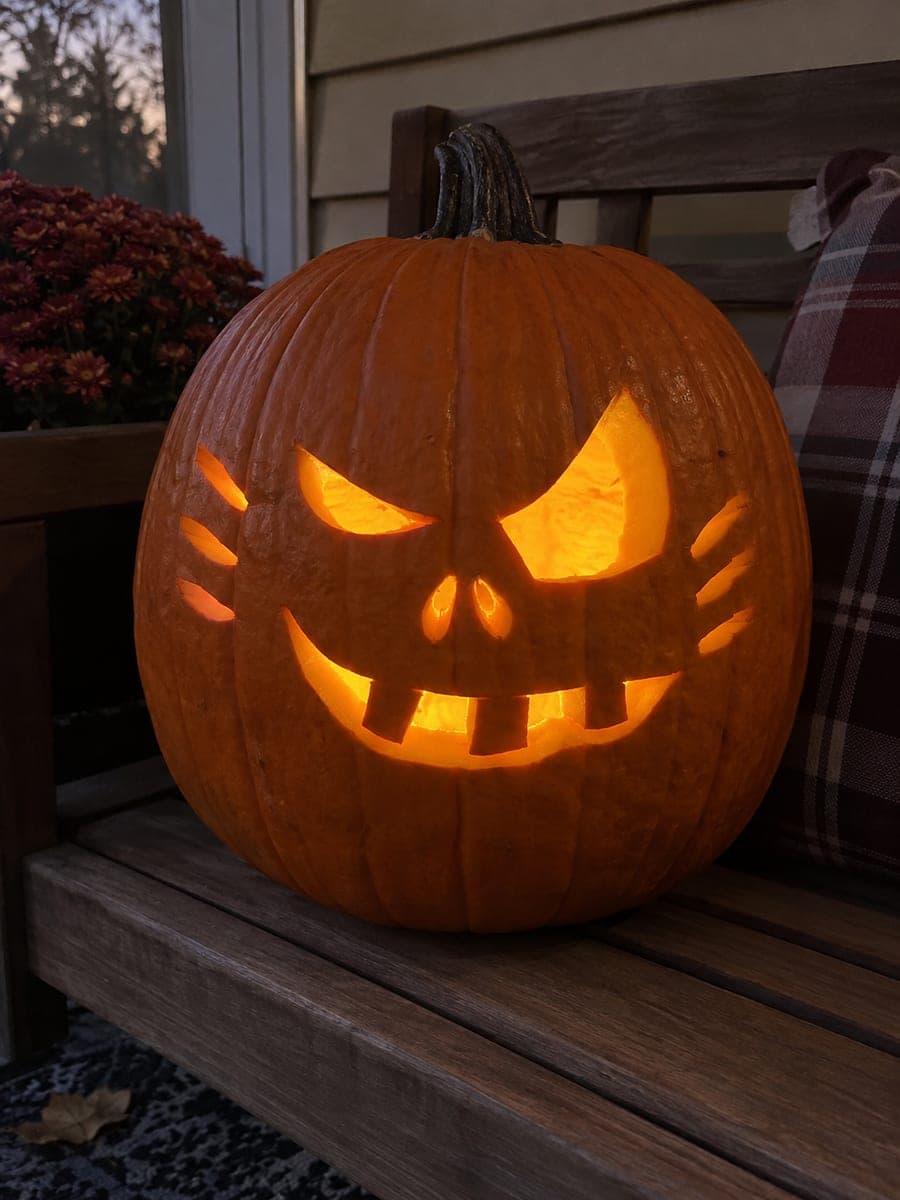
Clenched Pumpkin Face With Rectangular Pupil TabsAI
0

Report this carving

Tell us what is wrong. Reports are private.

Clenched Pumpkin Face With Rectangular Pupil Tabs

Upper-rooted broad rectangular pupils under slanted brows, separate short furrow holes, twin nostrils, a clenched mouth formed by ten independent rectangular gaps, and eight angular cheek slits make this a precise hard angry pumpkin face where every element reinforces the fury. The furrow holes between the brows are small but critical: they add the deep-set tension that makes the design read as genuinely angry rather than merely stern. Cut the brows and furrows first, then the eyes and pupils, then the clenched mouth, leaving the cheek slits for last.

No ratings yet · Sign in to rate

Comments (0)

  • No comments yet — be the first.

Save without an account. Sign in to like or comment.

Our tips for carving a similar design

The small furrow holes between the brows are the emotional core of this design. They add deep-set tension that makes the face read as genuinely furious rather than stern. Upper-rooted rectangular pupils, a ten-gap clenched mouth, and eight angular cheek slits build outward from that central furrow detail. Cut in strict sequence: brows, furrows, eyes, mouth, cheeks.

From pumpkin to porch

  1. Hollow and thin

    Hollow from the back and thin the inner wall to about 1.8 cm across the entire face. The many small cuts in this design require a consistent wall thickness for clean edges. Dry the surface thoroughly before marking.

  2. Transfer the full layout

    Use a poking tool to transfer all elements: slanted brow lines, short furrow holes between them, both eye outlines with upper-rooted rectangular pupils, twin nostril holes, the clenched mouth with ten rectangular gap positions, and eight cheek slit positions. Check every bridge before cutting.

  3. Cut brows and furrow holes

    Carve the slanted brow outlines first using short cuts, then remove the small furrow holes between the brows with a fine detail blade. These are tight cuts, so take your time and prioritize clean edges over speed.

  4. Cut eyes with upper-rooted pupils

    Cut each eye opening, then carefully remove the rind around each rectangular pupil while keeping its upper root fully attached to the top rim of the eye. The pupil should feel stable when tapped gently before you move on.

  5. Cut nostrils and clenched mouth

    Remove the two nostril holes with a small bit or detail blade. Then cut the ten rectangular mouth gaps one at a time, from the outer corners inward, leaving equal rind bars between each gap.

  6. Cut cheek slits and light

    Finish with the eight angular cheek slits. Use a detail blade for these narrow cuts. Insert a bright LED and check that the pupil tabs are reading as dark rectangles inside lit eye fields, which creates the intense staring quality the design calls for.

Written with AI to match this design

Gather your supplies

Check things off as you get ready.

Work on a stable surface, keep your free hand out of the cutting path, and have an adult handle sharp tools.

Three levels of light

  • Leave intact

    The intact brow zones above the furrow holes, the rind bars between mouth gaps, and the cheek walls between slits stay dark.

  • Peel & shade

    None.

  • Cut through

    Both brow cuts, the furrow holes, both eye openings (rectangular pupil tabs retained), both nostrils, all ten rectangular mouth gaps, and all eight cheek slits are cut through.

Learn the carving basics

Before you start cutting

The upper-rooted rectangular pupil feels loose after I cut around it. Is it about to fall out?

If the upper root is at least 10 mm wide and running continuously along the top rim of the eye opening, the pupil should hold. Gently press it from inside to feel how much it flexes. If it moves more than a millimeter, reinforce it from inside with a small strip of masking tape pressed flush against the rind.

How many of the ten mouth gaps should I cut at once before pausing to check?

Cut no more than three consecutive gaps before stepping back and checking that the rind bars between them are still solid. Cut from one outer corner inward and then from the other outer corner inward, meeting in the middle, so stress on the mouth zone is distributed evenly.

Are the cheek slits decorative or do they add to the angry expression?

Both. Structurally they scatter small points of light across the cheeks. Expressively, angular slits angled inward toward the nose reinforce the clenched fury of the mouth and brow. If you are short on time, the eight cheek slits are the one element that can be reduced to four without losing the overall effect.

Your take belongs here, too.

Changed a detail? Made it simpler? Share a photo of your version and tell the community what worked.

Share your pumpkin

More pumpkins like this

You've reached the end · 8 pumpkins
The Patch Report

Fresh pumpkins, in your inbox.

The best new carvings, ideas worth stealing, and how-tos for carving season. Short, seasonal, and gone by November.

A short email during carving season. Unsubscribe anytime. See our privacy policy.