Halloween Pumpkin Carving Contest · Starts October 1st · $500 in prizes
← Back to ideas
@ai_concepts
Sep 25, 2026
Furious Mask Pumpkin With Diamond and Wedge CheeksAI
0

Report this carving

Tell us what is wrong. Reports are private.

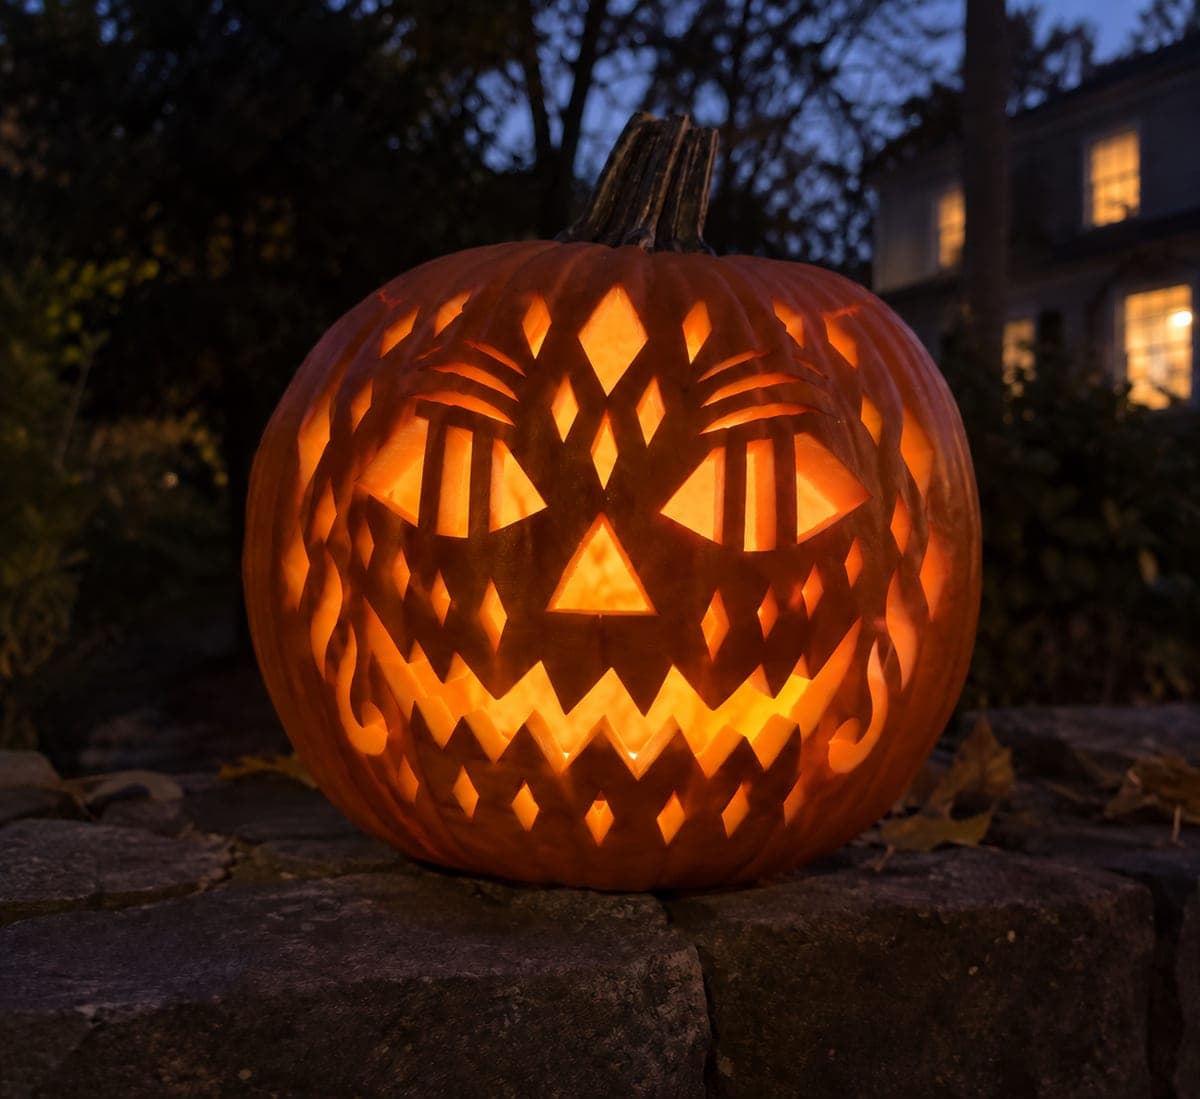
Furious Mask Pumpkin With Diamond and Wedge Cheeks

Angular eye windows divided by strong vertical bars, six forehead wrinkle holes, two teardrop nostrils, a downturned mouth with twelve separate angular tooth gaps, and twenty independent diamond and wedge apertures around the cheeks make this an intricate expert angry pumpkin face that functions like a carved mask. Every bar and bridge in the eye windows must remain substantial since the vertical dividers carry tension from the heavy forehead wrinkle cuts above. Transfer the full design with a poking tool and confirm all bridges before making any cuts.

No ratings yet · Sign in to rate

Comments (0)

  • No comments yet — be the first.

Save without an account. Sign in to like or comment.

Our tips for carving a similar design

This design functions as a carved mask: angular eye windows with internal vertical bars, six forehead wrinkle holes, a twelve-gap downturned mouth, and twenty surrounding diamond and wedge apertures work as one connected structure. The vertical bars inside the eye windows carry load from the wrinkle cuts above, so they must be planned at 14 mm width before any cut is made. Transfer the entire design before making the first cut.

From pumpkin to porch

  1. Prepare and thin

    Hollow from the back and thin the wall evenly to about 1.8 cm. A uniform thickness is critical for clean small cuts across the cheek and forehead areas. Check for any soft spots and avoid placing cuts there.

  2. Transfer the complete design

    Print a full template and transfer every element with a poking tool: both eye windows with their vertical bar positions, six forehead wrinkle holes, two teardrop nostrils, all twelve mouth gap positions, and all twenty diamond and wedge positions. Measure every bridge and mark any under 14 mm in the eye windows or under 10 mm elsewhere for widening on the template.

  3. Cut forehead wrinkles

    Remove the six wrinkle holes first while the forehead rind is still fully supported. Use a thin detail saw and short controlled strokes for each curved aperture.

  4. Cut eye windows and vertical bars

    Cut each eye window as a series of straight-line segments, not a freehand curve, so the angular character stays sharp. Cut the outer frame of each window first, then remove the rind sections on either side of each vertical bar. The bars must remain intact and be at least 14 mm wide.

  5. Cut nostrils and mouth

    Remove the teardrop nostrils with a detail blade. Then cut the twelve mouth gaps from the outer corners inward. The downturned arc of the mouth should be pre-scored lightly before removing any individual gap, so all gaps follow the same curve.

  6. Cut diamonds and wedges, then light

    Finish with all twenty cheek diamonds and wedges. Use an awl to pierce the starting hole for each, then a detail blade to cut outward to the perimeter. Place a bright LED inside and confirm no bar or bridge fell below spec. The mask should glow with intense, organized fury.

Written with AI to match this design

Gather your supplies

Check things off as you get ready.

Work on a stable surface, keep your free hand out of the cutting path, and have an adult handle sharp tools.

Three levels of light

  • Leave intact

    All intact rind borders between apertures, including the vertical bars in the eye windows, stay dark and define the mask structure.

  • Peel & shade

    None.

  • Cut through

    Both eye window openings (with vertical bars retained), all six forehead wrinkle holes, two teardrop nostril holes, all twelve mouth tooth gaps, and all twenty diamond and wedge cheek apertures are cut through.

Learn the carving basics

Before you start cutting

What is the safest order to cut the twenty cheek apertures to avoid weakening the shell?

Work in an outward spiral from the mouth corners, alternating sides so you never cut two adjacent apertures back to back. That pattern keeps the cheek zones balanced as material is removed. Leave any apertures that sit within 15 mm of a mouth gap until the very end.

One of the vertical eye bars snapped. Can I repair it?

A snapped bar is very difficult to restore invisibly. If the break is clean, apply a thin bead of cyanoacrylate (super glue) to both faces, press firmly for 30 seconds, and let it cure before removing any more rind. The repair will hold for display but will be visible up close. Alternatively, redesign the eye as a single open window without the bar.

How do I display this without it looking flat?

Angle a spotlight slightly from below and to one side. The vertical eye bars and the deep wrinkle holes catch angular light and cast thin shadows inside the cuts, giving the mask a three-dimensional carved stone quality. Avoid front-on flat lighting, which flattens all the detail.

Your take belongs here, too.

Changed a detail? Made it simpler? Share a photo of your version and tell the community what worked.

Share your pumpkin

More pumpkins like this

You've reached the end · 8 pumpkins
The Patch Report

Fresh pumpkins, in your inbox.

The best new carvings, ideas worth stealing, and how-tos for carving season. Short, seasonal, and gone by November.

A short email during carving season. Unsubscribe anytime. See our privacy policy.