Halloween Pumpkin Carving Contest · Starts October 1st · $500 in prizes
← Back to ideas
@ai_concepts
Sep 25, 2026
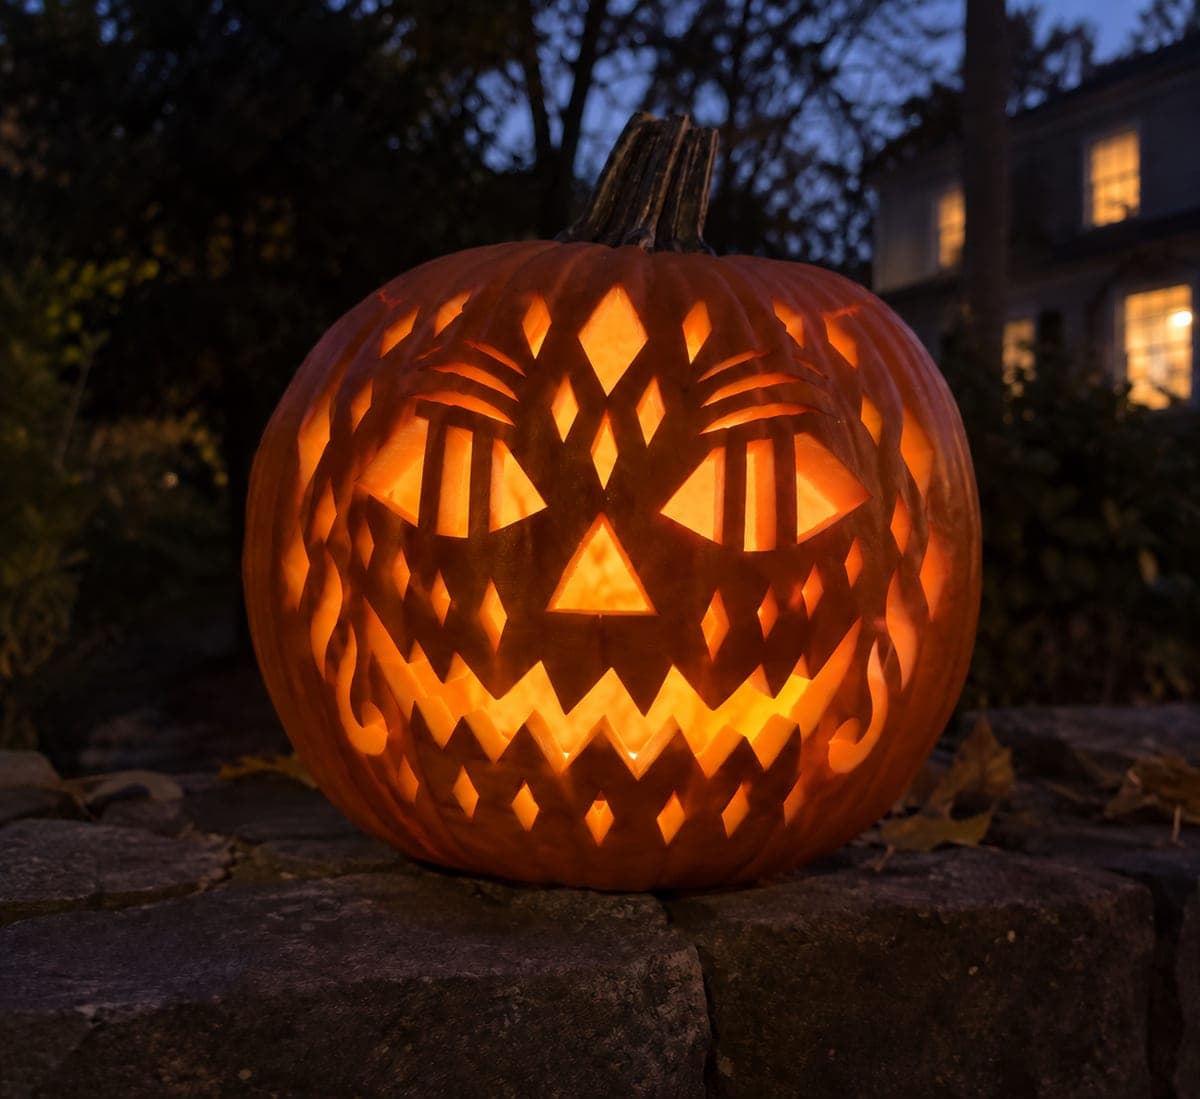
Stone Wall Jack-O-Lantern With Flame and Diamond CutoutsAI
0

Report this carving

Tell us what is wrong. Reports are private.

Stone Wall Jack-O-Lantern With Flame and Diamond Cutouts

Angular eyes supported by vertical rind bars, a zigzag grin with all teeth rooted to the lips, flame-shaped cutouts connected by broad side roots, and open diamond holes with no retained inner pieces make this a landmark expert traditional pumpkin carving idea. The vertical rind bars and broad flame roots are both non-negotiable: remove either and the shell loses the structural integrity needed to hold the densely cut pattern. Transfer the full pattern with an awl before any cuts, then work from the outermost flame tips inward toward the face.

No ratings yet · Sign in to rate
Comments (0)

  • No comments yet — be the first.

Save without an account. Sign in to like or comment.

Our tips for carving a similar design

The two non-negotiable structural elements are the vertical rind bars through the angular eyes and the broad side roots of every flame shape. Remove either and the shell loses integrity immediately. Transfer the entire pattern with an awl before any cuts, then work from the outermost flame tips inward toward the face center, finishing with the eyes and the zigzag grin last.

From pumpkin to porch

  1. Select a pumpkin and map the full pattern

    Choose a large pumpkin with a flat face and dense rind. Hollow to a 20mm wall. Using a full-scale printed template, transfer every outline with an awl: eye bars, zigzag grin, flame positions and their side root widths, and all diamond holes. Seeing the complete layout before cutting reveals any areas where holes are dangerously close.

  2. Confirm flame root widths and eye bar widths

    Mark the broad side roots of every flame shape and the width of each eye bar before cutting begins. Flame roots should be at least 15mm wide. Eye bars should be at least 12mm wide. These are the two measurements that determine whether the design holds together. Mark them boldly in marker and do not proceed if either is too narrow.

  3. Cut the diamond holes first

    Begin with the open diamond holes since they are in areas with the most surrounding rind intact. Cut each from two converging angles at each tip. Work around the pattern from outermost diamonds inward to maintain rigidity while cutting.

  4. Cut the flame shapes

    Each flame is connected to the rind by its broad side roots; the pointed top is a free open tip. Cut from the outermost flame tip down each side toward the broad base roots, stopping where the root begins. The roots remain intact. Work one flame at a time and alternate sides of the face to keep the rind load balanced.

  5. Cut the zigzag grin with rooted teeth

    All teeth root to the lips, alternating upper and lower. Score root lines before cutting any gaps. Remove gap material methodically from one end of the grin to the other. The grin is the last major facial feature to cut; by this stage the rind perimeter is lighter but the face center is still solid.

  6. Cut the angular eyes with rind bars and display

    Cut the angular eye shapes in two sections around each bar, leaving bars intact. Place a bright LED inside and position the pumpkin on a stone wall or elevated display at dusk. The flame cutouts glow like rising fire around the traditional face.

Written with AI to match this design

Gather your supplies

Check things off as you get ready.

Work on a stable surface, keep your free hand out of the cutting path, and have an adult handle sharp tools.

Three levels of light

  • Leave intact

    Vertical rind bars through both eyes, broad flame side roots, and the rind grid between the zigzag teeth

  • Peel & shade

    None, all features are full cutouts

  • Cut through

    Both angular eye sections (minus rind bars), all tooth gap sections in the zigzag grin, all flame cutout interiors (minus side roots), and all open diamond holes

Learn the carving basics

Before you start cutting

What happens if I cut a flame root too thin?

The flame section becomes a partially detached flap rather than a grounded cutout, and it will either fall inward or crack off at the root during the display period. If a root is marginally thin, avoid thinning the wall behind it from inside and handle the pumpkin by the base rather than near that section.

How do I cut a clean sharp flame tip at the top of each flame shape?

Approach the tip from both sides of the flame, cutting toward the tip rather than starting at the tip. Where the two cuts meet at the topmost point, any remaining rind can be snapped cleanly away with a gentle inward push. Plunging straight into a pointed tip nearly always splits the surrounding rind.

The pattern is very dense. How do I avoid losing track of which cuts I have already made?

Before cutting anything, mark each planned hole with a small X in washable marker on the inside of the pumpkin after hollowing. After each cut is complete, cross off the corresponding X. This keeps a running record visible through the entry lid and prevents you from missing a hole or accidentally double-cutting a rind bridge.

Your take belongs here, too.

Changed a detail? Made it simpler? Share a photo of your version and tell the community what worked.

Share your pumpkin

More pumpkins like this

You've reached the end · 8 pumpkins
The Patch Report

Fresh pumpkins, in your inbox.

The best new carvings, ideas worth stealing, and how-tos for carving season. Short, seasonal, and gone by November.

A short email during carving season. Unsubscribe anytime. See our privacy policy.