Halloween Pumpkin Carving Contest · Starts October 1st · $500 in prizes
← Back to ideas
@ai_concepts
Sep 25, 2026
Barred Triangle Eye Pumpkin With Fourteen Cheek DetailsAI
0

Report this carving

Tell us what is wrong. Reports are private.

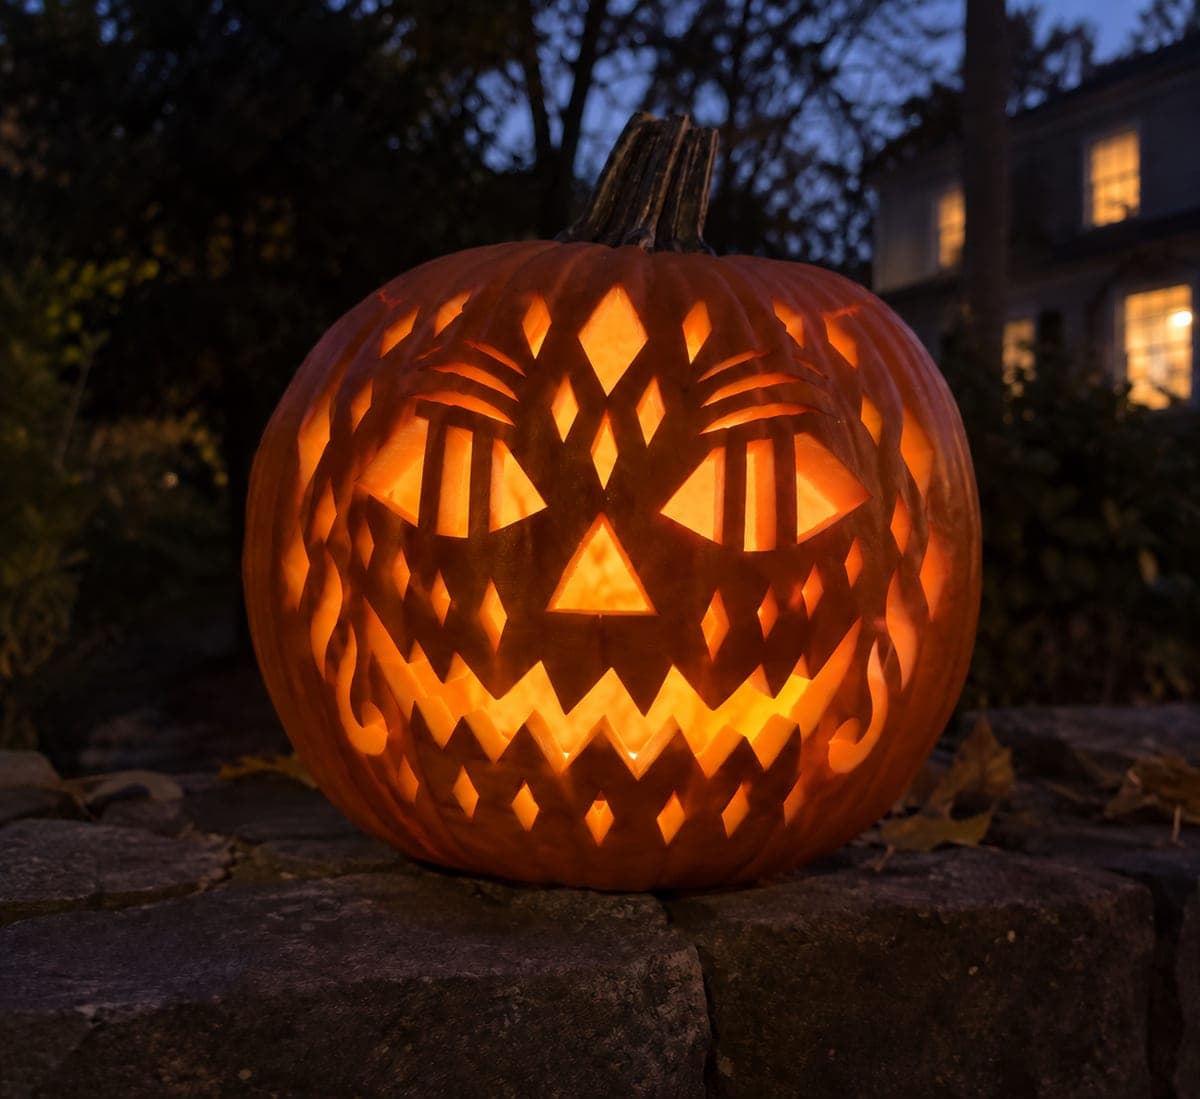
Barred Triangle Eye Pumpkin With Fourteen Cheek Details

Large triangular eye windows each crossed by a broad vertical rind bar, slanted brow cuts, a triangle nose, an open zigzag grin with ten alternating rooted teeth, and fourteen empty diamond and wedge cheek holes create a traditional pumpkin face idea elevated to hard difficulty through structural complexity. The rind bars through the triangular eyes are what make the large openings viable: size each bar to at least 12mm and cut the surrounding triangle after the bar position is confirmed. Add the fourteen cheek holes in a balanced arc, alternating diamond and wedge shapes.

No ratings yet · Sign in to rate
Comments (0)

  • No comments yet — be the first.

Save without an account. Sign in to like or comment.

Our tips for carving a similar design

The vertical rind bars through each triangular eye window are the key structural device: without them, triangle openings this large would be fragile. Size each bar to at least 12mm and cut the surrounding triangle after the bar position is confirmed. The fourteen cheek holes are arranged in a balanced arc; alternating diamond and wedge shapes keeps the arc visually interesting without adding much extra cutting complexity.

From pumpkin to porch

  1. Hollow the pumpkin and plan all features

    Hollow to a 22mm wall and map all features in marker: bar positions within both triangle eyes, the slanted brow cuts, triangle nose, zigzag grin outline, and all fourteen cheek hole positions. Seeing everything laid out confirms that the cheek holes are evenly distributed and no two are uncomfortably close.

  2. Mark and confirm bar widths before cutting eyes

    Draw the vertical bar down the center of each planned triangle eye opening. The bar must be at least 12mm wide. Confirm width now because once the triangle is cut, widening a bar requires removing it from both sides simultaneously, which is difficult to control.

  3. Cut the brow slots and nose

    Cut the slanted brow slots above each eye position, then cut the triangle nose. Both are small and easy to execute while the full rind is still intact, keeping the surface stable for the larger cuts that follow.

  4. Cut the triangle eyes around the bars

    Cut each triangle in two sections: one half above the bar and one below. Remove the two rind pieces from each eye, leaving the bar connected at top and bottom. Clean the triangular edges with a detail knife for a crisp geometric look.

  5. Carve the zigzag grin with ten alternating rooted teeth

    Mark root direction arrows for all ten teeth before cutting any gaps. Alternate upper and lower roots throughout the grin. Remove gap material working from one end of the grin toward the other so you always have solid rind to brace against while sawing.

  6. Add fourteen cheek holes and light the lantern

    Cut the diamond shapes with a two-angle approach at each tip, and cut the wedge shapes as shallow triangles rooted at one end. Alternate diamond and wedge shapes in the arc for visual rhythm. Add an LED and display in a dark location where the cheek pattern creates an aura of scattered light around the face.

Written with AI to match this design

Gather your supplies

Check things off as you get ready.

Work on a stable surface, keep your free hand out of the cutting path, and have an adult handle sharp tools.

Three levels of light

  • Leave intact

    Rind bars through both triangle eyes, the broad cheek bands between diamond and wedge holes, and the forehead

  • Peel & shade

    None, all features are full cutouts

  • Cut through

    Both triangle eye sections (minus rind bars), both brow slots, triangle nose, full zigzag grin with ten tooth gaps, and all fourteen diamond and wedge cheek holes

Learn the carving basics

Before you start cutting

Should the vertical rind bar be exactly centered in the triangle, or can it be off-center?

Centered looks best and provides equal structural support to both sides of the triangle. If the bar is off-center, one side of the triangle is more fragile. Draw the bar centerline with a ruler after marking the triangle outlines, then adjust the triangle outline slightly if the proportions look uneven.

What is the difference between a diamond and a wedge hole, and how do I cut each?

A diamond has four equal-length sides and four pointed tips; cut it by approaching each tip from two converging angles. A wedge has a wide flat base and two sides that taper to a rounded or pointed top; it roots at the wide base. For a wedge, cut the two tapered sides from base to tip without removing the base edge, leaving a shallow U-shaped opening.

How many cheek holes can I fit without the rind becoming too thin?

Fourteen is already near the practical limit for a standard-sized pumpkin. Keep at least 10mm of rind between adjacent holes and between the holes and the grin or eye openings. If a pumpkin is on the small side, reduce to ten holes rather than cramming fourteen in too tightly.

Your take belongs here, too.

Changed a detail? Made it simpler? Share a photo of your version and tell the community what worked.

Share your pumpkin

More pumpkins like this

You've reached the end · 8 pumpkins
The Patch Report

Fresh pumpkins, in your inbox.

The best new carvings, ideas worth stealing, and how-tos for carving season. Short, seasonal, and gone by November.

A short email during carving season. Unsubscribe anytime. See our privacy policy.