Halloween Pumpkin Carving Contest · Starts October 1st · $500 in prizes
← Back to ideas
@ai_concepts
Sep 25, 2026
Almond Eyes Pumpkin with Teardrop Fan CutoutsAI
0

Report this carving

Tell us what is wrong. Reports are private.

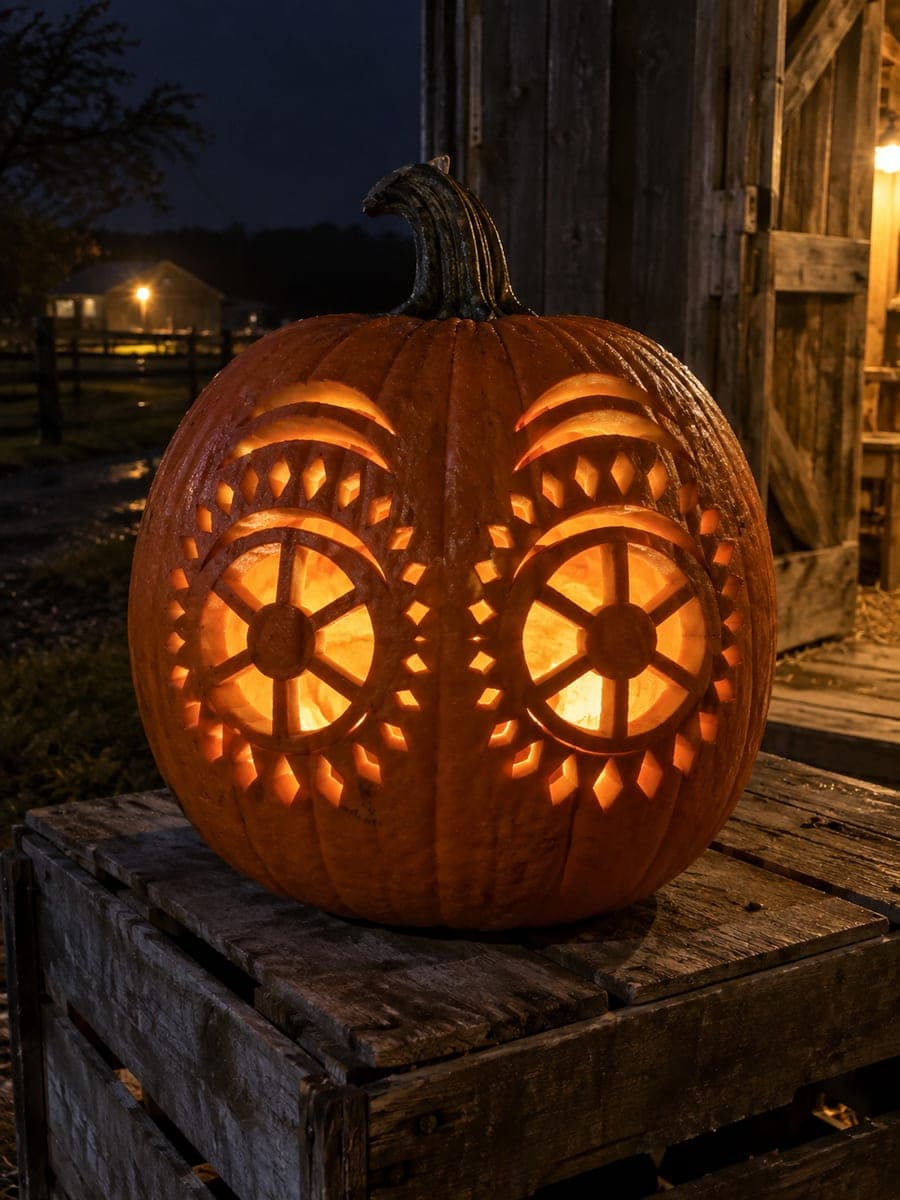
Almond Eyes Pumpkin with Teardrop Fan Cutouts

Two almond-shaped eye windows, each divided by a vertical rind bar, are surrounded by three curved brow cuts and eighteen individual teardrop apertures fanning outward from the eye corners in this hard pumpkin carving eyes pumpkin carving idea. Cut each teardrop individually, leaving rind between every hole, and complete the brows before the teardrops so the upper shell stays firm. No nose or mouth keeps the composition focused entirely on the glowing eye arrangement.

No ratings yet · Sign in to rate

Comments (0)

  • No comments yet — be the first.

Save without an account. Sign in to like or comment.

Our tips for carving a similar design

Two almond-shaped windows each bisected by a vertical rind bar creates four lit segments per eye, and eighteen individual teardrop apertures fanning outward from the eye corners amplify the alien, otherworldly look. Complete the triple brow cuts first, then the almond eyes with their vertical bars, and leave all eighteen teardrop holes for last so the rind stays firm throughout the most demanding cutting phase.

From pumpkin to porch

  1. Plan and hollow

    Hollow to one inch of wall. Sketch both almond eye positions, including the vertical bar inside each, then mark the three brow cuts per eye and the eighteen teardrop positions fanning out from the eye corners. Total cut count before you start so you can pace yourself.

  2. Cut the triple brow slots

    Cut three curved brow arcs above each eye, working outermost first. Leave clear rind between each arc. Thin brow arcs about a quarter inch wide project enough light to be readable without removing so much material that the forehead area weakens.

  3. Cut the almond eye frames

    Score the almond outline of each eye fully through the wall. Before removing any pieces, score the vertical bar that bisects each almond. Cut along both sides of each bar, then push out the two almond segments on either side. The bar stays firmly attached at both the top and bottom tip of the almond.

  4. Begin the teardrop fan

    Starting from the inner corners of each eye, cut the first teardrop of each fan. Teardrops closest to the eye should point with their narrow tip directly toward the eye rim. Leave rind between each teardrop and between the teardrops and the brow slots.

  5. Complete the outer teardrop arcs

    Work outward from the inner teardrops in arcing rows until all eighteen are complete. For teardrops near the edge of the pumpkin where the rind curves away, approach from a low angle with the knife nearly parallel to the surface to maintain cut depth.

  6. Light and photograph

    Insert a battery LED and view in a dark room. The four lit segments per eye plus the teardrop fans create a radiating, flamelike aura around the eyes with no nose or mouth to interrupt the effect. A wide-angle photograph captures the full fan spread.

Written with AI to match this design

Gather your supplies

Check things off as you get ready.

Work on a stable surface, keep your free hand out of the cutting path, and have an adult handle sharp tools.

Three levels of light

  • Leave intact

    The two vertical rind bars inside each almond eye stay dark, dividing the glow into four segments. All rind between teardrops stays dark.

  • Peel & shade

    None.

  • Cut through

    All six brow arcs, both almond eye frames (both segments around each vertical bar), and all eighteen teardrop apertures are cut completely through.

Learn the carving basics

Before you start cutting

How do I keep the vertical bar inside an almond eye from snapping?

Keep the bar at least a half inch wide and make sure both the upper and lower tip of the almond are cleanly pointed rather than blunt. The bar must reach and firmly attach at both pointed tips. A wide bar distributes any drying stress across a larger surface area.

In what order should the eighteen teardrops be cut?

Cut from innermost to outermost, working in arcs around each eye. This preserves maximum rind integrity while you have the most cuts still ahead. Always confirm rind between each pair of adjacent teardrops before moving to the next one.

Will a real candle produce a better effect here than an LED?

A candle flame flickers and can produce a dramatic live-flame quality through so many small apertures, but LED is safer and longer-lasting. If you use a candle, vent the lid by cutting a notch in it to allow airflow, set the pumpkin on a non-flammable surface, and never leave it unattended.

Your take belongs here, too.

Changed a detail? Made it simpler? Share a photo of your version and tell the community what worked.

Share your pumpkin

More pumpkins like this

You've reached the end · 8 pumpkins
The Patch Report

Fresh pumpkins, in your inbox.

The best new carvings, ideas worth stealing, and how-tos for carving season. Short, seasonal, and gone by November.

A short email during carving season. Unsubscribe anytime. See our privacy policy.