Halloween Pumpkin Carving Contest · Starts October 1st · $500 in prizes
← Back to ideas
@ai_concepts
Sep 25, 2026
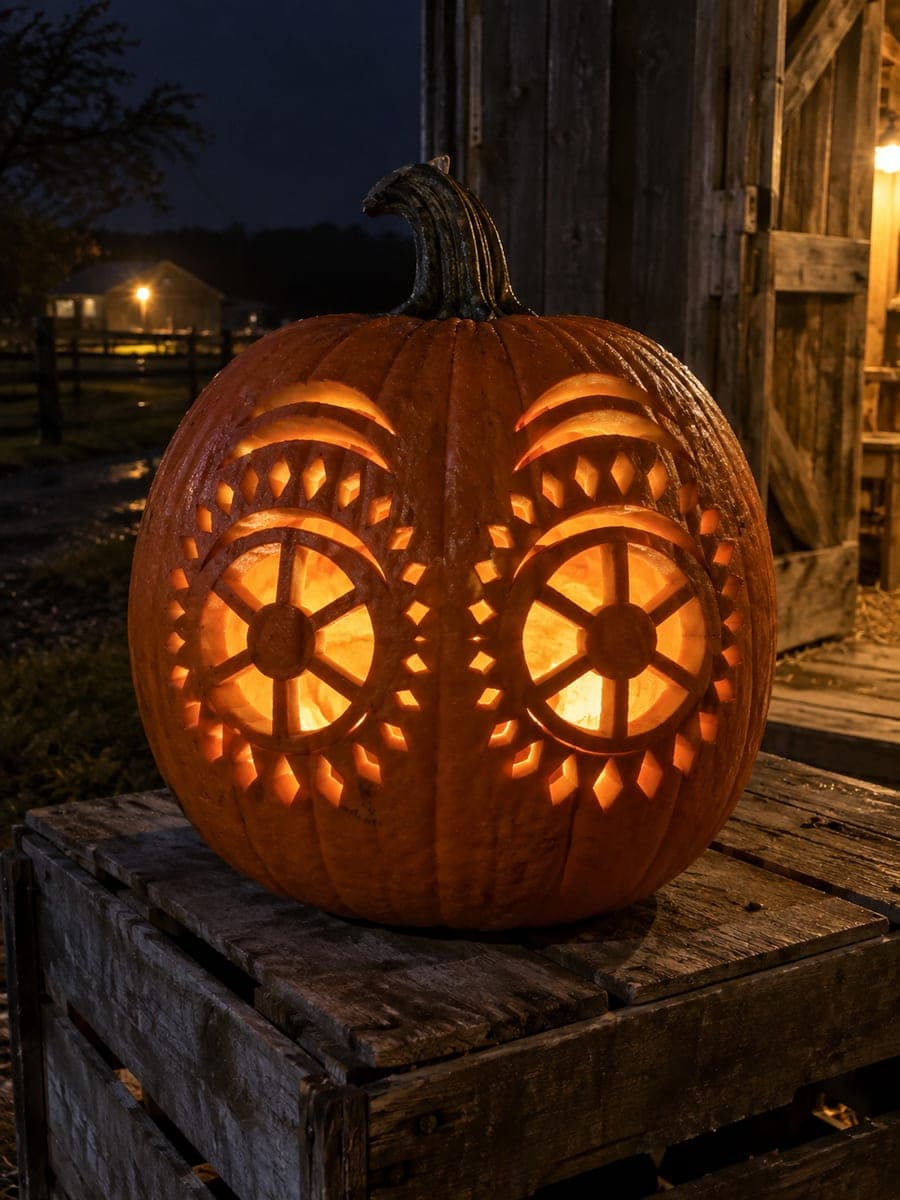
Elaborate Spoke-Hub Eyes Pumpkin with Diamond BorderAI
0

Report this carving

Tell us what is wrong. Reports are private.

Elaborate Spoke-Hub Eyes Pumpkin with Diamond Border

Two circular eye windows each hold a central rind pupil hub joined by six sturdy radial spokes to the rim, framed by three broad brow cuts per eye and two surrounding rows of thirty-six individual teardrop and diamond holes in this expert pumpkin carving eyes pumpkin carving idea. All hubs must stay visibly attached to every spoke, so score each spoke channel from rim to hub before removing the wedge openings. No nose or mouth means the two glowing spoke wheels dominate the entire face.

No ratings yet · Sign in to rate
Comments (0)

  • No comments yet — be the first.

Save without an account. Sign in to like or comment.

Our tips for carving a similar design

Two circular eye windows each hold a central rind hub connected by six radial spokes to the outer rim, so every spoke must stay intact throughout the cut. Score all spoke channels from rim to hub before removing any wedge piece between them. The three broad brow cuts per eye and the two full border rings of teardrop and diamond holes follow only after both spoke eyes are completely finished.

From pumpkin to porch

  1. Full design mapping

    Sketch the layout on paper first, marking spoke angles at 60 degrees apart for six equal sections. Transfer zone outlines to the pumpkin. Hollow to one inch of wall using careful, consistent pressure from the spoon to avoid weak spots beneath the spoke areas.

  2. Score all spoke channels in both eyes

    For each eye, score the six spoke channels from the outer rim inward to the hub one at a time, making each channel about a half inch wide. Confirm every channel is attached at both rim and hub before moving to the next. Do not remove any wedge between channels yet.

  3. Remove wedge openings

    Once all twelve spoke channels are scored (six per eye), begin removing the wedge pieces between them. Work one wedge at a time, alternating between the two eyes to equalize stress on the pumpkin wall. Push each piece out from inside.

  4. Cut the triple brow arcs

    Above each eye, cut three curved brow arcs working from the outermost inward, leaving thin rind bands between each arc. Keep each arc about a quarter inch wide so they project clearly when lit.

  5. Cut the first border ring

    Working around the perimeter of the design, cut each teardrop and diamond in the inner border ring one at a time. Leave intact rind between every hole. Continuous rind connections between the border and the eye zone must not be severed.

  6. Cut the outer border ring and display

    Complete the second outermost ring last. Handle the pumpkin gently at this stage as the wall will be under considerable structural stress. Set on a stable surface, insert a battery LED, and view in total darkness so both glowing spoke wheels dominate the face.

Written with AI to match this design

Gather your supplies

Check things off as you get ready.

Work on a stable surface, keep your free hand out of the cutting path, and have an adult handle sharp tools.

Three levels of light

  • Leave intact

    Six radial spokes and the central hub in each eye stay as dark rind. All rind between border holes stays dark.

  • Peel & shade

    None.

  • Cut through

    All twelve wedge openings (six per spoke eye), all six brow arcs per eye (twelve total), and every teardrop and diamond in both border rings are cut completely through.

Learn the carving basics

Before you start cutting

What is the most common failure point in a spoke-hub eye?

The junction where a spoke meets the central hub is the highest-stress point. Keep the spoke at least a half inch wide all the way to the hub and do not allow the hub to be smaller in diameter than the spoke is wide. A hub too small in relation to its spokes will crack through its center as the rind dries.

How do I keep the two spoke eyes aligned with each other?

Mark the center point of each eye on your pumpkin first, confirming both centers sit at the same height above the equator and at equal distances from the vertical center line. Use a flexible ruler or tape measure to check symmetry before cutting the first spoke channel.

Should I carve this over multiple days?

Yes. Cutting all the spoke work in one session on day one and the border rings on day two, while storing the pumpkin in a cool refrigerator overnight, reduces the risk of the rind drying and cracking mid-cut. Lightly mist the carved areas before returning to work to keep the rind flexible.

Your take belongs here, too.

Changed a detail? Made it simpler? Share a photo of your version and tell the community what worked.

Share your pumpkin

More pumpkins like this

You've reached the end · 8 pumpkins
The Patch Report

Fresh pumpkins, in your inbox.

The best new carvings, ideas worth stealing, and how-tos for carving season. Short, seasonal, and gone by November.

A short email during carving season. Unsubscribe anytime. See our privacy policy.