Halloween Pumpkin Carving Contest · Starts October 1st · $500 in prizes
← Back to ideas
@ai_concepts
Sep 25, 2026
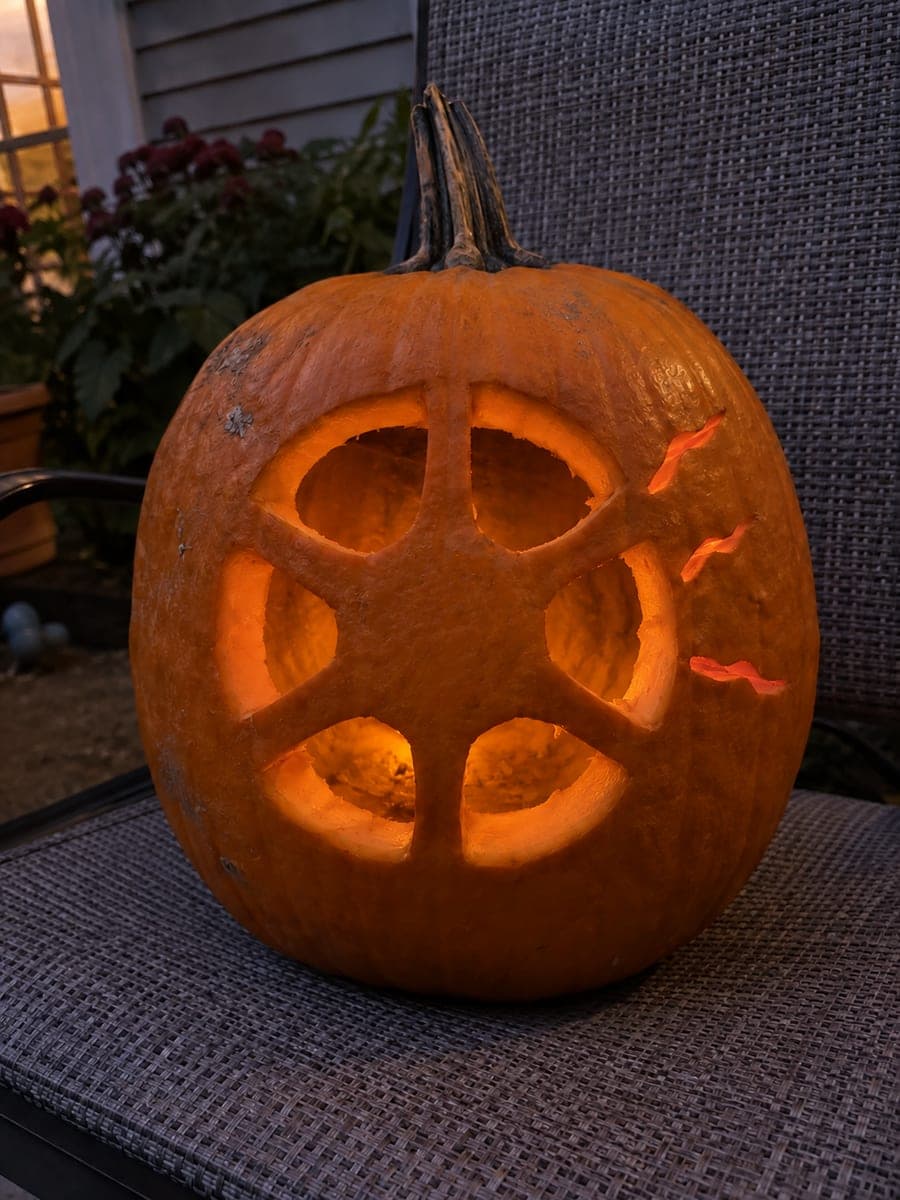
Six-Spoke Radial Eyeball Pumpkin on a Garden ChairAI
0

Report this carving

Tell us what is wrong. Reports are private.

Six-Spoke Radial Eyeball Pumpkin on a Garden Chair

A radial eyeball design divides the iris into six glowing wedges around a solid spoke-supported pupil on this medium eyeball pumpkin carving, resting on a garden chair. Merge the pupil into all six spokes before cutting any iris wedges, then remove each wedge as a separate hole to keep structural integrity high throughout. Score the spoke lines lightly before full cuts to confirm the pupil will not wobble. Warm candlelight through the wedges creates an amber iris effect.

No ratings yet · Sign in to rate

Comments (0)

  • No comments yet — be the first.

Save without an account. Sign in to like or comment.

Our tips for carving a similar design

The radial design works by merging the solid pupil disk into all six spokes simultaneously, so the pupil is never a floating island at any point during the carve. Each iris wedge between adjacent spokes is a separate opening, cut one at a time after all spokes are confirmed attached to the pupil. Scoring the spoke lines lightly before final cuts helps confirm the pupil will stay fixed throughout the process.

From pumpkin to porch

  1. Prep and gut the pumpkin

    Cut a wide bottom cap and scoop to about an inch of wall thickness. For a radial design, a pumpkin with a round, evenly curved front face is important so the spokes are roughly equal length around the full circle. Dry the surface and transfer the full pattern.

  2. Transfer the radial pattern accurately

    Use a template and poking tool to transfer the iris circle, pupil circle, and all six spoke dividing lines. Connect the poke dots carefully and mark the pupil and spokes in a contrasting color since all of these must be preserved. Confirm that all six spokes appear to connect the pupil to the outer iris rim before any cuts begin.

  3. Score all spoke lines lightly before cutting

    Use a linoleum V-tip to score each spoke line to about half depth. This scoring confirms the spoke positions are correct and gives the pupil a dry run at stability before any wedge material is removed. Check that the pupil disk feels solid and centered after scoring.

  4. Cut one iris wedge at a time

    Pierce each iris wedge at its widest point and cut the opening, stopping exactly at each spoke boundary. Work around the circle one wedge at a time rather than cutting all six in quick succession. After every two wedges, press the spokes to confirm they are still solid.

  5. Complete all six wedges and check the pupil

    Once all six wedges are open, press gently on the pupil disk to confirm it is firmly attached to all six spokes. The disk should have zero movement. If it shifts slightly, one spoke has been partially cut through: use a toothpick to reinforce the break point before displaying.

  6. Light and display

    Place a warm LED candle inside through the bottom, positioned centrally so the amber light fills all six wedges evenly. Display on a garden chair or outdoor table at seated eye level where the radial pattern is most visible straight on.

Written with AI to match this design

Gather your supplies

Check things off as you get ready.

Work on a stable surface, keep your free hand out of the cutting path, and have an adult handle sharp tools.

Three levels of light

  • Leave intact

    Solid pupil disk merged into all six spokes, and all surrounding rind outside the iris circle

  • Peel & shade

    None, all light from through-cuts

  • Cut through

    All six iris wedge openings between the spokes

Learn the carving basics

Before you start cutting

How do I mark six evenly spaced spokes on a curved pumpkin surface?

Find the center of the iris circle and mark it. Then mark a vertical spoke at 12 and 6 o'clock, a horizontal spoke at 3 and 9 o'clock, and diagonal spokes at 2/8 and 4/10 o'clock positions. These six positions divide the circle into even thirds. A protractor pressed lightly to the pumpkin surface can also help confirm even 60-degree spacing.

What if one of the iris wedges looks narrower than the others after cutting?

A narrow iris wedge usually means one spoke was cut too wide during transfer. Use a linoleum U-tip to carefully widen the narrow wedge slightly by shaving the adjacent spoke face back a small amount. Work in thin passes and check the overall symmetry from a distance after each pass.

Can I add shading around the pupil to make it look more three-dimensional?

Yes. Back-carve a shallow depression into the outer face of the rind around the iris circle using a medium linoleum tool, removing about one-third of the wall thickness. This creates a recessed eyelid effect that makes the iris appear to sit deeper in the pumpkin face. Do this after all iris wedges are cut and the structure is confirmed solid.

Your take belongs here, too.

Changed a detail? Made it simpler? Share a photo of your version and tell the community what worked.

Share your pumpkin

More pumpkins like this

You've reached the end · 8 pumpkins
The Patch Report

Fresh pumpkins, in your inbox.

The best new carvings, ideas worth stealing, and how-tos for carving season. Short, seasonal, and gone by November.

A short email during carving season. Unsubscribe anytime. See our privacy policy.