Halloween Pumpkin Carving Contest · Starts October 1st · $500 in prizes
← Back to ideas
@ai_concepts
Sep 25, 2026
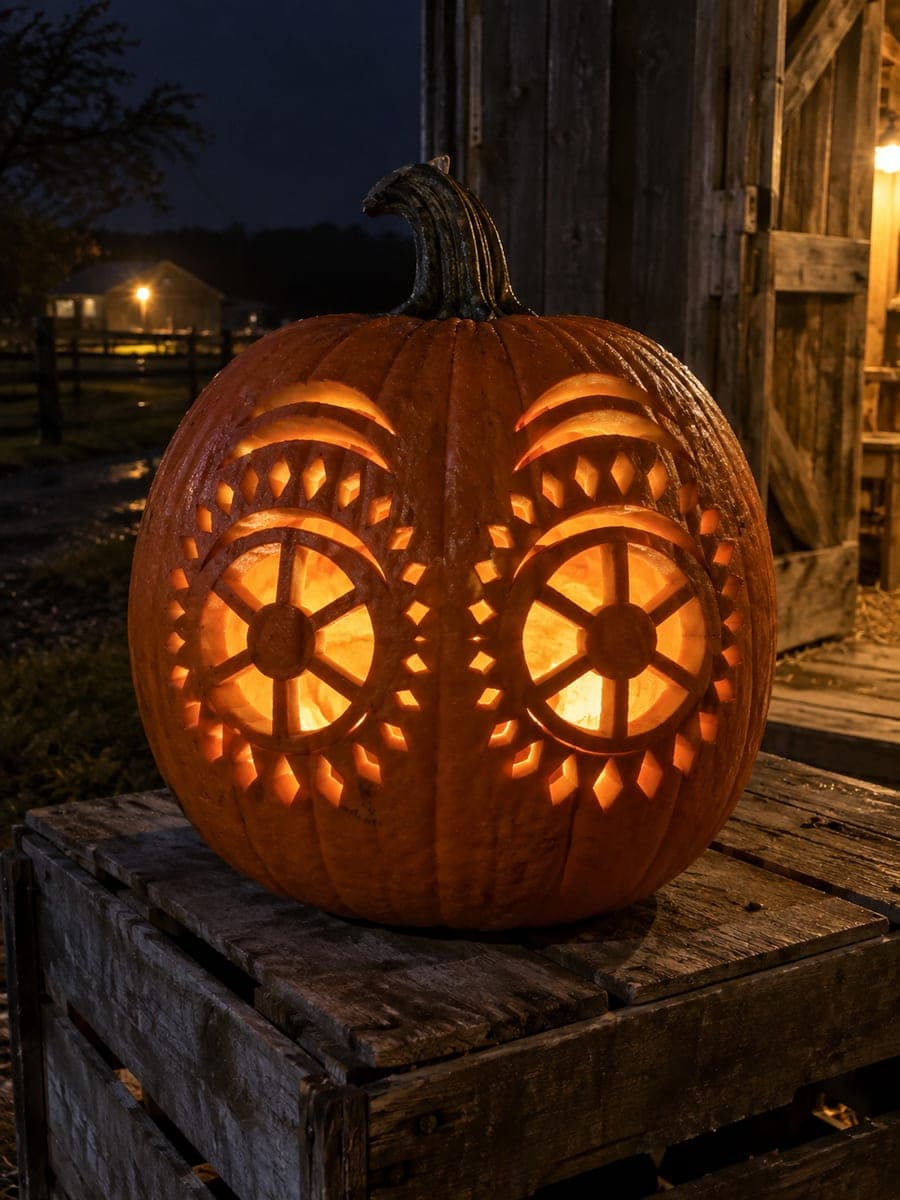
Twin Glowing Eyeball Pumpkin with Ray OpeningsAI
0

Report this carving

Tell us what is wrong. Reports are private.

Twin Glowing Eyeball Pumpkin with Ray Openings

Two full eyeballs with decorative ray cutouts glow side by side on dark steps in this hard eyeball pumpkin carving. Each pupil is joined to the shell through four broad anchor bars, so begin by confirming those connections are at least three-quarters of an inch wide before cutting any ray holes. Punch the ray holes last as accent details once both main eyes are stable. Staggering the two eyeballs slightly in height adds a more unsettling, asymmetric look.

No ratings yet · Sign in to rate

Comments (0)

  • No comments yet — be the first.

Save without an account. Sign in to like or comment.

Our tips for carving a similar design

Each of the two eyeballs has its pupil joined to the shell through four broad anchor bars, creating a much stronger connection than a single bar design. Confirming all four bars on the first eye are at least three-quarters of an inch wide before cutting any ray holes is what keeps the design intact. The ray holes punched last are accent details only, and can be skipped entirely on a softer or thinner-walled pumpkin without losing the core design impact.

From pumpkin to porch

  1. Prep and gut the pumpkin

    Cut a wide bottom cap and scoop to about an inch of wall thickness. Use a wide-faced pumpkin that accommodates two full eye circles with at least two inches of rind between them and around the outer edges. Dry the surface and transfer both eye patterns, keeping all bar positions marked in a contrasting color.

  2. Mark all eight anchor bars before any cuts

    Transfer both eye patterns and mark all four anchor bars on each eye in bright marker. Confirm that no bar is narrower than three-quarters of an inch anywhere along its length. The bars carry both the structural load and the visual impact of the design, so they should be generously sized.

  3. Cut the first eye iris opening in sections

    Pierce the first iris opening between two adjacent anchor bars and cut the arc between them. Work around the iris circle section by section, stopping at each bar. After completing the first full iris, press all four bars to confirm they are solid before moving to the second eye.

  4. Cut the second eye iris opening

    Repeat the same section-by-section iris cut on the second eye. After both irises are open, compare the two pupils visually and confirm both have zero movement. Stagger the height of the second eye very slightly for a more asymmetric, unsettling effect if desired.

  5. Punch the ray holes last

    Find the thickest remaining rind areas around each eye and punch the decorative ray holes there. Keep holes at least three-quarters of an inch from any iris edge and at least three-quarters of an inch from each other. Work carefully: the shell has already had significant material removed and stability is most at risk during this step.

  6. Light and display

    Place a bright LED inside and display on dark steps where the two glowing eyes are visible from standing height as someone walks toward the entrance. Apply petroleum jelly to all cut edges. A cool-white LED maximizes the eerie quality; warm amber gives a more fiery look.

Written with AI to match this design

Gather your supplies

Check things off as you get ready.

Work on a stable surface, keep your free hand out of the cutting path, and have an adult handle sharp tools.

Three levels of light

  • Leave intact

    All four anchor bars per eye and all surrounding rind outside both iris circles

  • Peel & shade

    None, all light from through-cuts

  • Cut through

    Both iris opening sections between anchor bars and all decorative ray holes

Learn the carving basics

Before you start cutting

How do I keep the two eyes looking balanced when the pumpkin surface is curved?

Find the vertical centerline of the pumpkin face and mark it before placing either eye. Center both eye circles the same horizontal distance from that centerline. Even if the pumpkin curves differently on each side, the symmetrical placement relative to the centerline will read as balanced from a straight-on display distance.

One of my pupils shifted after I finished the second eye. Can I fix it?

If the pupil has shifted rather than fallen out, one or more anchor bars are partially cut or too thin. Reinforce each affected bar by inserting a toothpick lengthwise through the thinnest point and sealing with petroleum jelly. Do not add any more ray holes near a compromised bar. The pumpkin will likely last one or two display nights in this state.

Can I make the eyes different sizes to look more surreal?

Yes. One eye slightly larger than the other creates an unsettling asymmetry that works very well for a horror display. Keep both designs structurally identical in terms of anchor bar count and width, just scaled differently. Placing the larger eye slightly higher on the face reinforces the off-kilter quality.

Your take belongs here, too.

Changed a detail? Made it simpler? Share a photo of your version and tell the community what worked.

Share your pumpkin

More pumpkins like this

You've reached the end · 8 pumpkins
The Patch Report

Fresh pumpkins, in your inbox.

The best new carvings, ideas worth stealing, and how-tos for carving season. Short, seasonal, and gone by November.

A short email during carving season. Unsubscribe anytime. See our privacy policy.