Halloween Pumpkin Carving Contest · Starts October 1st · $500 in prizes
← Back to ideas
@ai_concepts
Sep 25, 2026
Almond Contour Eyeball Pumpkin with Shallow Carved BrowAI
0

Report this carving

Tell us what is wrong. Reports are private.

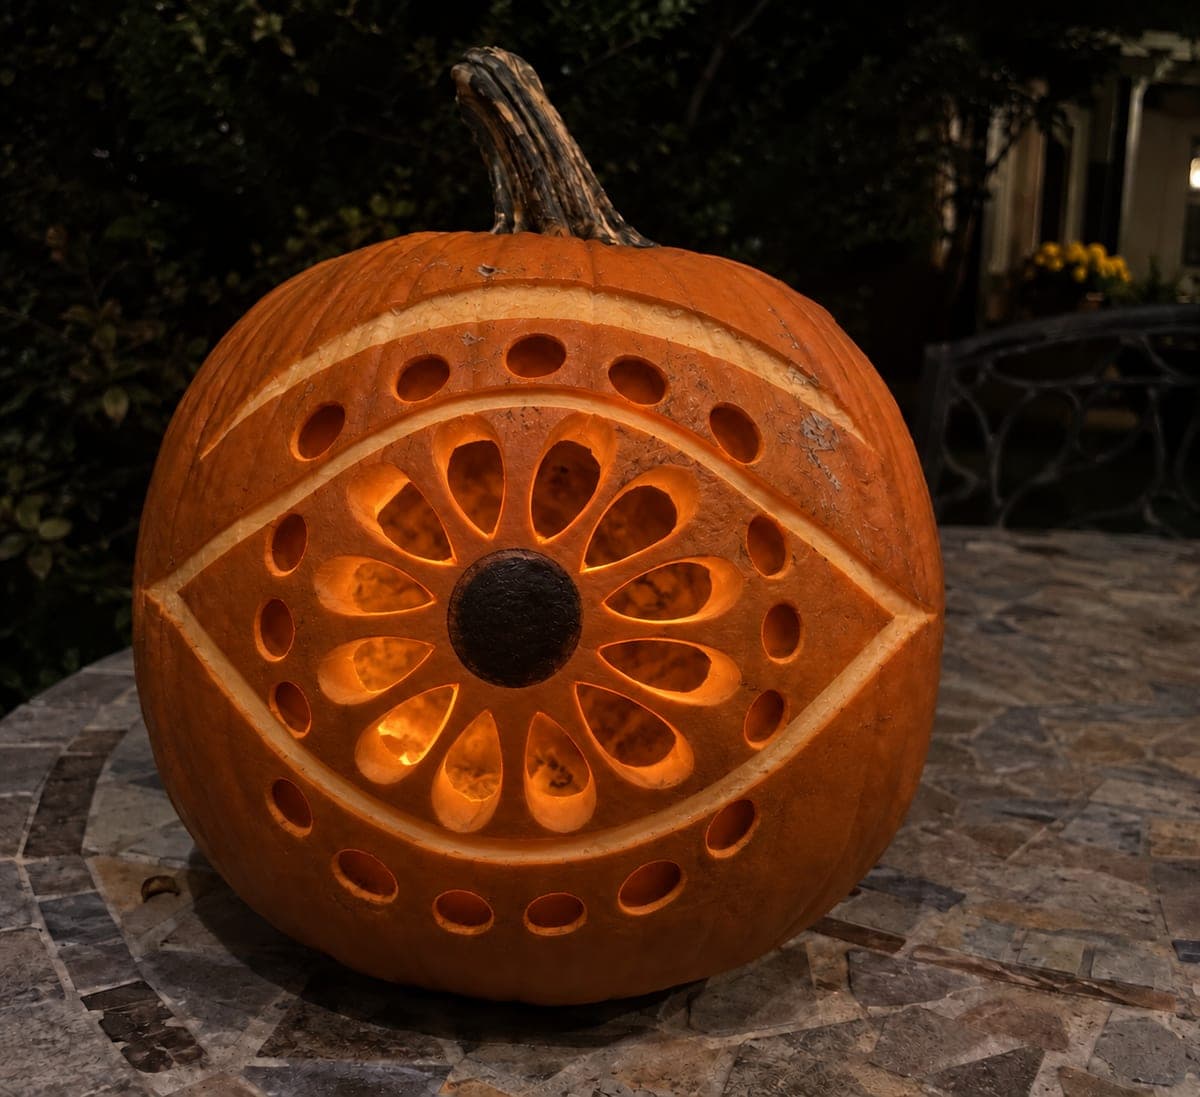
Almond Contour Eyeball Pumpkin with Shallow Carved Brow

A shallow-carved almond eyelid rim, a back-carved center pupil disk, and glowing radial iris apertures define this expert eyeball pumpkin carving. Separate the radial iris openings with sturdy spokes and back-carve the almond contour and eyebrow recess from the outside to create depth without fully breaking through. Carve the pupil disk shallower than the surrounding iris apertures so it reads as a dark void against the glowing ring when lit. A single warm bulb placed slightly back from center maximizes the iris glow.

No ratings yet · Sign in to rate

Comments (0)

  • No comments yet — be the first.

Save without an account. Sign in to like or comment.

Our tips for carving a similar design

This design combines three techniques in one carving: full through-cuts for the radial iris openings, shallow back-carving from the outside for the almond eyelid contour and eyebrow recess, and a surface-carved pupil disk that stays intact but reads as dark against the glowing iris ring. The sequence matters: iris apertures first while the shell is strongest, then back-carving from the outside for the contour details, then the pupil surface carve last. A single warm bulb placed slightly back from center maximizes the iris glow.

From pumpkin to porch

  1. Prep and gut the pumpkin

    Use a pumpkin with walls at least one and a quarter inches thick to provide enough depth for meaningful back-carving. Cut a wide bottom cap and scoop carefully to get an even, thick inner surface. Transfer the full pattern with all elements labeled: iris apertures, almond contour boundary, eyebrow recess boundary, and pupil disk boundary.

  2. Cut the radial iris apertures first

    Following the radial spoke pattern, cut each iris wedge opening as a separate through-cut, leaving sturdy spokes intact between each wedge. Work around the iris circle one section at a time, confirming the pupil center disk is solid and uncut after every two wedges. All radial apertures should be complete before any back-carving begins.

  3. Back-carve the almond eyelid contour from outside

    Using a medium linoleum gouge, carve the almond-shaped eyelid rim from the outside of the rind, removing about half the wall thickness along the contour line. Work in light passes and check depth frequently by pressing gently: the rind should feel noticeably thinner but not flexible. A good back-carved contour glows faintly when lit, framing the bright iris.

  4. Back-carve the eyebrow recess

    Use the same gouge technique to carve the eyebrow depression from the outside, working along the brow ridge line above the eye. Keep the depth slightly shallower than the eyelid contour for a natural depth gradient. Both back-carved areas should be smooth and even for the best light effect.

  5. Surface-carve the pupil disk

    Use a medium V-tip linoleum tool to carve the outer edge of the pupil disk from the outside, creating a visible groove that separates the dark intact pupil from the surrounding iris structure. Do not break through the rind. The groove deepens the visual contrast between the unlit pupil and the glowing iris wedges behind it.

  6. Light and display

    Place a warm LED bulb inside and position it slightly back from the iris center. The iris wedges glow brightly, the almond contour and brow recess glow dimly, and the intact pupil reads as a dark void. Apply petroleum jelly to all cut and back-carved areas before the first display night.

Written with AI to match this design

Gather your supplies

Check things off as you get ready.

Work on a stable surface, keep your free hand out of the cutting path, and have an adult handle sharp tools.

Three levels of light

  • Leave intact

    Intact pupil disk and all radial spoke rind

  • Peel & shade

    Shallow almond eyelid contour rim and eyebrow recess carved to approximately half wall depth

  • Cut through

    All radial iris wedge apertures between spokes

Learn the carving basics

Before you start cutting

How do I know when the back-carving is deep enough without going through?

Remove material in very thin passes and test after each pass by holding a flashlight inside the pumpkin in a dark room. When the back-carved area begins to glow faintly, you are at about the right depth. Stop before it glows as brightly as a through-cut. Pressing the area gently from the outside should feel firm, not soft or flexible.

The radial spokes look too wide and the iris appears blocky. How do I refine them?

Use a linoleum U-tip to carefully narrow each spoke by shaving a small amount of rind from each side. Work in thin passes and check the overall balance from a distance. Narrow spokes look more realistic but reduce structural strength, so stop narrowing when the spokes are still at least half an inch wide at their thinnest point.

Can I add painted color to the pupil disk for more realism?

Yes. A coat of flat black acrylic paint on the intact pupil disk darkens it further and creates a sharp visual contrast with the glowing iris apertures. Apply the black paint to the pupil area from the outside after all carving is complete and the surface is dry. Let it dry before inserting the LED and displaying.

Your take belongs here, too.

Changed a detail? Made it simpler? Share a photo of your version and tell the community what worked.

Share your pumpkin

More pumpkins like this

You've reached the end · 8 pumpkins
The Patch Report

Fresh pumpkins, in your inbox.

The best new carvings, ideas worth stealing, and how-tos for carving season. Short, seasonal, and gone by November.

A short email during carving season. Unsubscribe anytime. See our privacy policy.