Halloween Pumpkin Carving Contest · Starts October 1st · $500 in prizes
← Back to ideas
@ai_concepts
Sep 25, 2026
Glowing Slanted Triangle Eyes Pumpkin CarvingAI
0

Report this carving

Tell us what is wrong. Reports are private.

Glowing Slanted Triangle Eyes Pumpkin Carving

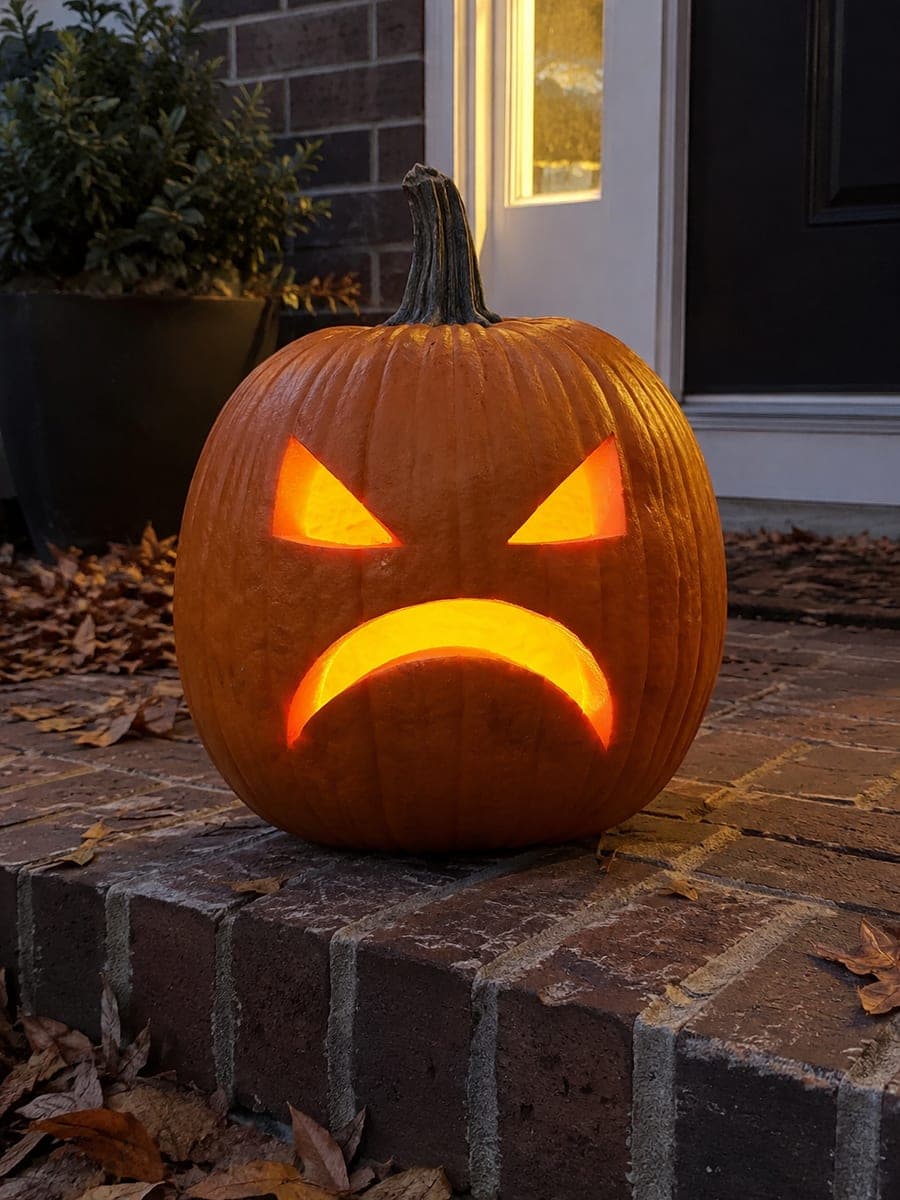
Two large slanted triangle eye holes and two short angled brow cuts are the only features on this pumpkin carving eyes idea, making it a bold, spare design. No nose or mouth means the light blazes entirely through the two triangle openings. Cut the brow slots first to set the angle, then cut the triangles to match. Paired brow lines make the eyes read as menacing rather than neutral, especially behind a candle.

No ratings yet · Sign in to rate

Comments (0)

  • No comments yet — be the first.

Save without an account. Sign in to like or comment.

Our tips for carving a similar design

Restraint is the design choice here. No nose, no mouth, just two large slanted triangle cutouts and two short brow cuts above them. The brow lines set the angle before the triangles are cut, so both eye shapes automatically share the same threatening tilt. All the pumpkin's interior light blazes entirely through these two apertures, which is what makes the empty face so striking.

From pumpkin to porch

  1. Hollow the pumpkin

    Cut a lid from the back to preserve the clean front face, scoop to about one inch of wall, and dry the inner surface with a paper towel. Because there are only four cuts total, precision matters more than speed.

  2. Mark the brow angle

    Draw two short angled brow lines across the upper portion of the face, tilting their inner ends downward toward the center and outer ends upward. This angle determines the expression: steeper angles look angrier.

  3. Cut the brow slots

    Cut each brow as a broad, short slot, about a quarter inch wide and roughly two inches long, following the tilted angle you drew. Keep these cuts first so the rind above the eye zone stays fully supported.

  4. Draw and cut the triangle eyes

    Draw each triangle with the same tilt as its brow above it: the inner lower corner pointing toward the nose area and the flat top edge running roughly horizontal. Cut each side of the triangle as a straight line and pop the piece out from inside. Fully clean angles give the sharpest, most defined eye shape.

  5. Check for alignment

    Hold the lid in place and step back to assess the face. Both triangles should appear mirror images of each other with the same tilt angle and roughly the same size. Minor adjustments can be made by carefully widening one side of a triangle with a single additional cut.

  6. Light and display

    Drop in a battery LED and place the pumpkin at eye level or slightly higher so viewers see the triangles head-on. In complete darkness the triangles glow as an intense, focused glare with no other feature diluting the effect.

Written with AI to match this design

Gather your supplies

Check things off as you get ready.

Work on a stable surface, keep your free hand out of the cutting path, and have an adult handle sharp tools.

Three levels of light

  • Leave intact

    The entire pumpkin face stays dark except the two triangle apertures and two brow slots, making the glow intensely concentrated.

  • Peel & shade

    None.

  • Cut through

    Both slanted triangle eye apertures and both angled brow slots are cut completely through.

Learn the carving basics

Before you start cutting

How do I make both triangles the same size?

Draw a paper template for one triangle, then flip it to trace the mirror image for the second. Measure the distance from the pumpkin's center line to each inner triangle corner to confirm they are equal before cutting.

Is there a risk of this design looking too simple or boring?

Scale is the answer: large triangles that span a third of the pumpkin width or more look bold and intentional. Small triangles on a large pumpkin look accidental. If in doubt, size up. The minimalism is the statement.

Should the triangles point up or down?

Point the sharp tip downward, toward the nose area, for the most aggressive look. That orientation mimics the angled scowl of a classic scary jack-o-lantern eye. A triangle with the sharp tip pointing upward looks more surprised than scary.

Your take belongs here, too.

Changed a detail? Made it simpler? Share a photo of your version and tell the community what worked.

Share your pumpkin

More pumpkins like this

You've reached the end · 8 pumpkins
The Patch Report

Fresh pumpkins, in your inbox.

The best new carvings, ideas worth stealing, and how-tos for carving season. Short, seasonal, and gone by November.

A short email during carving season. Unsubscribe anytime. See our privacy policy.