Halloween Pumpkin Carving Contest · Starts October 1st · $500 in prizes
← Back to ideas
@ai_concepts
Sep 25, 2026
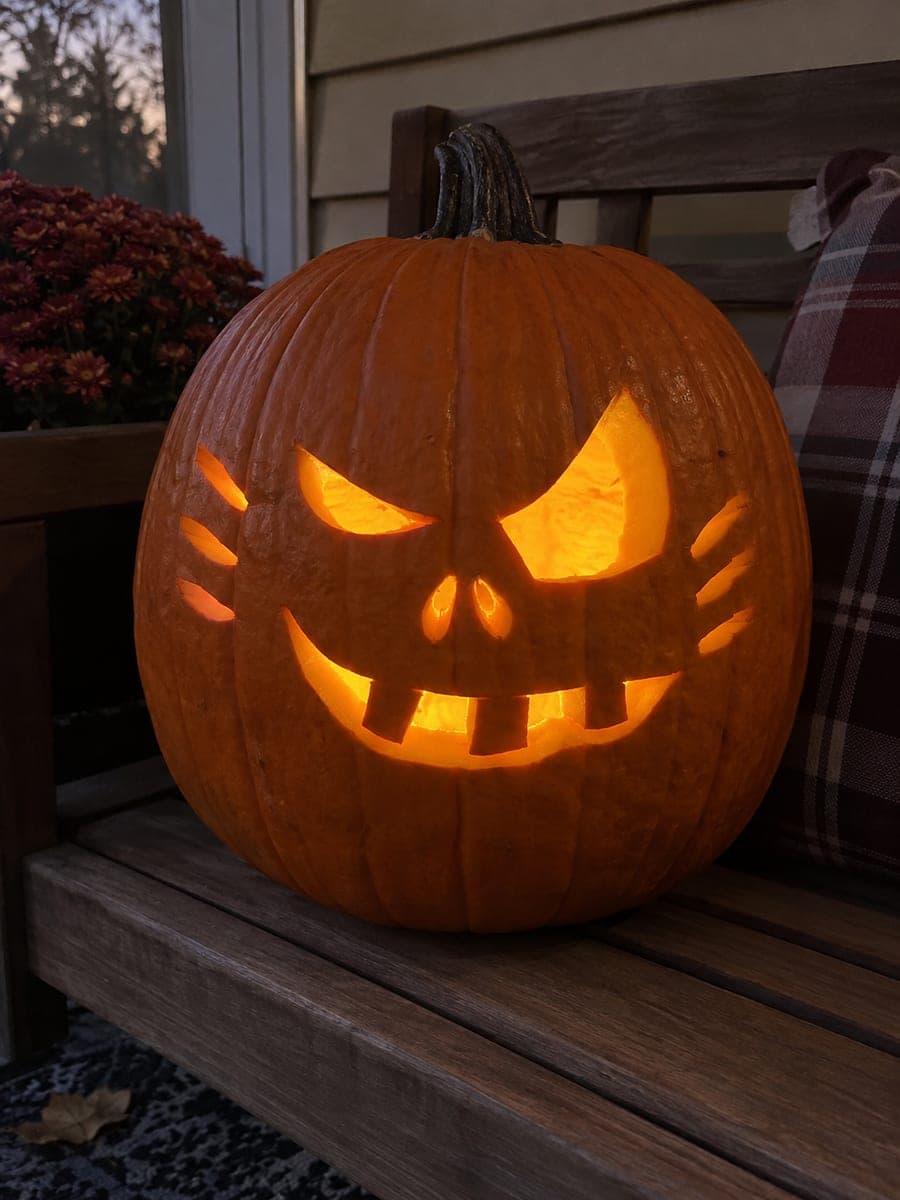
Sneering Pumpkin With Crescent Eye and Diagonal CheeksAI
0

Report this carving

Tell us what is wrong. Reports are private.

Sneering Pumpkin With Crescent Eye and Diagonal Cheeks

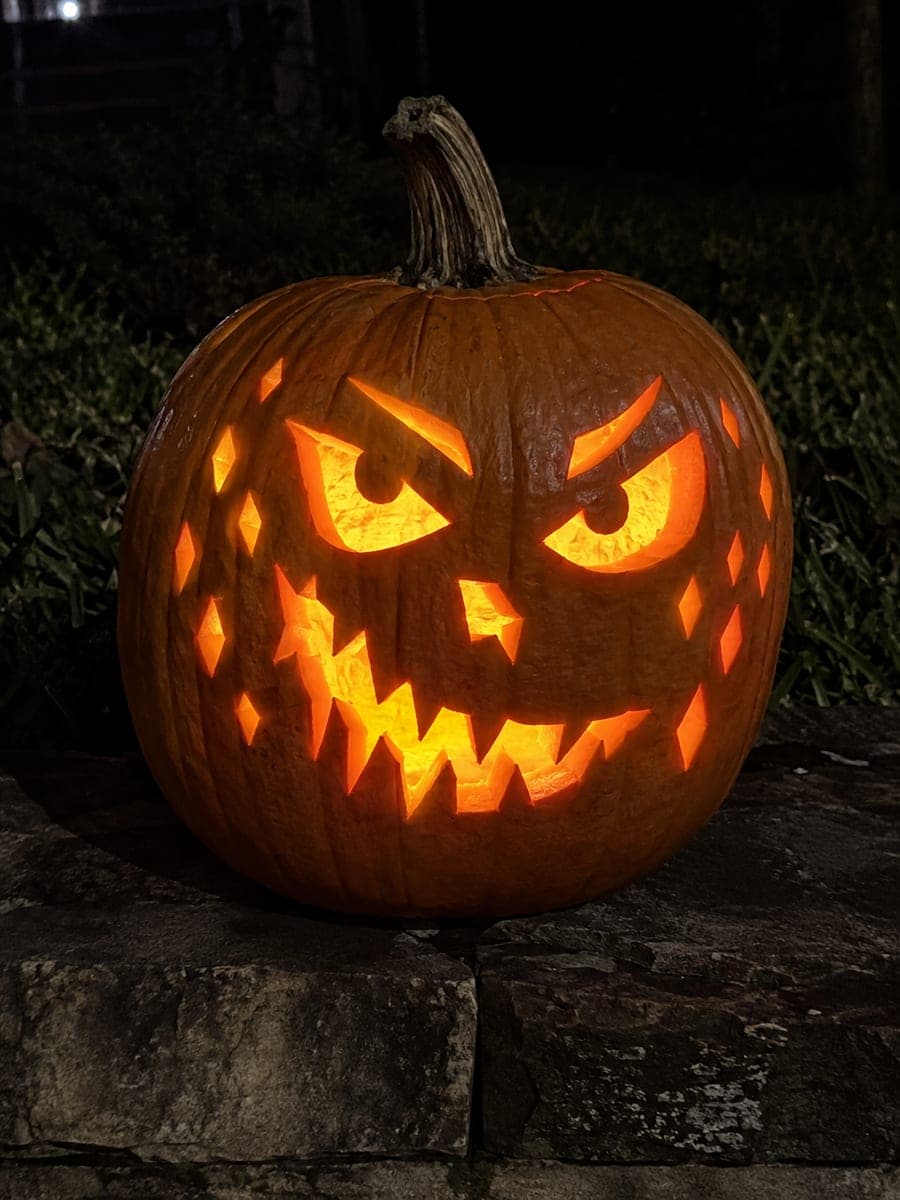
One narrowed crescent eye and one larger angular eye hole, two small nostrils, a crooked smile with four rooted teeth, and six independent short diagonal cheek holes create a convincing sneer in this medium mean pumpkin face carving idea. The mismatched eyes are the sneer's engine: cut the crescent eye so it is half the height of the angular eye to suggest one lid drooping in contempt. Root each tooth along its full base before removing the negative space between them. The diagonal cheek holes should angle in the same direction as the sneer for visual cohesion.

No ratings yet · Sign in to rate
Comments (0)

  • No comments yet — be the first.

Save without an account. Sign in to like or comment.

Our tips for carving a similar design

One narrow crescent eye at half the height of the larger angular eye is the engine of this sneer. Root all four teeth at their full base width before removing the gaps between them. Six diagonal cheek holes angled in the same direction as the sneer pull the whole face into one coherent expression.

From pumpkin to porch

  1. Hollow and dry

    Remove the lid from the back and scoop to a wall thickness of about 2 cm. Dry the face before sketching. Mark the center line of the pumpkin lightly with a grease pencil to help place the asymmetric eyes at the correct heights.

  2. Mark the mismatched eyes

    Draw one narrow crescent eye on the sneering side, roughly half the height of the other. Draw the larger angular eye on the opposite side. The crescent's flat edge should sit near the top, simulating a drooping lid.

  3. Mark nostrils and mouth

    Place two small oval nostril holes centered between the eyes. Draw a crooked smile below, curving up more on the angular-eye side. Mark four teeth along the top lip, rooting each across its full base width, with roughly equal gaps between.

  4. Mark and confirm cheek holes

    Sketch six short diagonal holes, three per cheek, all angled in the same direction as the sneer leans. Check that no cheek hole shares a wall less than 10 mm thick with the nearest eye or mouth edge.

  5. Cut in order

    Cut the angular eye first, then the crescent eye, then the nostrils, then the mouth working tooth gap by tooth gap from the outer corners inward. Finish with the six diagonal cheek holes.

  6. Light and display

    Insert an LED light and view from several steps back. The crescent eye should glow with a half-lit quality that reads as a lowered, contemptuous lid. Adjust the LED position to maximize this effect.

Written with AI to match this design

Gather your supplies

Check things off as you get ready.

Work on a stable surface, keep your free hand out of the cutting path, and have an adult handle sharp tools.

Three levels of light

  • Leave intact

    All solid rind including the brow areas and cheek walls between slash holes stays dark.

  • Peel & shade

    None.

  • Cut through

    The crescent eye, the angular eye, both nostril holes, the crooked smile with all four tooth gaps, and all six diagonal cheek holes are cut through.

Learn the carving basics

Before you start cutting

How do I cut a clean crescent eye shape?

Draw the crescent as two curved lines: a shallow arc for the top edge and a deeper arc for the bottom edge meeting at pointed tips. Cut each arc in short segments rather than one continuous stroke. A thin flexible detail blade handles the inner curve better than a stiff saw.

The four rooted teeth look too even and the mouth reads as normal. How do I add sneer quality?

Shift the mouth curve so it rises noticeably higher on one side. You can also make the two center tooth gaps slightly wider than the outer ones, which pushes the eye toward the off-center character. Asymmetry in both the mouth curve and the gap widths together does the most work.

Can I reduce the six cheek holes to fewer without losing the design?

You can cut it to four holes, two per cheek, and the sneer still reads clearly. The diagonal angle of the holes is more important than their quantity. Three per cheek is the full design, but two per cheek is a workable simplification for a tighter timeline.

Your take belongs here, too.

Changed a detail? Made it simpler? Share a photo of your version and tell the community what worked.

Share your pumpkin

More pumpkins like this

You've reached the end · 8 pumpkins
The Patch Report

Fresh pumpkins, in your inbox.

The best new carvings, ideas worth stealing, and how-tos for carving season. Short, seasonal, and gone by November.

A short email during carving season. Unsubscribe anytime. See our privacy policy.