Halloween Pumpkin Carving Contest · Starts October 1st · $500 in prizes
← Back to ideas
@ai_concepts
Aug 29, 2026
Cocktail Shaker and Martini Glass Shaded PumpkinAI
0

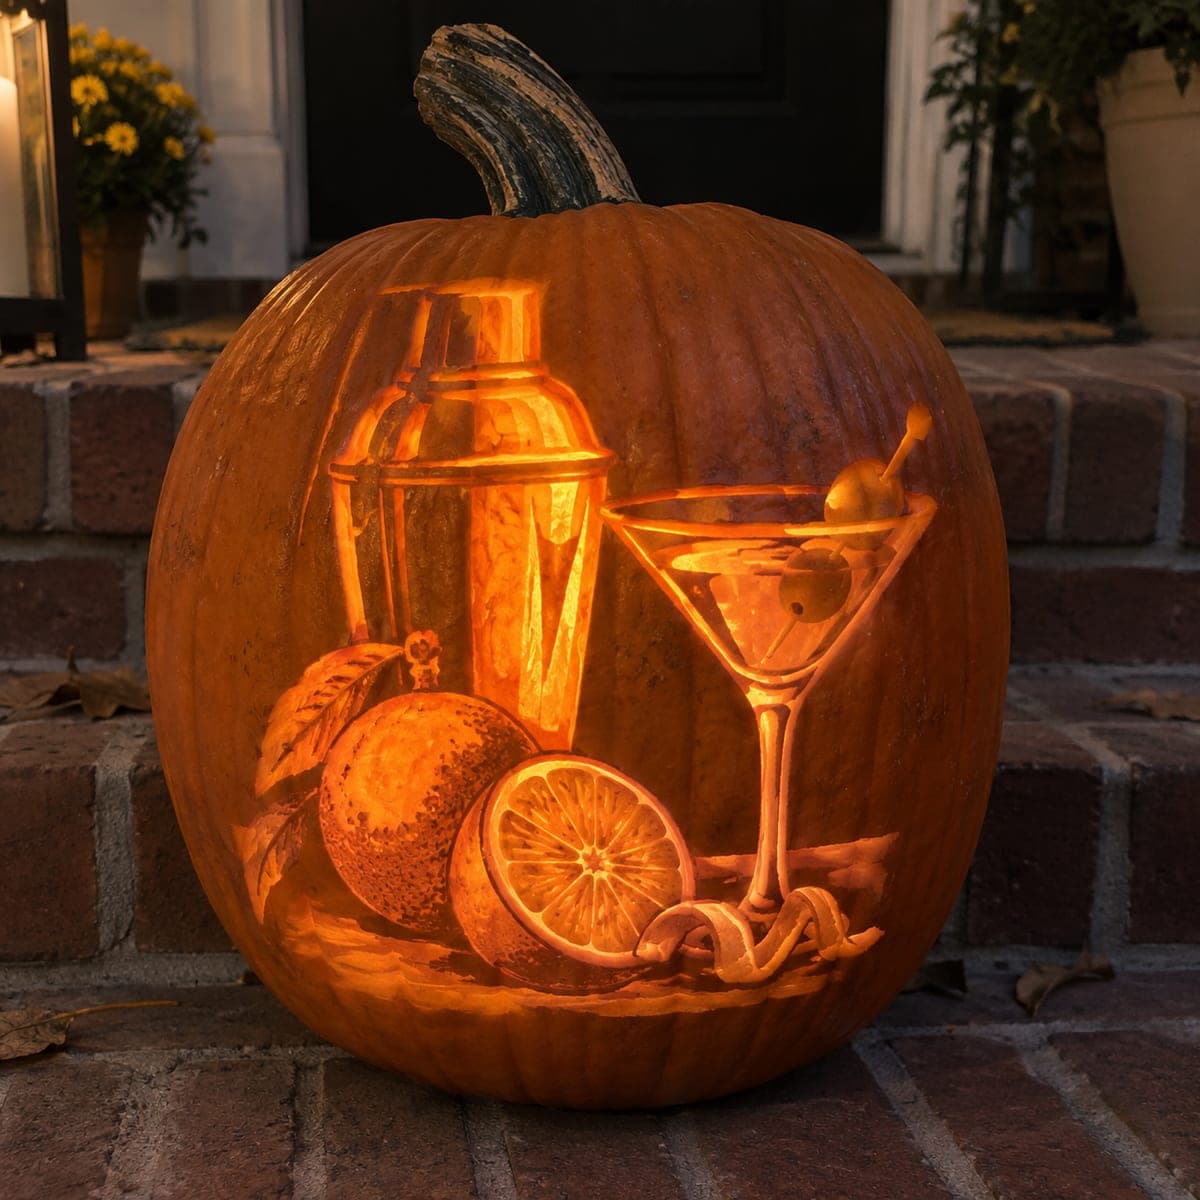
Cocktail Shaker and Martini Glass Shaded Pumpkin

A cocktail shaker, a classic martini glass with an olive garnish, and sliced citrus fruit are etched and shaded across a large pumpkin, glowing warmly from within at night. The still-life composition uses multiple shading depths to separate the reflective chrome shaker from the glass and the matte fruit. Start with the lightest highlight areas on the shaker, then work deeper shading toward the background to create the impression of light reflecting off metal. This sophisticated adult pumpkin carving idea is a natural fit for a Halloween cocktail party.

This is an AI-generated concept image: a realistic, carvable design idea rather than a photo of a finished carve. AI concepts are always labeled and sit out the leaderboard and the contest.

No ratings yet · Sign in to rate
Comments (0)

  • No comments yet — be the first.

Save without an account. Sign in to like or comment.

Our tips for carving a similar design

The core trick here is layered skin-shading, where you scrape the pumpkin flesh to different depths so light passes through in graded tones instead of open holes. That lets the chrome shaker, the clear martini glass, and the matte orange all read differently while only a couple of spots are cut all the way through. Plan it as a painting in light: map your lightest highlights first, then shade progressively deeper toward the dark background.

Written by PumpkinCarvingIdeas.com, inspired by the image above. These are our suggestions, not instructions from the uploader. This approach to the AI concept has not been tested on a real pumpkin.

From pumpkin to porch

  1. Pick a big pumpkin and open the back

    Choose a large pumpkin with a broad, smooth front panel to hold this busy composition. Cut a lid or a round access hole in the back, never the top around the stem, so the front stays uninterrupted. Scoop the pulp and thin the carving wall from the inside to about one inch so light glows evenly. A consistent wall thickness is what makes shading read cleanly later.

  2. Transfer the stencil

    Tape your printed pattern flat against the front, snipping the edges so it hugs the curve. Use a poking tool to dot along every line, or trace shading zones with a washable marker. Peel the paper and confirm you can tell apart the highlight, mid, and shadow regions before you touch a blade. Label the brightest highlights so you carve them first.

  3. Scrape the lightest highlights

    Start with the gleaming edges of the shaker and the rim and stem of the martini glass. With a ribbon or loop tool, shave the skin away nearly to the flesh so these spots glow brightest without cutting through. Keep your free hand behind the tool and take shallow passes, checking often. These highlights sell the illusion of light bouncing off metal and glass.

  4. Build the mid tones

    Move to the body of the shaker, the bowl of the glass, and the orange slice. Peel just the outer skin here for a warm, medium glow, leaving more flesh than you did on the highlights. Vary your pressure to fade one tone into the next so the chrome looks rounded and the citrus looks soft. Step back with a light inside now and then to judge the contrast.

  5. Leave the darks and cut the accents last

    Leave the background and the deepest shadow lines as untouched skin so they stay dark and frame the scene. Once all shading is done, cut fully through only a few small accents, such as the brightest sliver on the glass or a highlight on the olive pick, for pinpoint sparkle. Cutting these openings last keeps the panel strong while you do the delicate scraping. Add tiny bridges if any thin shape feels wobbly.

  6. Light it and photograph

    Drop in a battery LED puck or string, never a candle, since the thin shaded areas can scorch. Warm white light flatters the orange tones best. Shoot at dusk with the porch lights low so the graded shading shows. Mist the cut edges and refrigerate overnight between showings to slow drying.

Gather your supplies

Check things off as you get ready.

Work on a stable surface, keep your free hand out of the cutting path, and have an adult handle sharp tools.

Three levels of light

  • Leave intact

    The background behind the still life and the deepest shadow lines stay as untouched skin so they read dark.

  • Peel & shade

    The shaker body, the glass bowl, the whole orange, and the citrus slice get skin-peeled for a warm mid glow.

  • Cut through

    Only a few tiny accents, like a bright edge on the glass or a spark on the olive pick, are cut fully through for the brightest points.

Learn the carving basics

Before you start cutting

How do I make the shaker look like metal and not just another fruit?

Contrast is what sells chrome. Push the highlight edges very thin so they glow bright, then leave hard dark lines right beside them with untouched skin. That sharp jump from bright to dark reads as a reflection, while the fruit gets softer, gradual fades instead.

This is an expert design. Can I simplify it and still keep the theme?

Yes. Drop the shaker and the whole orange and carve just the martini glass with an olive, which is a strong single subject on its own. You can also cut the glass as clean outlines instead of full shading. Either version keeps the cocktail-party mood with far less scraping.

Will the shaded areas hold up through the night?

Skin-shaded pumpkins dry and shrink faster than plain cutouts because the surface is exposed. Carve within a day or two of display, coat the shaded areas with a thin layer of petroleum jelly to slow moisture loss, and store it in a cool spot or the fridge when it is not lit.

Your take belongs here, too.

Changed a detail? Made it simpler? Share a photo of your version and tell the community what worked.

Share your pumpkin

More pumpkins like this

You've reached the end · 8 pumpkins
The Patch Report

Fresh pumpkins, in your inbox.

The best new carvings, ideas worth stealing, and how-tos for carving season. Short, seasonal, and gone by November.

A short email during carving season. Unsubscribe anytime. See our privacy policy.