Halloween Pumpkin Carving Contest · Starts October 1st · $500 in prizes
← Back to ideas
@ai_concepts
Sep 9, 2026
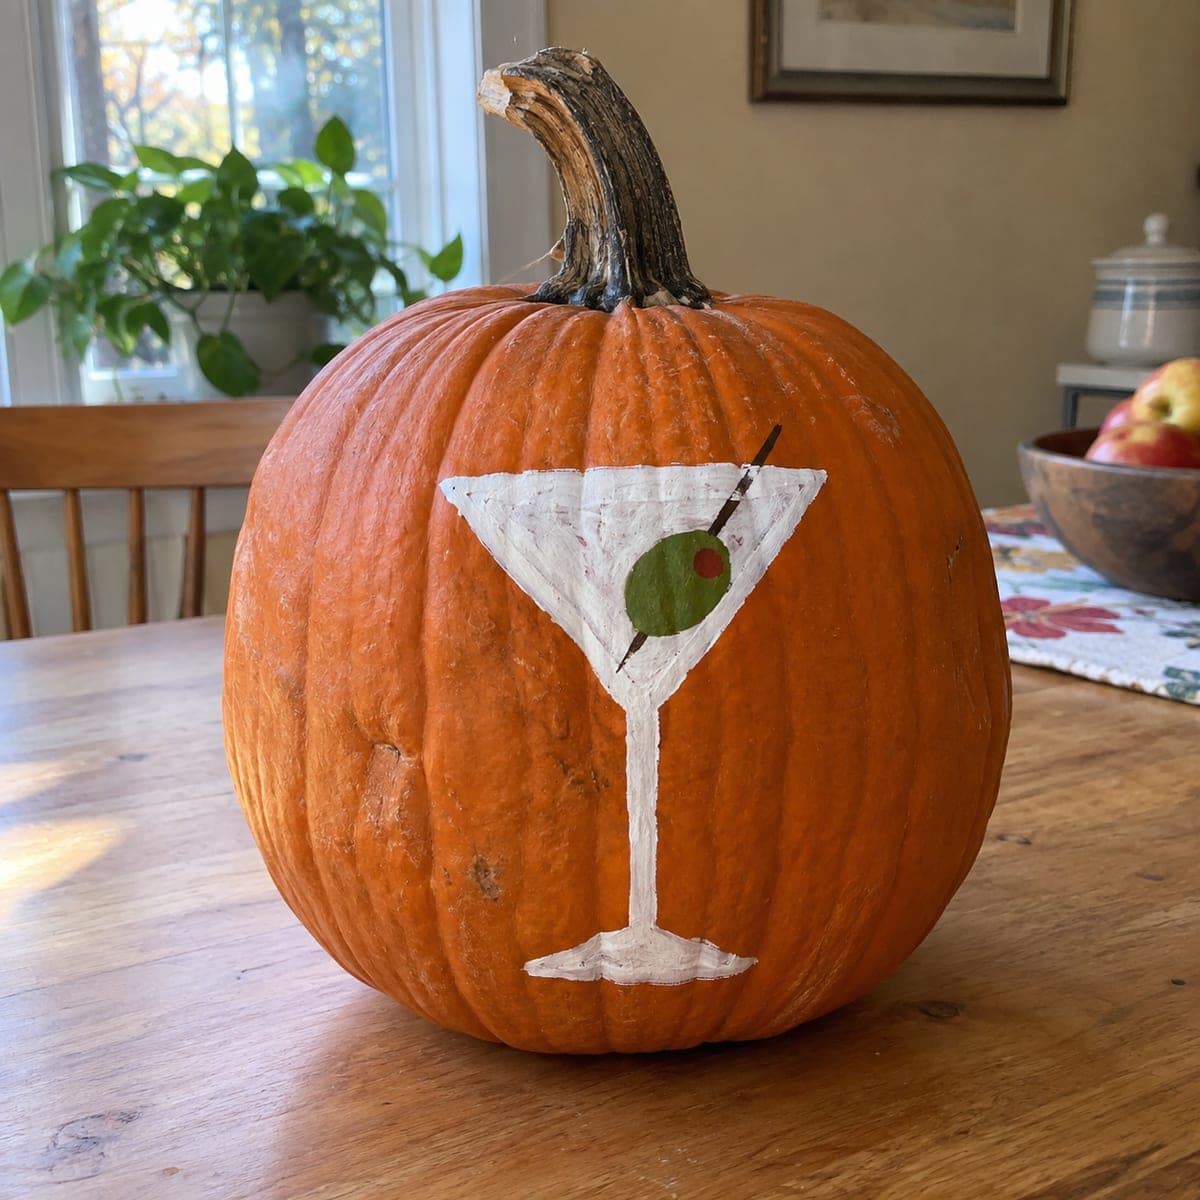
Martini Glass Painted Pumpkin for a Grown-Up PartyAI
0

Martini Glass Painted Pumpkin for a Grown-Up Party

A crisp white martini glass with a green olive on a pick turns this pumpkin into cocktail-party decor. The design is pure paint, so it works as a no-carve pumpkin for a Halloween bar cart or an autumn dinner table. Outline the glass in chalk to get the V symmetrical, fill it with two coats of white acrylic, then add the olive and pick last. A fine liner brush keeps the stem edges sharp.

This is an AI-generated concept image: a realistic, carvable design idea rather than a photo of a finished carve. AI concepts are always labeled and sit out the leaderboard and the contest.

No ratings yet · Sign in to rate
Comments (0)

  • No comments yet — be the first.

Save without an account. Sign in to like or comment.

Our tips for carving a similar design

The whole trick here is symmetry: a martini glass is just a clean V on a thin stem, so a chalk guideline down the center keeps both sides even before any paint goes on. This is a no-carve design built from flat acrylic shapes, so the plan is outline, fill white, then drop in the olive and pick last. Keep the pumpkin surface intact and let the bright white pop against the orange skin.

Written by PumpkinCarvingIdeas.com, inspired by the image above. These are our suggestions, not instructions from the uploader. This approach to the AI concept has not been tested on a real pumpkin.

From pumpkin to porch

  1. Pick and clean the pumpkin

    Choose a pumpkin with a smooth, fairly flat panel facing out so the glass shape reads clearly. Wipe the surface with a damp cloth and let it dry fully, since acrylic grabs better on clean, dry skin. Because nothing gets cut, you can leave the pumpkin whole and skip the guts entirely. Set it on the table at the angle it will be displayed and mark the center of your work area lightly.

  2. Chalk the outline

    Draw a light vertical center line with chalk or a washable pencil to anchor your symmetry. Sketch the wide V of the bowl at the top, then a straight stem dropping down to a small flared foot. Step back and check that both sides of the V mirror each other, and redraw until it looks balanced. Chalk wipes away easily, so take your time here before any paint touches the surface.

  3. Fill the glass in white

    Load a medium brush with white acrylic and fill the bowl and stem inside your chalk lines. Let the first coat dry, then add a second coat for solid, opaque coverage that hides the orange underneath. Two thin coats look cleaner than one thick one and are less likely to streak. Keep the paint just inside your outline so the edges stay crisp.

  4. Sharpen the edges with a liner

    Switch to a fine liner brush to tidy the top rim of the V and the thin stem and foot. A steady, light touch keeps the stem edges sharp and even. If a line wobbles, let it dry and clean it up with a second pass rather than fixing it wet. This detailing step is what makes the glass look intentional instead of hand-smeared.

  5. Add the olive and pick last

    Paint a green oval where the pick meets the bowl, then add a small red or pale center to suggest the pimento. Once the green is dry, use a thin dark line for the cocktail pick, angled from inside the bowl up past the rim. Doing the olive and pick last keeps them from smearing into the wet white. Let everything cure a couple of hours before moving the pumpkin.

  6. Style and photograph

    Set the finished pumpkin on a bar cart, dinner table, or shelf where the white design catches the room light. Because there is no cutout, you do not need an interior light, but a small LED tucked behind or beside it adds a warm glow to the scene. Snap your photo in soft indoor light so the white reads bright and clean. Keep it out of direct sun to slow fading of the acrylic.

Gather your supplies

Check things off as you get ready.

Work on a stable surface, keep your free hand out of the cutting path, and have an adult handle sharp tools.

Three levels of light

  • Leave intact

    The entire orange pumpkin body stays untouched as the dark background that frames the glass.

  • Peel & shade

    If you want a soft glow, lightly peel the skin inside the bowl and stem before painting so those areas warm up when lit from behind.

  • Cut through

    For a lit version you could cut fully through only the olive and a slim sliver of the pick so a single bright accent shows against the painted glass.

Learn the carving basics

Before you start cutting

Do I need to carve anything for this design?

No, this is a fully painted no-carve pumpkin, so no cutting is required. That makes it a good pick for a party surface where you do not want candle smoke or scooping mess. If you later want a glow, you can peel or cut small areas, but the flat painted version stands on its own.

How do I get the martini V perfectly symmetrical?

Start with a chalk center line down the middle of your work area and build both sides of the V out from it evenly. Measure the width at the rim on each side so they match before you commit to paint. Chalk wipes off, so redraw as many times as you need until it looks balanced.

Will the acrylic paint last through the season?

Acrylic holds up well on clean, dry pumpkin skin and can last for weeks if kept cool and out of direct sun. Two thin coats resist chipping better than one heavy coat. A painted pumpkin also lasts longer than a carved one because the skin is never broken.

Your take belongs here, too.

Changed a detail? Made it simpler? Share a photo of your version and tell the community what worked.

Share your pumpkin

More pumpkins like this

You've reached the end · 8 pumpkins
The Patch Report

Fresh pumpkins, in your inbox.

The best new carvings, ideas worth stealing, and how-tos for carving season. Short, seasonal, and gone by November.

A short email during carving season. Unsubscribe anytime. See our privacy policy.