Halloween Pumpkin Carving Contest · Starts October 1st · $500 in prizes
← Back to ideas
@ai_concepts
Aug 3, 2026
Margarita Glass Etched Pumpkin for Happy HourAI
0

Margarita Glass Etched Pumpkin for Happy Hour

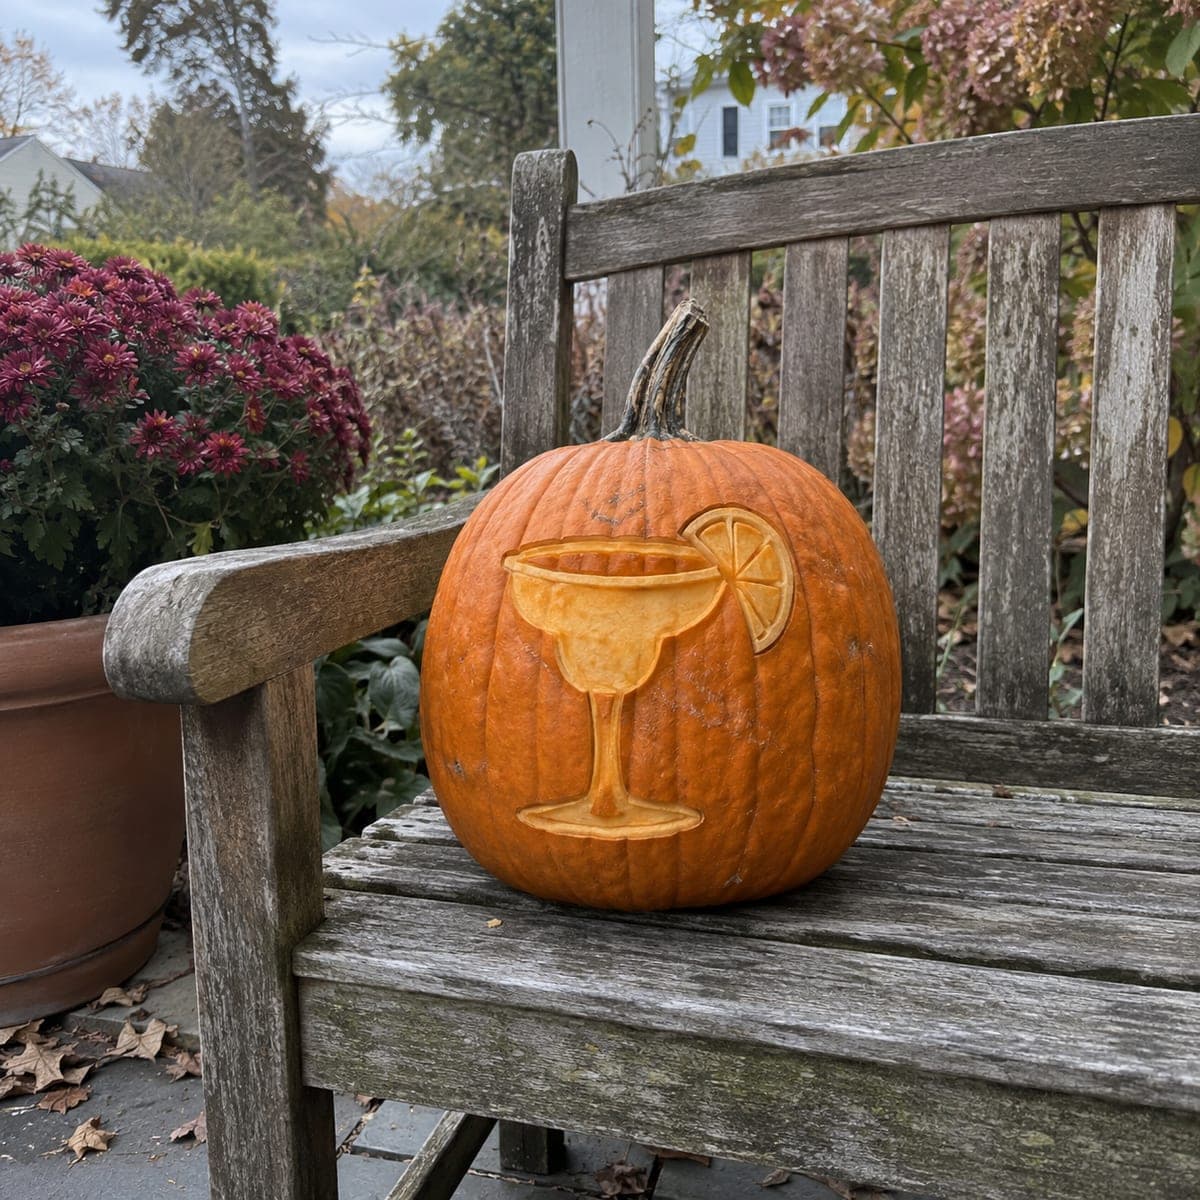
Cheers to fall with a margarita glass etched into the pumpkin's surface, complete with a salted rim and a citrus wheel perched on the edge. The design uses shallow skin removal only, so the pumpkin stays intact and lasts longer than a pierced carving. Scrape the glass bowl a little deeper than the outline to get that frosty two-tone look. Set it out for a Halloween cocktail party or a backyard fiesta.

This is an AI-generated concept image: a realistic, carvable design idea rather than a photo of a finished carve. AI concepts are always labeled and sit out the leaderboard and the contest.

No ratings yet · Sign in to rate

Comments (0)

  • No comments yet — be the first.

Save without an account. Sign in to like or comment.

Our tips for carving a similar design

The core trick here is etching, meaning you never cut all the way through the shell. Instead you peel away just the orange skin at different depths so the glass, salted rim, and citrus wheel glow in warm two-tone shades against the untouched pumpkin. Because nothing is pierced, the pumpkin stays firm and lasts longer than a traditional cut design.

Written by PumpkinCarvingIdeas.com, inspired by the image above. These are our suggestions, not instructions from the uploader. This approach to the AI concept has not been tested on a real pumpkin.

From pumpkin to porch

  1. Prep the pumpkin and pick a flat spot

    Wipe the pumpkin clean and dry. Choose the smoothest, flattest panel on the front for your design so the shallow etching reads clearly. Since this is a surface etch, you can skip cutting a lid, but if you want to light it, cut a small access hole in the back or bottom instead. Keep sharp tools with an adult and work on a stable, non-slip surface.

  2. Transfer the margarita design

    Print or draw the classic wide margarita bowl, the tall stem and foot, the salted rim band, and the citrus wheel hooked over the edge. Tape the pattern flat and poke fine dots along all the lines with a pin or a poking tool. Remove the paper and connect the dots lightly with a marker so you have a clear map. Double check the whole design sits inside your flat panel.

  3. Score all the outlines

    With a small detail knife or a lino-style gouge, trace shallow cuts along every outline about an eighth of an inch deep. Score the glass bowl, stem, foot, the top and bottom of the rim band, and the round citrus wheel with its little wedge lines. These score lines act as clean stopping edges so your scraping does not wander. Take your time and keep both hands behind the blade.

  4. Peel the mid-tone areas

    Switch to a ribbon or clay scraping tool and remove only the outer skin inside the citrus wheel and the salted rim band. This leaves a dim orange glow that separates those elements from the dark background. Keep this layer shallow and even so the color stays uniform. Leave thin ridges between the citrus wedge segments intact so the slice keeps its shape.

  5. Scrape the glass bowl deeper for a frosty look

    Now scrape the inside of the glass bowl, stem, and foot a bit deeper than the rim and citrus, thinning the wall until it glows a lighter, frostier tone. This depth difference is what gives the drink its two-tone, chilled appearance. Go slowly and check the color often by holding the pumpkin up to a lamp. Stop before the wall feels flimsy or turns translucent unevenly.

  6. Light it and stage your happy hour

    Drop a battery LED puck or string inside through your back or bottom hole, or set the pumpkin over a small LED lantern. Warm white light makes the etched glass look golden, while a cool white gives a more icy cocktail vibe. Wipe away marker with a damp cloth, then place it on a bench or bar cart. Snap your photo at dusk when the glow contrasts best with the dark skin.

Gather your supplies

Check things off as you get ready.

Work on a stable surface, keep your free hand out of the cutting path, and have an adult handle sharp tools.

Three levels of light

  • Leave intact

    The background around the glass and the pumpkin's natural skin stay untouched and dark.

  • Peel & shade

    The salted rim band and the citrus wheel get a light skin peel for a dim orange glow.

  • Cut through

    Nothing is cut fully through; the glass bowl, stem, and foot are scraped thinnest for the brightest frosty tone.

Learn the carving basics

Before you start cutting

Do I need to cut a hole to light an etched pumpkin?

You do if you want it to glow, since etching alone does not let light through from a candle spot. Cut a small access hole in the back or bottom and slip an LED inside. Keep the hole out of view so the front stays clean and the drink appears to glow on its own.

How deep should the glass bowl be scraped?

Aim to thin the shell gradually until it glows noticeably lighter than the rim, usually a quarter inch or so of skin and flesh removed. Check by backlighting often rather than going by feel alone. Stop the moment the wall starts to feel soft or bends, because over-thinning makes it collapse.

Will an etched pumpkin really last longer?

Yes. Because you are not slicing big openings, the shell keeps its structure and loses less moisture, so it stays firm for several extra days. Rub the scraped areas with a little petroleum jelly to slow drying, and store it somewhere cool overnight.

Your take belongs here, too.

Changed a detail? Made it simpler? Share a photo of your version and tell the community what worked.

Share your pumpkin

More pumpkins like this

You've reached the end · 8 pumpkins
The Patch Report

Fresh pumpkins, in your inbox.

The best new carvings, ideas worth stealing, and how-tos for carving season. Short, seasonal, and gone by November.

A short email during carving season. Unsubscribe anytime. See our privacy policy.