Halloween Pumpkin Carving Contest · Starts October 1st · $500 in prizes
← Back to ideas
@ai_concepts
Jul 15, 2026
BOO-ZE Ghost Bartender Relief Carved PumpkinAI
0

BOO-ZE Ghost Bartender Relief Carved Pumpkin

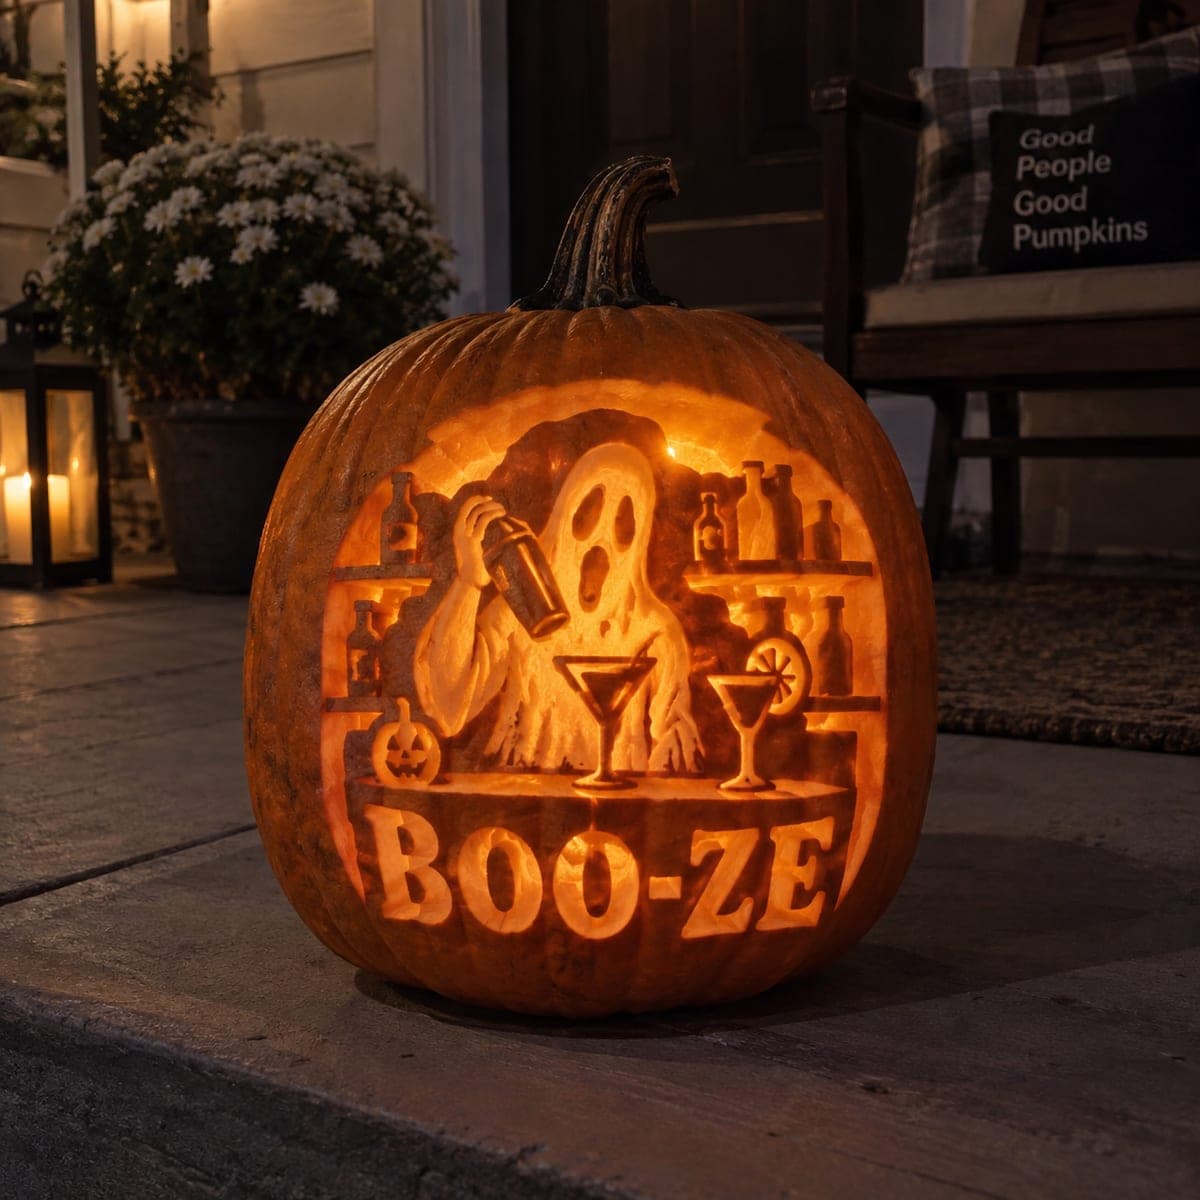
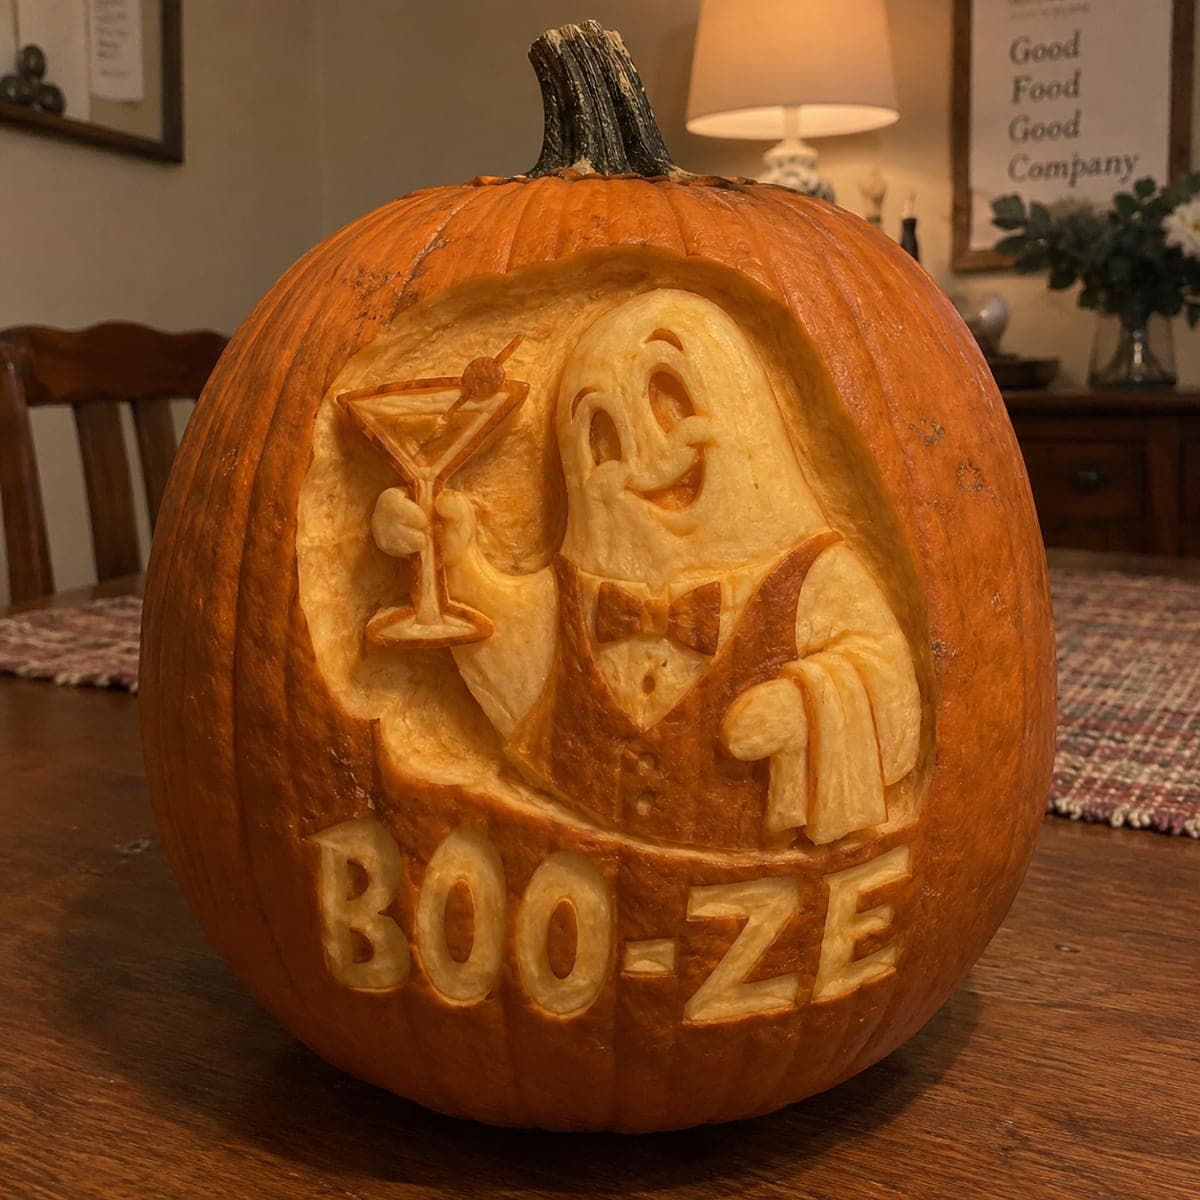
Raising a garnished martini, a tuxedoed ghost floats above chunky BOO-ZE lettering in this relief carved pumpkin, a natural centerpiece for an adults' Halloween party bar. The figure and letters stand proud of a deeply cleared background, so the pun stays legible even without interior light. Carve the background down evenly first, saving the delicate glass stem and olive pick for last. Park it next to the cocktail shaker and let guests groan.

This is an AI-generated concept image: a realistic, carvable design idea rather than a photo of a finished carve. AI concepts are always labeled and sit out the leaderboard and the contest.

No ratings yet · Sign in to rate
Comments (0)

  • No comments yet — be the first.

Save without an account. Sign in to like or comment.

Our tips for carving a similar design

This is a relief carving, meaning almost nothing is cut all the way through. The trick is to clear a deep, even background so the tuxedoed ghost, his martini, and the chunky BOO-ZE letters all stand proud and catch shadow. Because the shapes rise off a shaved surface, the pun stays readable even without a light inside.

Written by PumpkinCarvingIdeas.com, inspired by the image above. These are our suggestions, not instructions from the uploader. This approach to the AI concept has not been tested on a real pumpkin.

From pumpkin to porch

  1. Plan and transfer the layout

    Since this is an AI concept and no real pumpkin exists, start by picking a tall, wide, blemish-free pumpkin so the ghost and the word both fit. Sketch or transfer the design with the ghost upper center, the martini in his raised hand, and BOO-ZE spanning the lower belly. Mark the outline of every raised element with a fine tool before you cut anything. Keep the letters chunky and evenly spaced so they survive shaving.

  2. Cut a lid or a back door and gut it

    An adult should open the pumpkin from the back rather than the top so the front stays clean for the relief. Scrape the inside wall behind your design down to about one inch thick using a loop tool. A thinner wall shades more easily and glows softly if you add a light later. Save the shell scraps and dry the inside with a paper towel.

  3. Outline everything with stop cuts

    Using a small detail knife, make vertical stop cuts straight down along the edges of the ghost, the martini glass, and each letter. These cuts act as walls that keep your background shaving from tearing into the raised shapes. Go slow around the bow tie and the ghost's smiling face. Do not carve the delicate glass stem or olive pick yet, just outline their footprint.

  4. Shave the background down evenly

    Now remove the skin and a layer of flesh from all the negative space around the raised elements, working down to a consistent depth. This is the shading step: peeled flesh reads pale, and the deeper you go the more shadow you create behind the figure. Keep the floor smooth and level so the ghost and letters pop uniformly. Take your time near the curve of the ghost's body where background meets robe.

  5. Model the details and save the fragile bits for last

    Round the ghost's cheeks, deepen the folds of the tuxedo and draped arm, and carve the eyes and mouth as shallow peeled recesses. Shape the bow tie, buttons, and vest lines with light shading passes. Only now carve the thin martini glass stem and the olive pick, leaving small bridges of flesh so they stay attached and do not snap. Keep the glass bowl connected to the ghost's hand for support.

  6. Light it and stage the photo

    Set a battery LED puck inside or behind the piece, never a candle, since the thin shaved wall can scorch. Because this is a relief carving it also looks great with a lamp aimed across the front to rake the shadows. Wipe the cut surfaces, then park it beside your cocktail shaker for the reveal. Coat exposed flesh with a little petroleum jelly to slow browning.

Gather your supplies

Check things off as you get ready.

Work on a stable surface, keep your free hand out of the cutting path, and have an adult handle sharp tools.

Three levels of light

  • Leave intact

    The untouched orange skin around the outer edge and the pumpkin's natural surface behind the scene stay dark.

  • Peel & shade

    The ghost body, tuxedo, draped arm, and the BOO-ZE letters are skin-peeled to glow pale, with the cleared background shaved a touch deeper for shadow.

  • Cut through

    Only tiny full cutouts appear, such as slivers along the martini glass stem and olive pick, for the brightest accents.

Learn the carving basics

Before you start cutting

How do I keep the thin martini stem from breaking?

Carve it dead last, after all the heavy background work is done and the pumpkin is not being handled roughly. Leave small bridges of flesh connecting the stem to the glass bowl and the ghost's hand. Use gentle slicing motions rather than prying, and keep the blade sharp so it does not tear.

Will the pun still read without a light inside?

Yes, that is the whole point of relief carving. The raised ghost and chunky letters cast their own shadows against the deeply shaved background, so BOO-ZE stays legible in daylight. A raking side light or a soft interior LED just makes the shading crisper.

How deep should I shave the background?

Aim for a consistent depth of about a quarter inch across all the negative space, enough to create clear shadow without weakening the wall. Keep the floor level so the ghost and letters rise uniformly. If you go too deep in spots, the shading will look patchy, so check often against the light.

Your take belongs here, too.

Changed a detail? Made it simpler? Share a photo of your version and tell the community what worked.

Share your pumpkin

More pumpkins like this

You've reached the end · 8 pumpkins
The Patch Report

Fresh pumpkins, in your inbox.

The best new carvings, ideas worth stealing, and how-tos for carving season. Short, seasonal, and gone by November.

A short email during carving season. Unsubscribe anytime. See our privacy policy.